Table of Contents
The page is for model NEJE 3 Max installation manual.
What NEJE 3 Max has improved:
- You can safely and stably upgrade to the latest GRBL firmware through NEJE software, When using the device for the first time, please open the NEJE software to update to the latest firmware.
- NEJE optimizes the low-light experience in GRBL mode for diode lasers, and the low-light settings can be adjusted through the laserGRBL software.
- NEJE is compatible with M8, M7, Door functions, and automatically adapts to lightburn, laserGRBL and NEJE software for better automation of processes.
- The motor is automatically locked when power is turned on, and secondary processing can be performed when repeating the engraving work, so that the position information will not be lost.
- NEJE win software adds area customization settings, NEJE provides the function of expanding the orbits, both the Y-axis area and the X-axis area can be freely expanded, and the laser module also automatically engraves silently.
- NEJE 3 comes standard with a high-pressure air assist kit.
- NEJE 3 adopts all-metal frame + PC CNC structural parts, which improves the stability of the structure and enhances the smoothness of movement. It also adopts easy maintenance driving structure.
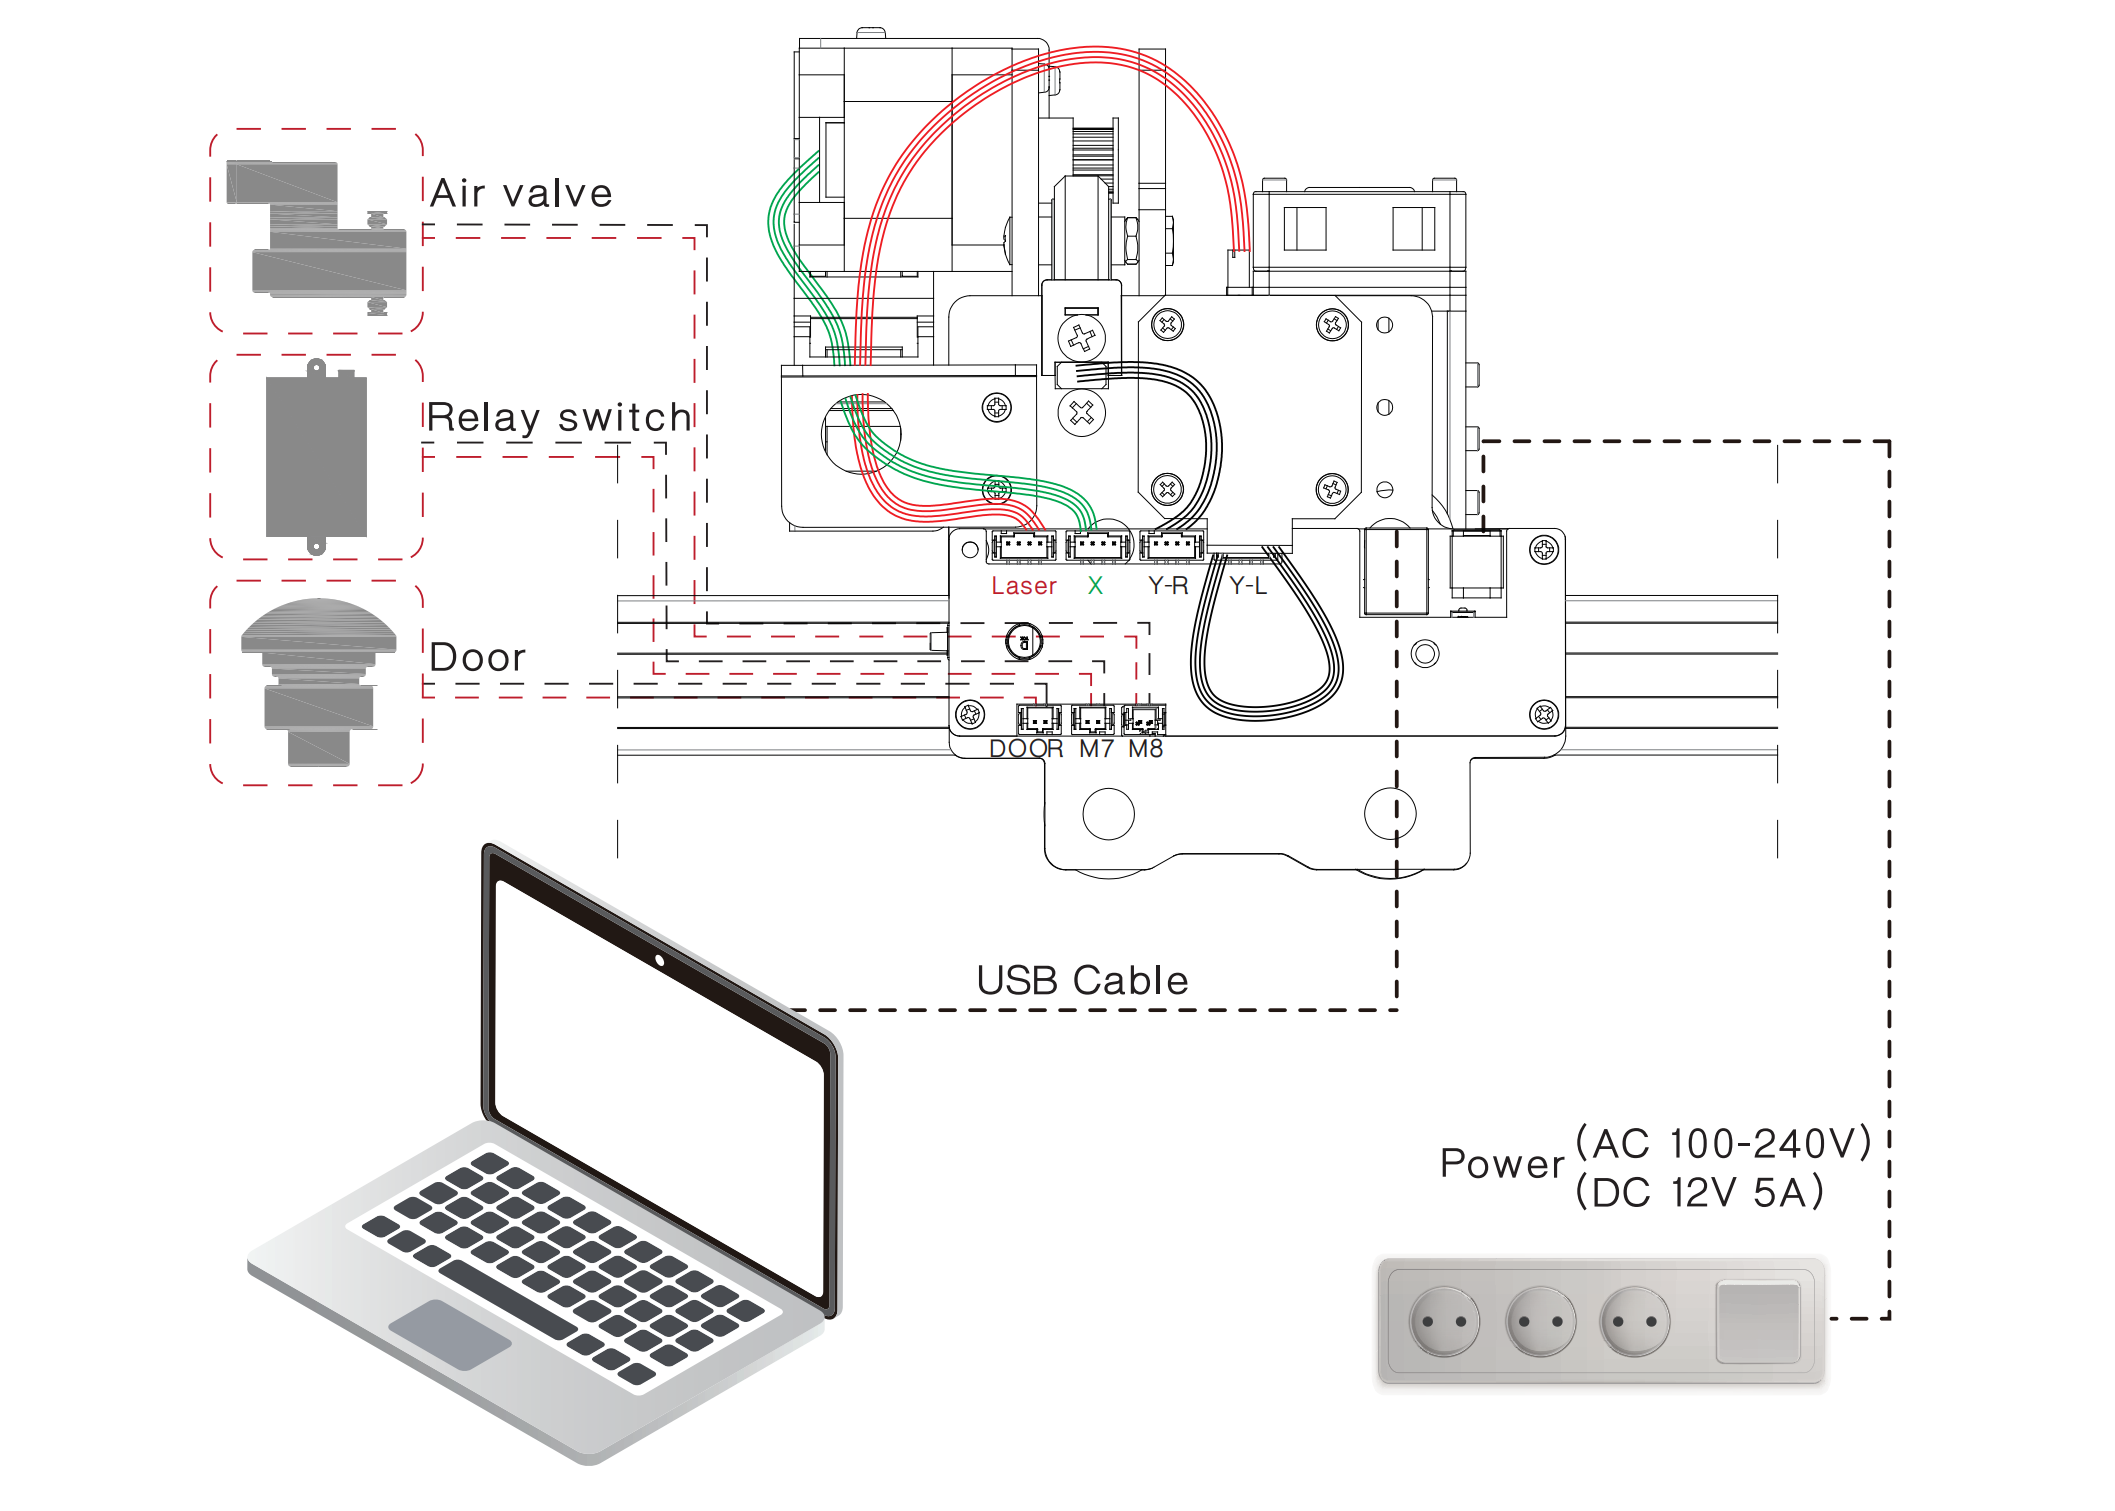
- NEJE 3 Max comes standard with M8 air valve kit for controlling air assist, M7 relay switch kit for controlling smoke exhaust system, and Door switch for emergency stop.
- NEJE 3 Max is equipped with a towline as standard to organize air pipes and wires for easy installation into a closed box.
- NEJE has greatly enhanced the anti-static and surge design under the new control system. NEJE has passed the very severe test in the experiment, which has greatly improved the reliability of the NEJE control system. The new system does not require additional grounding to protect equipment.
- The new laser uses a high temperature resistant window to protect the lens, which effectively improves the service life of the lens.
Step 1: Structural Install
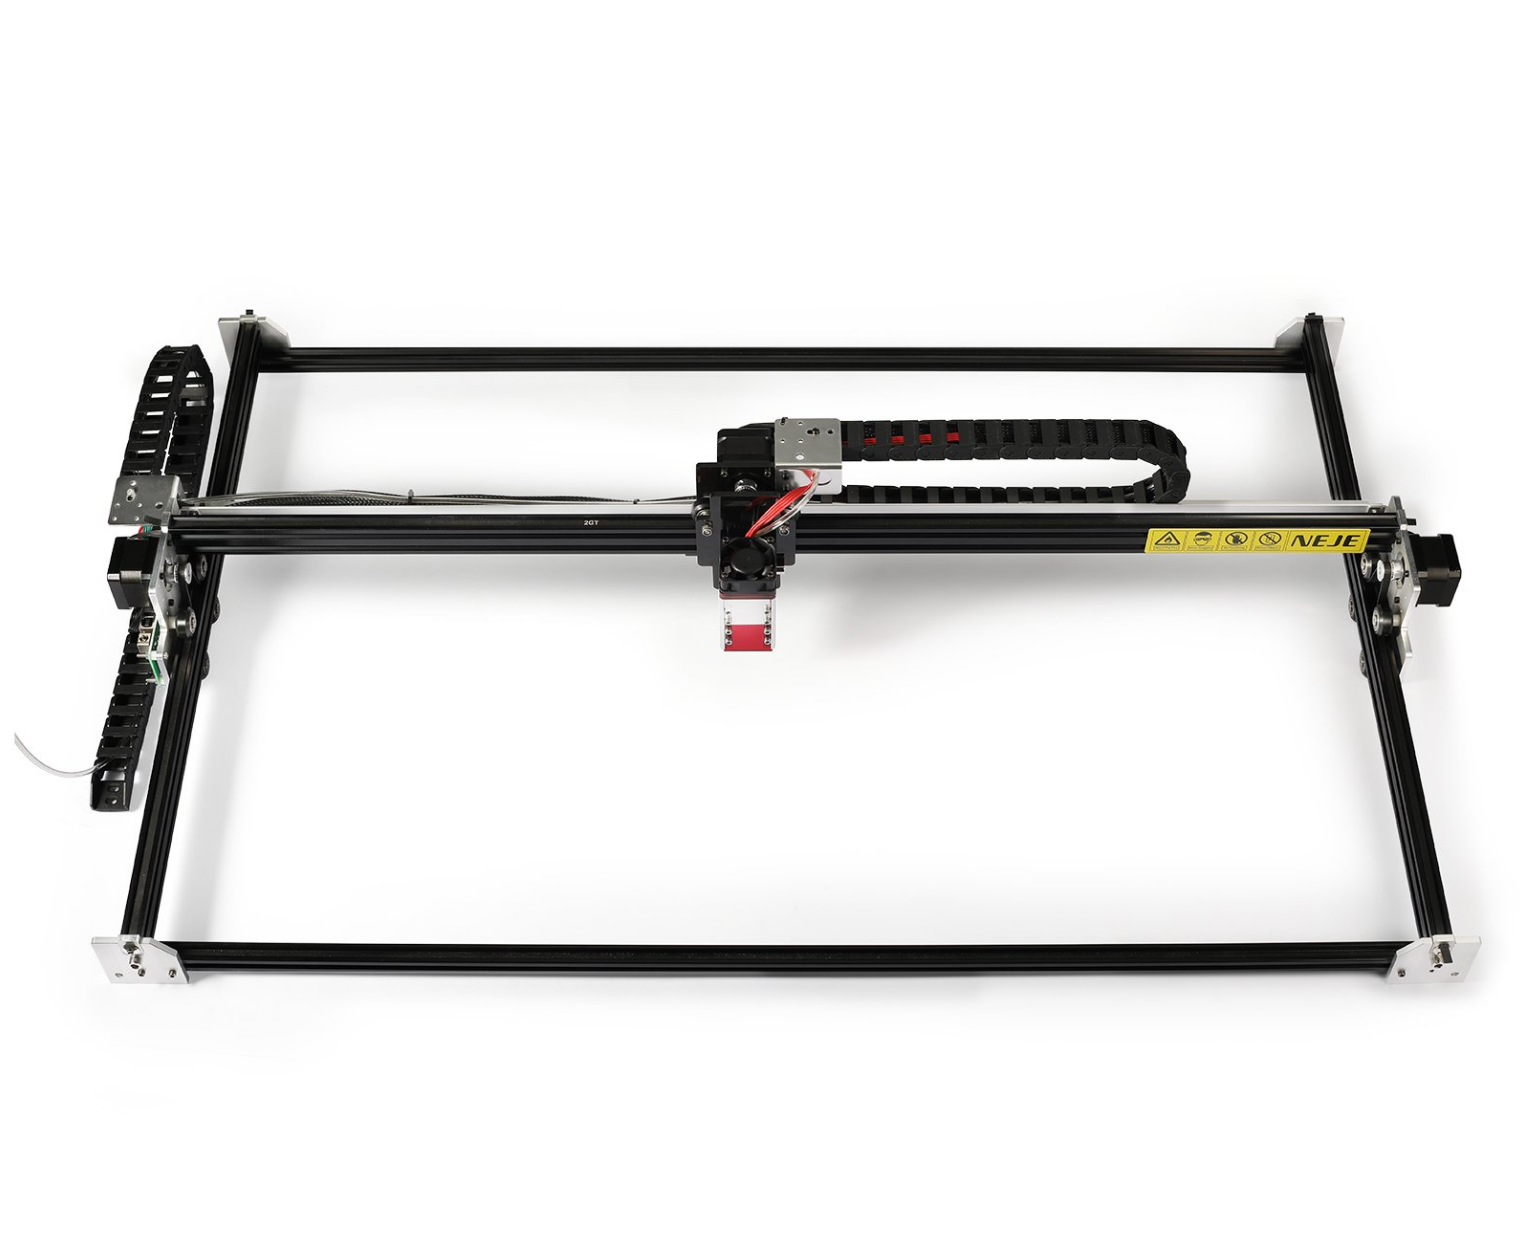
In order to ensure that the product is absolutely reliable after each user receives the product, NEJE has done a complete machine test for each device, you only need to simply install 6 screws to complete the initial assembly.
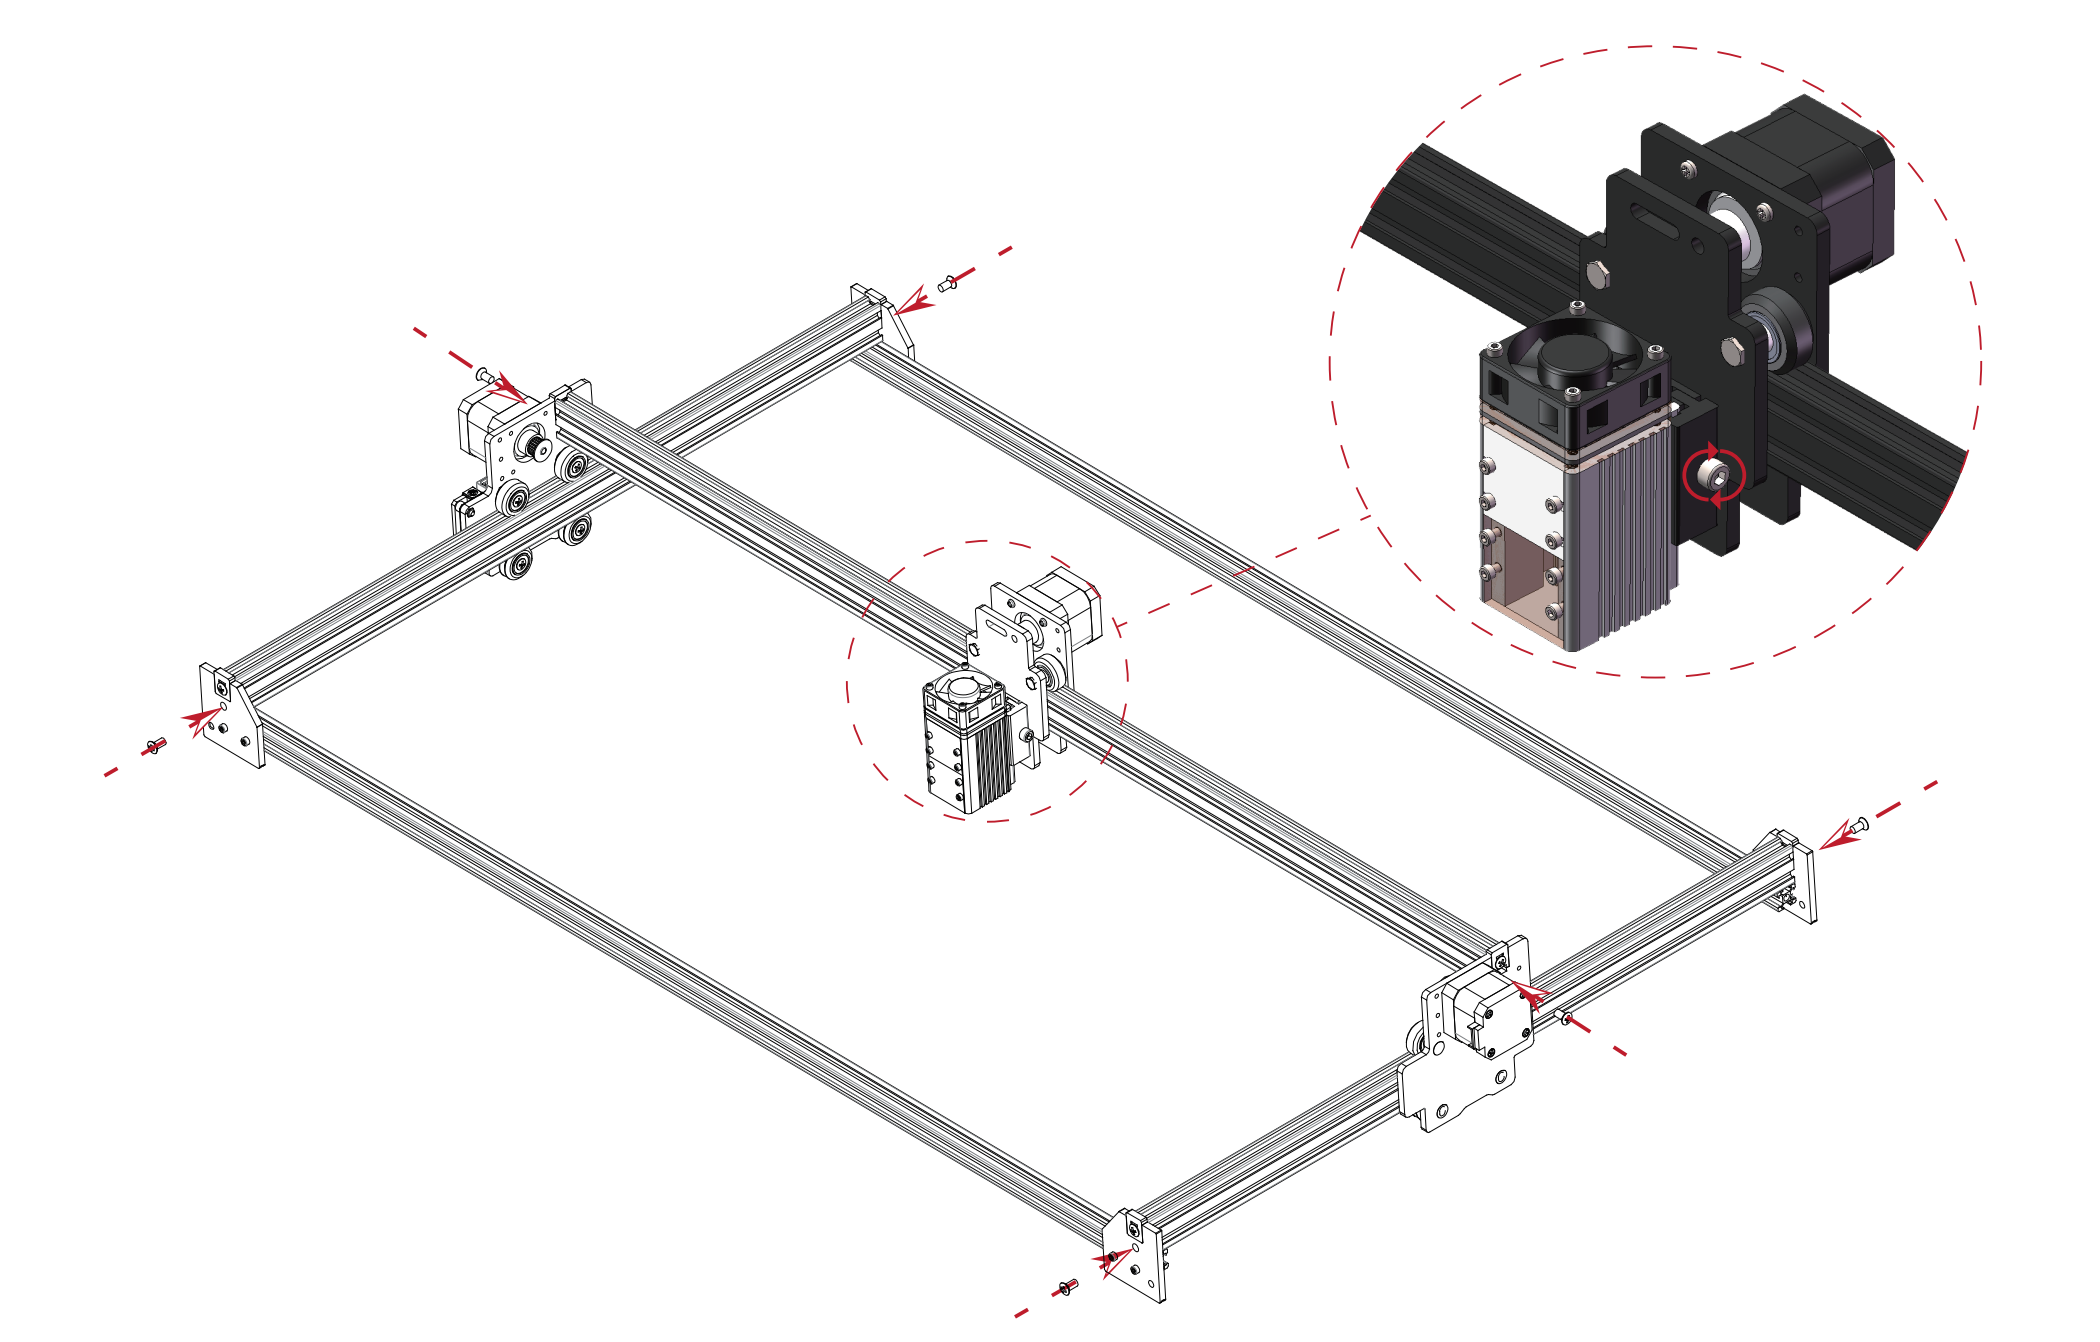
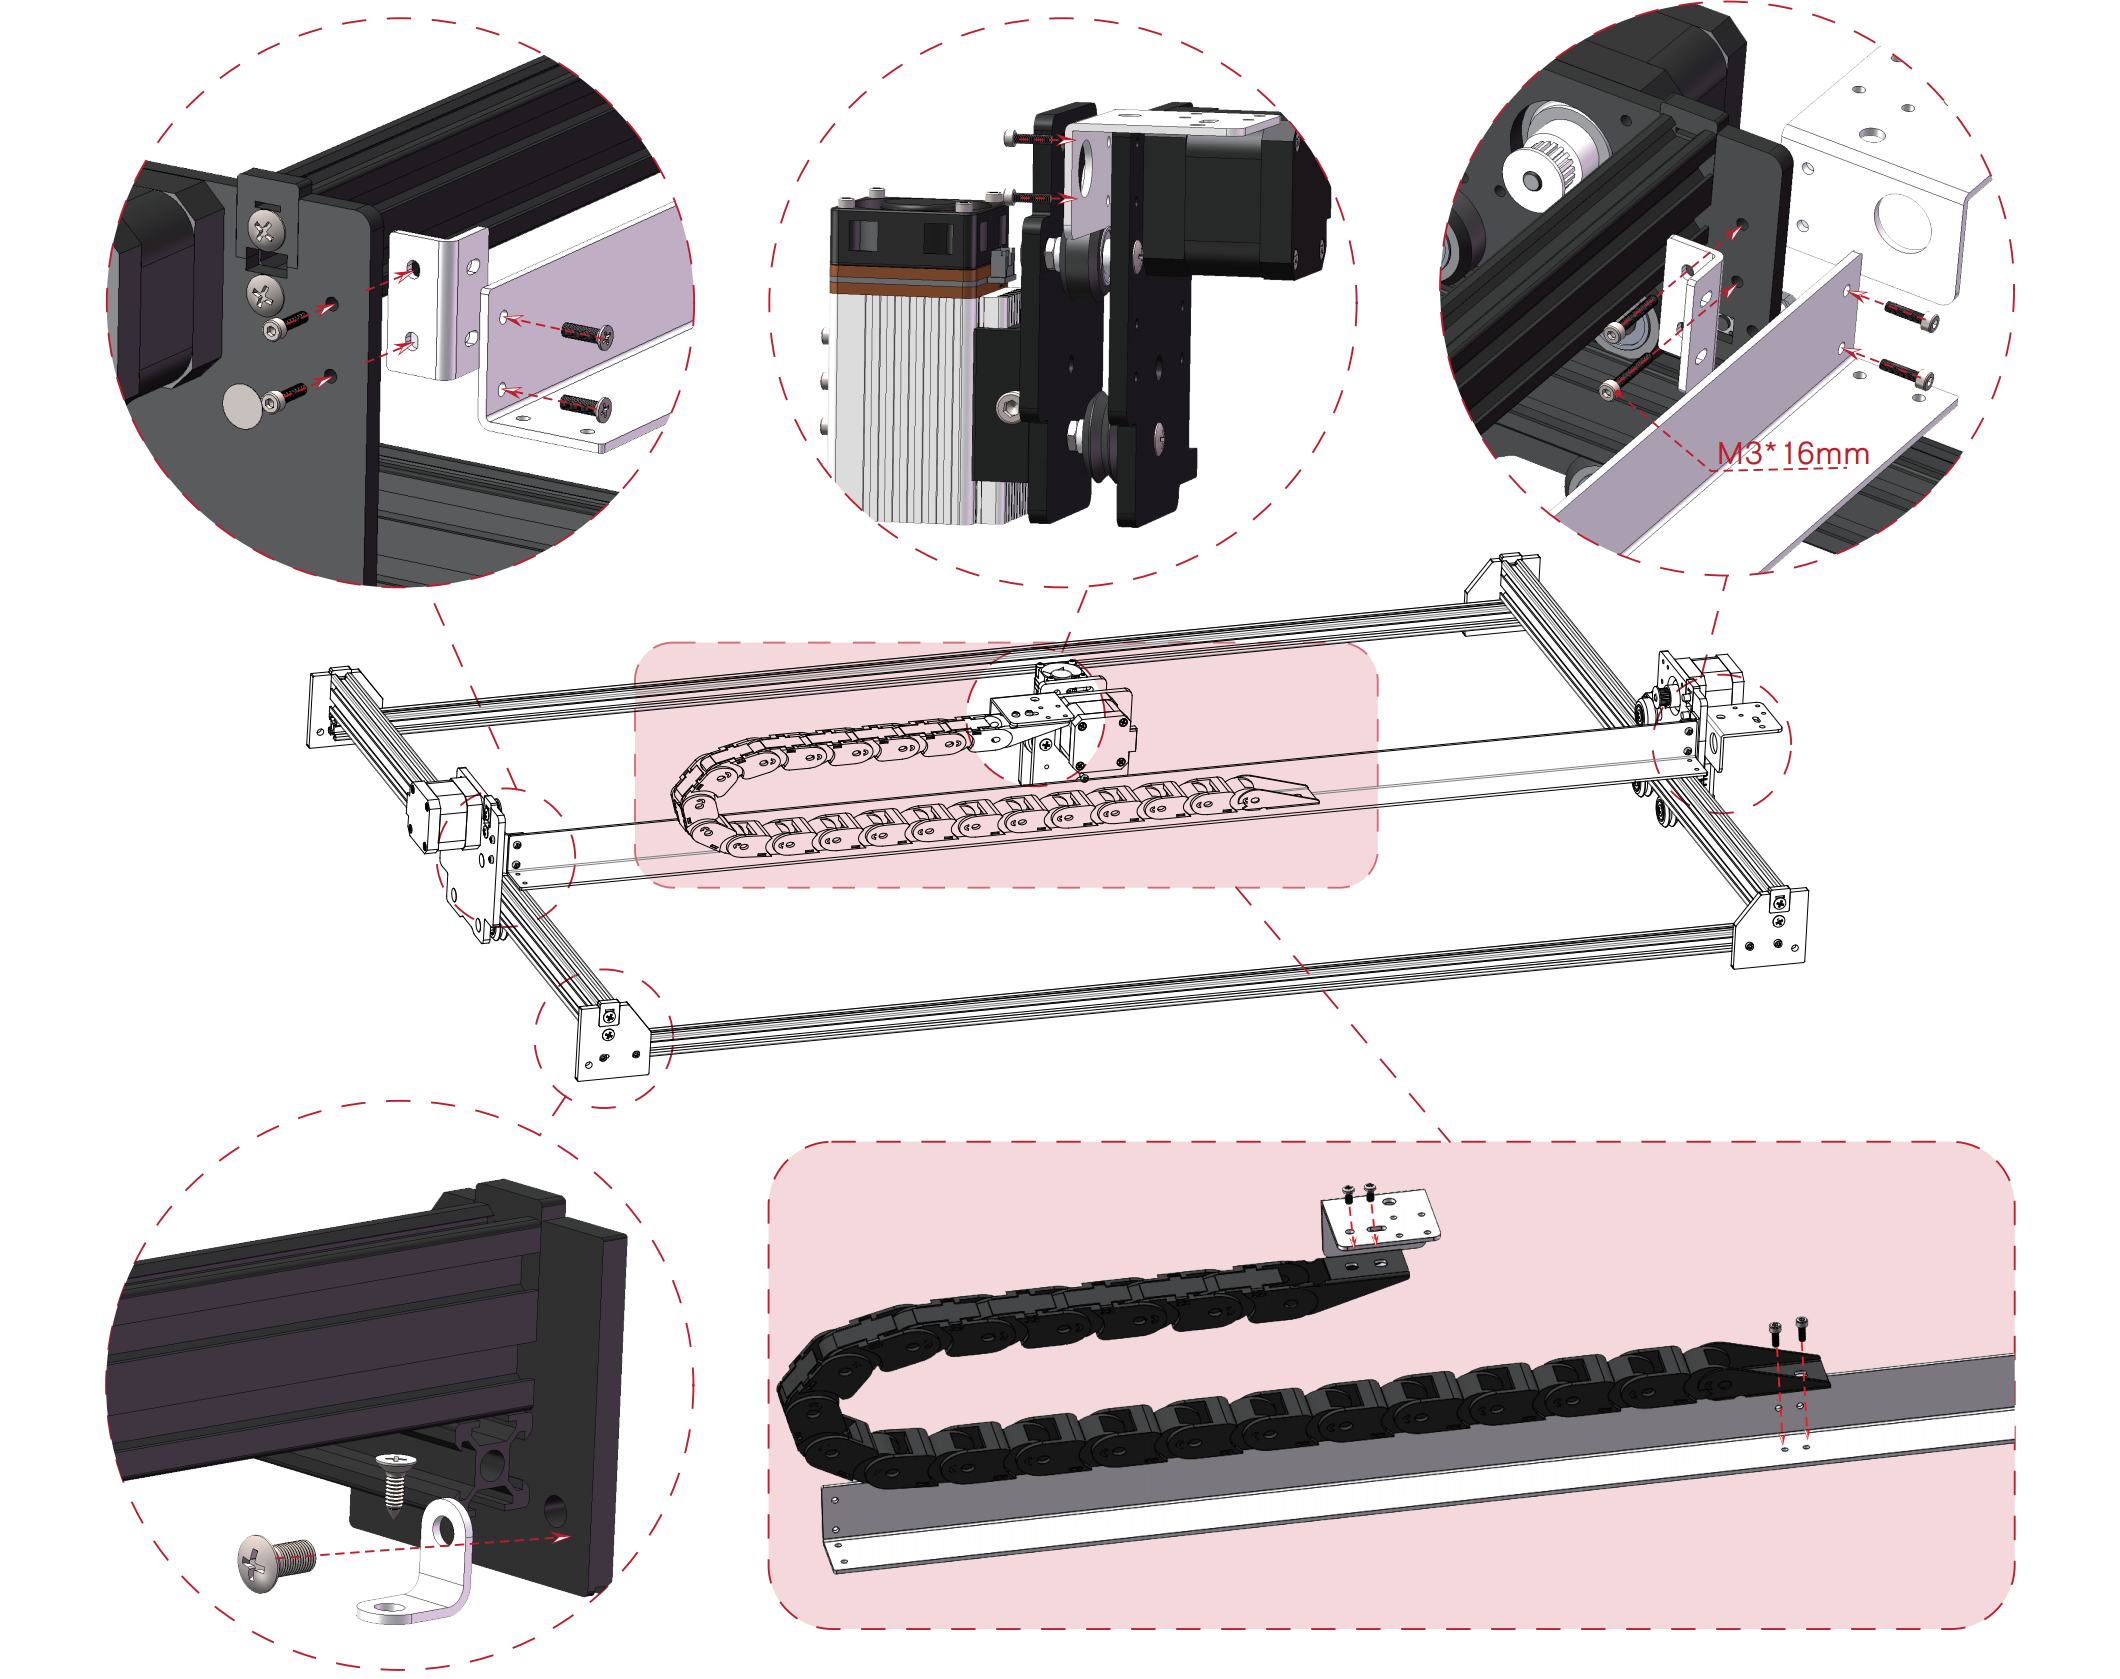
It is recommended to install the X-axis drag chain support frame first, and then install the X sliding assembly;
The M7 relay module is generally used for the control of the smoke exhaust system. Some users also use it to control the oxygenator, which is not very safe! M8 air valve is generally used to control the air circuit of the user. You need to cut the air pipe according to the actual situation, and connect the other end to the air compressor or other air source; Y-R motor don't forget to connect.
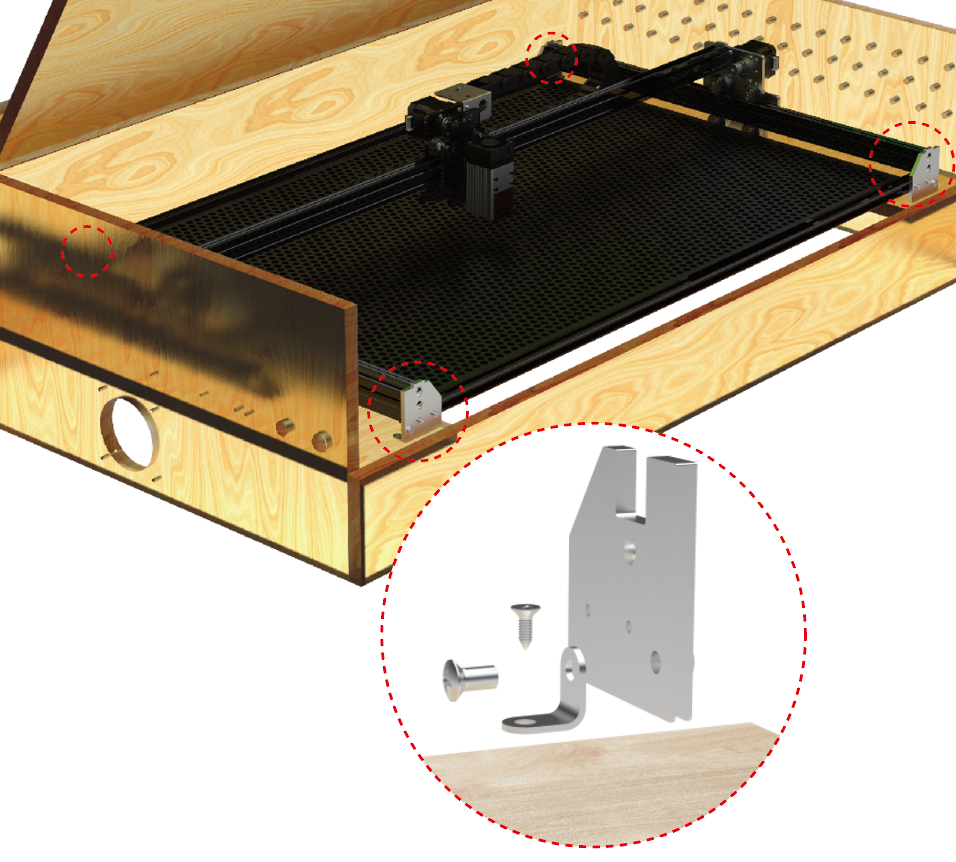
It is recommended that the 4 feet be fixed on the wooden table top with corner codes, if you are interested, you can download the CAD file Laser_Box.DWG to make a simple protective box.
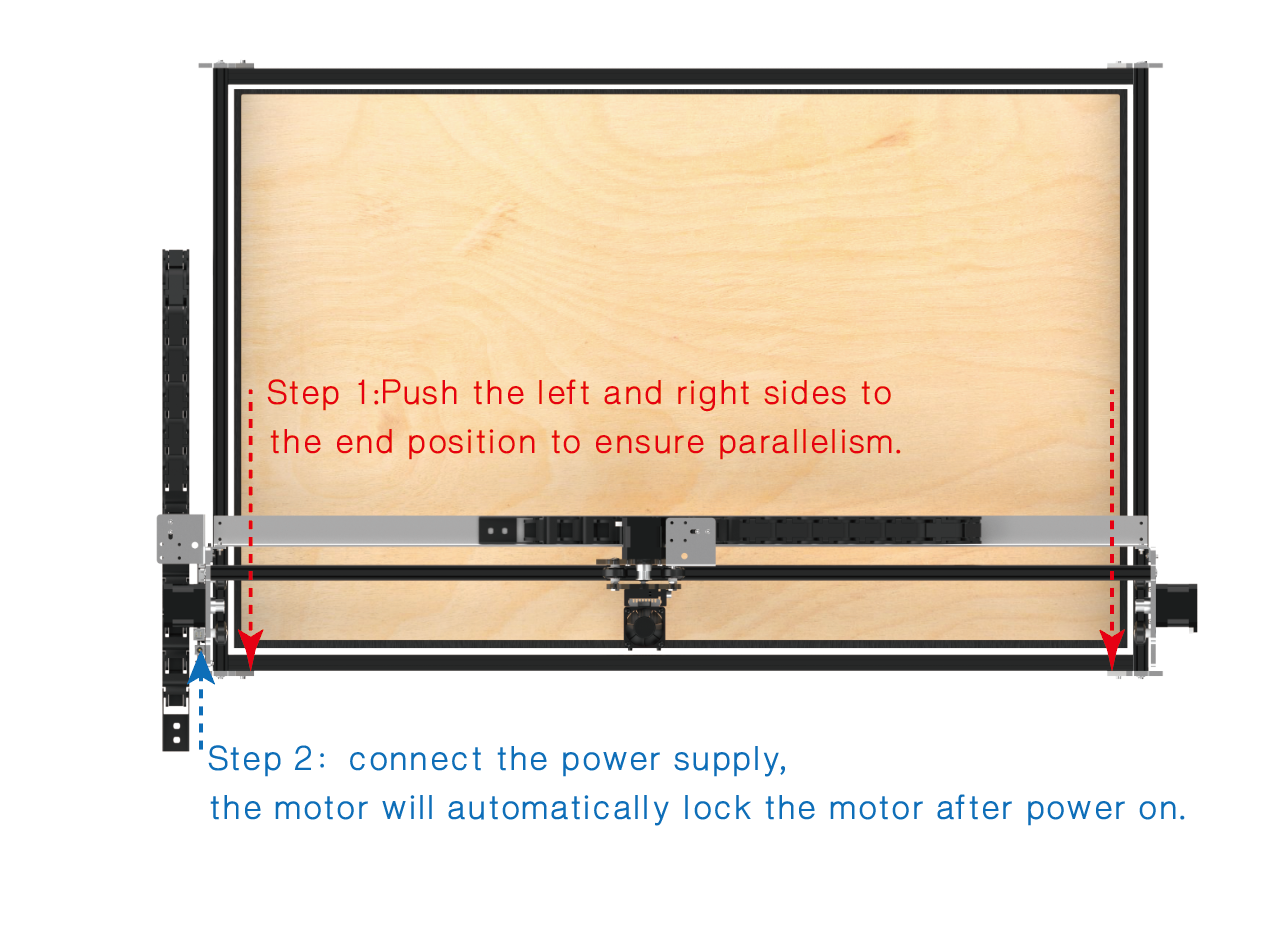
Push the left and right sides to the end position to ensure parallelism; connect the power supply, the motor will automatically lock the motor after power on;
When you are ready, you can start the following work.
Step 2: Software Download
NEJE Win Software
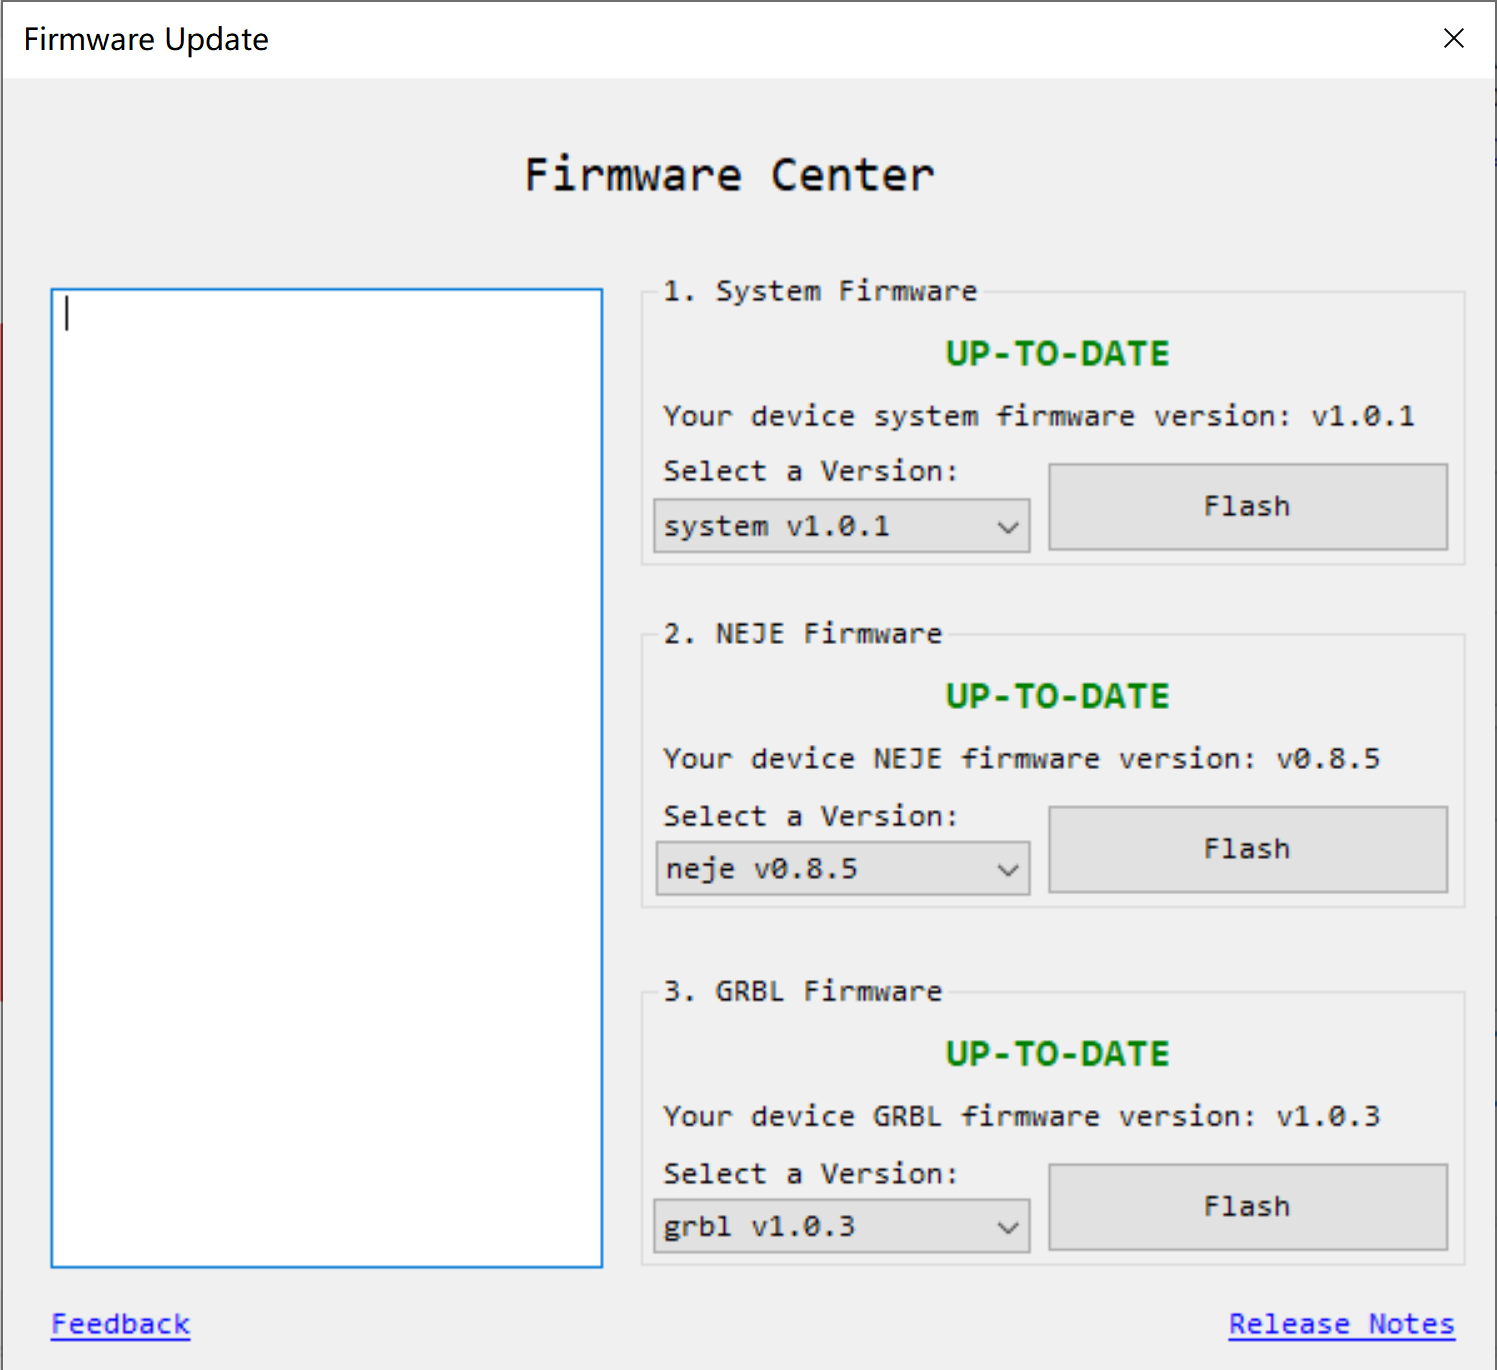
When using the machine for the first time, please open the NEJE Win software first to check the latest firmware update. The NEJE team will continue to optimize the NEJE firmware and GRBL firmware to provide you with more surprising experiences.
VCP_Driver.exe —Ignore if win10 and above How to install serial driver
.NET Framework 4.8 — Ignore if win10 and above
NEJE_v6.1.2.exe — 2022.2.28 . The Latest NEJE Win Software, Only supports NEJE 3 series.
NEJE APP for Android
NEJE_3_v3.0.apk —2022.3.1
The "N-Scanner" APP (click me to download)mainly uses the fast transmission between the engraving materials in your mobile phone and the NEJE Win software. You can directly shoot the image through the mobile phone or quickly transfer the content of the photo stored in the mobile phone to the computer for editing and engraving;
NEJE APP for iphone, iPad, macbook
Sorry, the NEJE Apple APP is being upgraded, it may take a while!
LaserGRBL Software
VCP_Driver.exe (Ignore if driver is already installed)
laserGRBL for Windows:
https://github.com/arkypita/LaserGRBL/releases/latest/download/install.exe
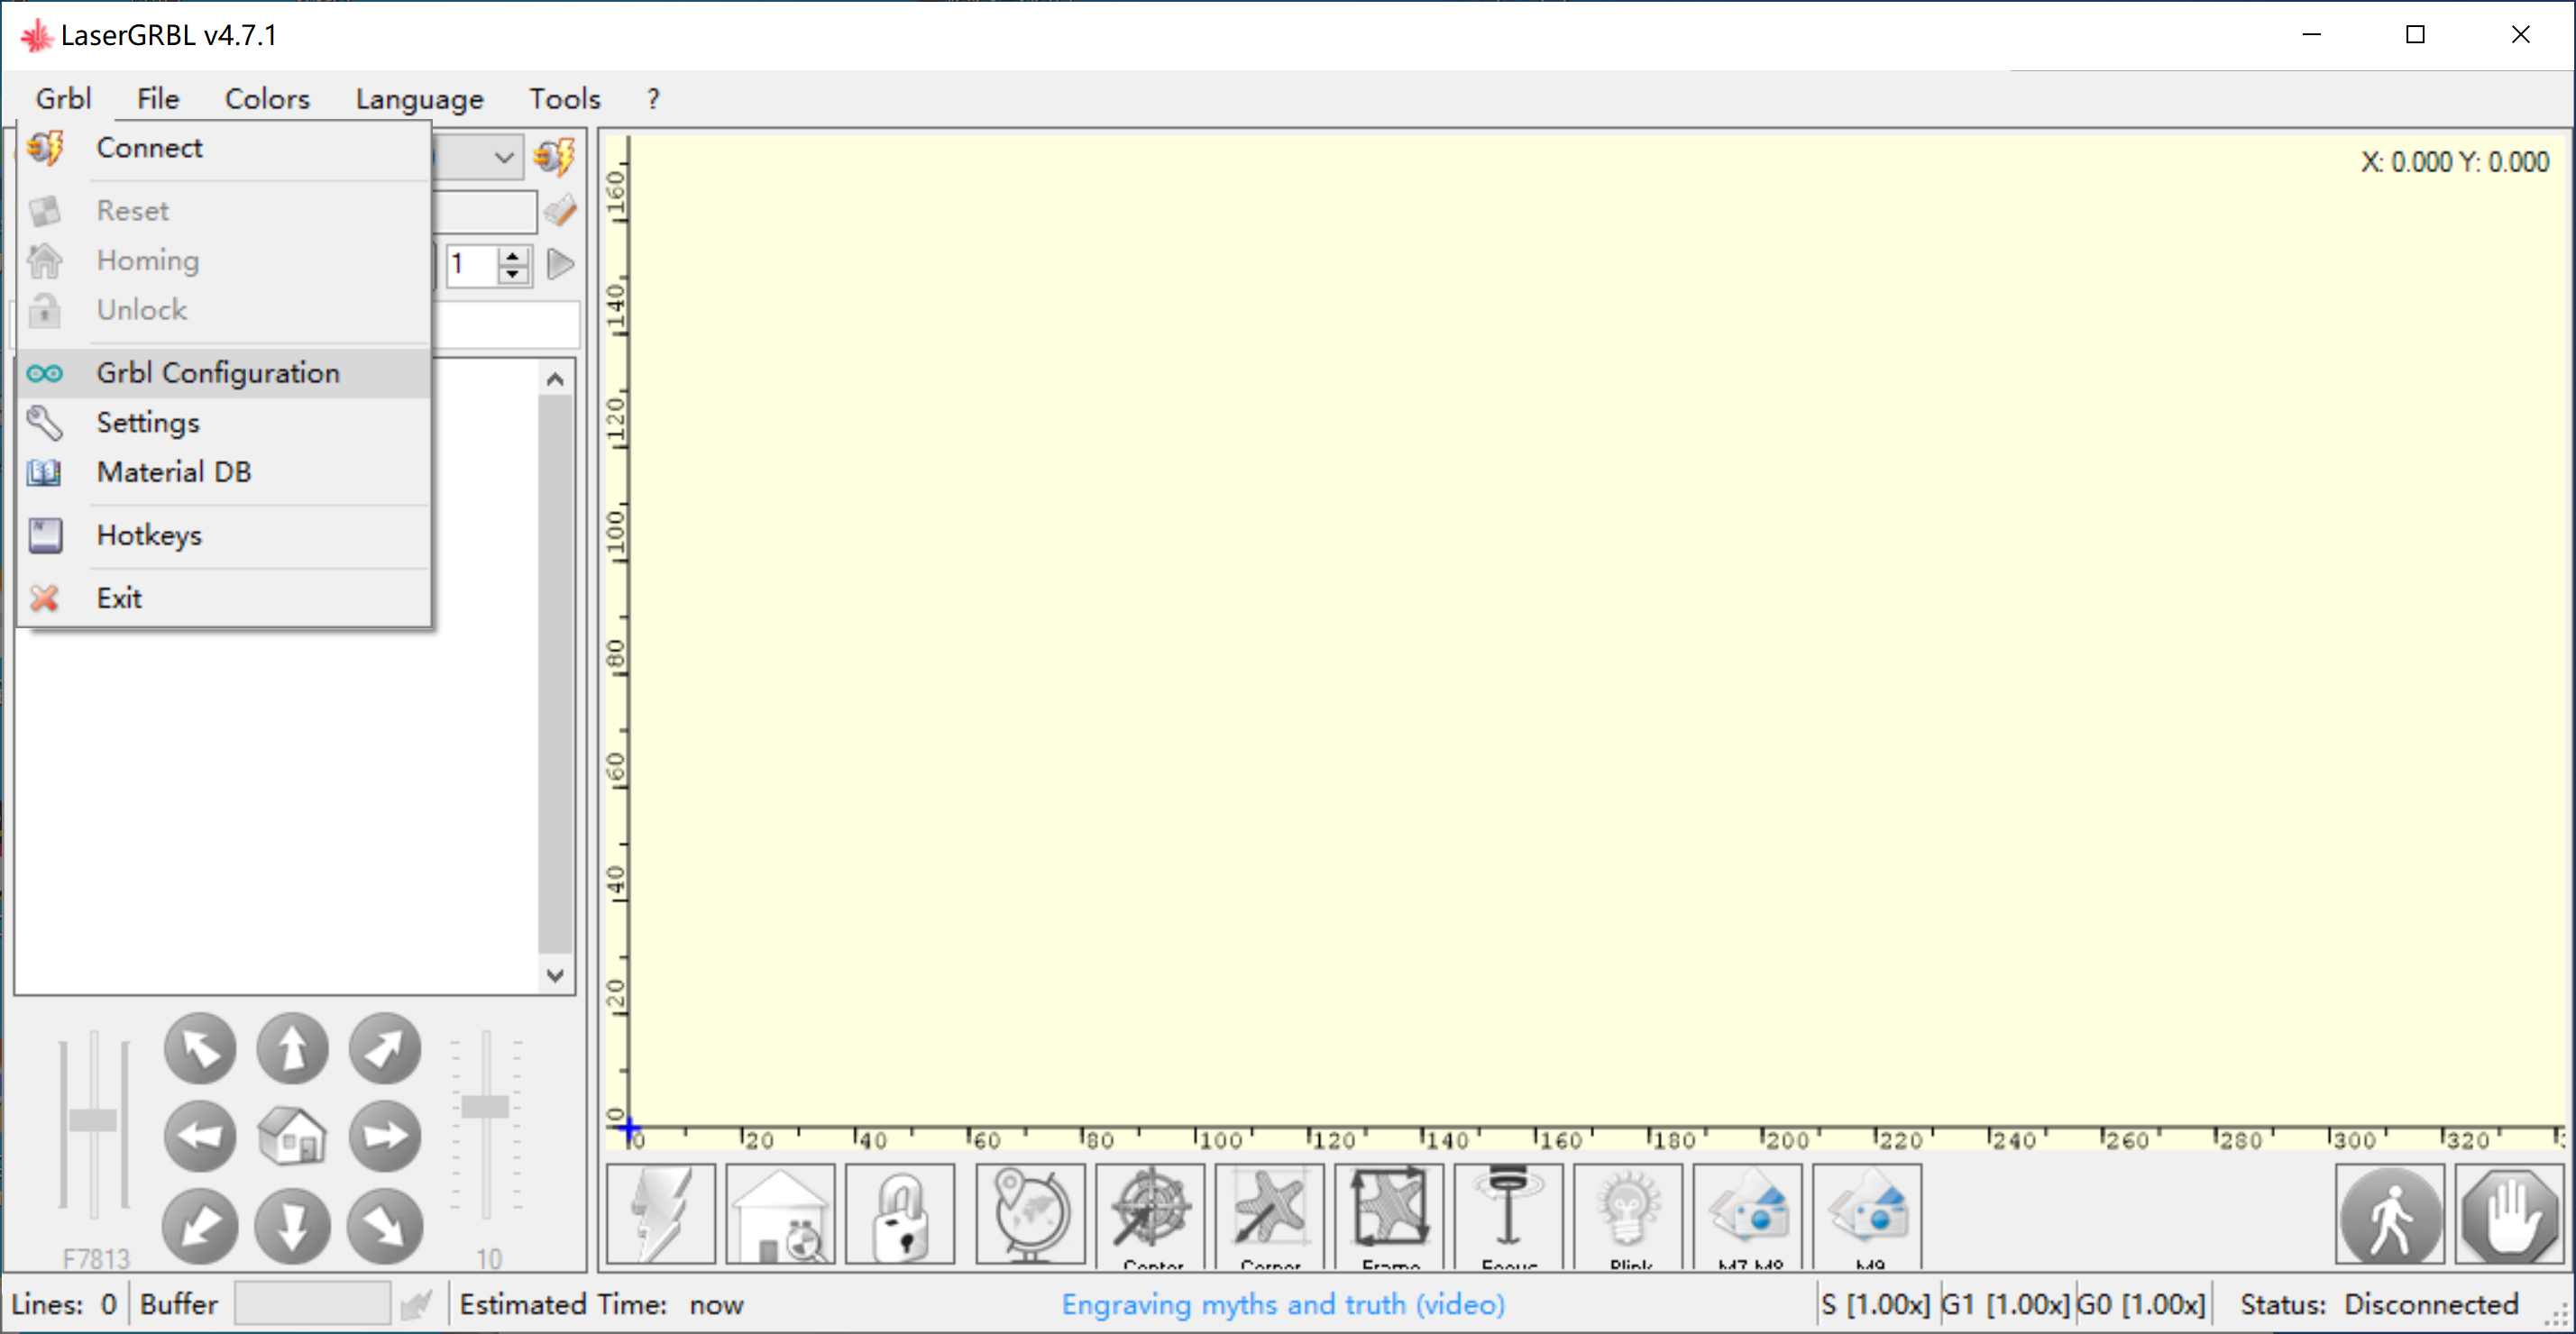
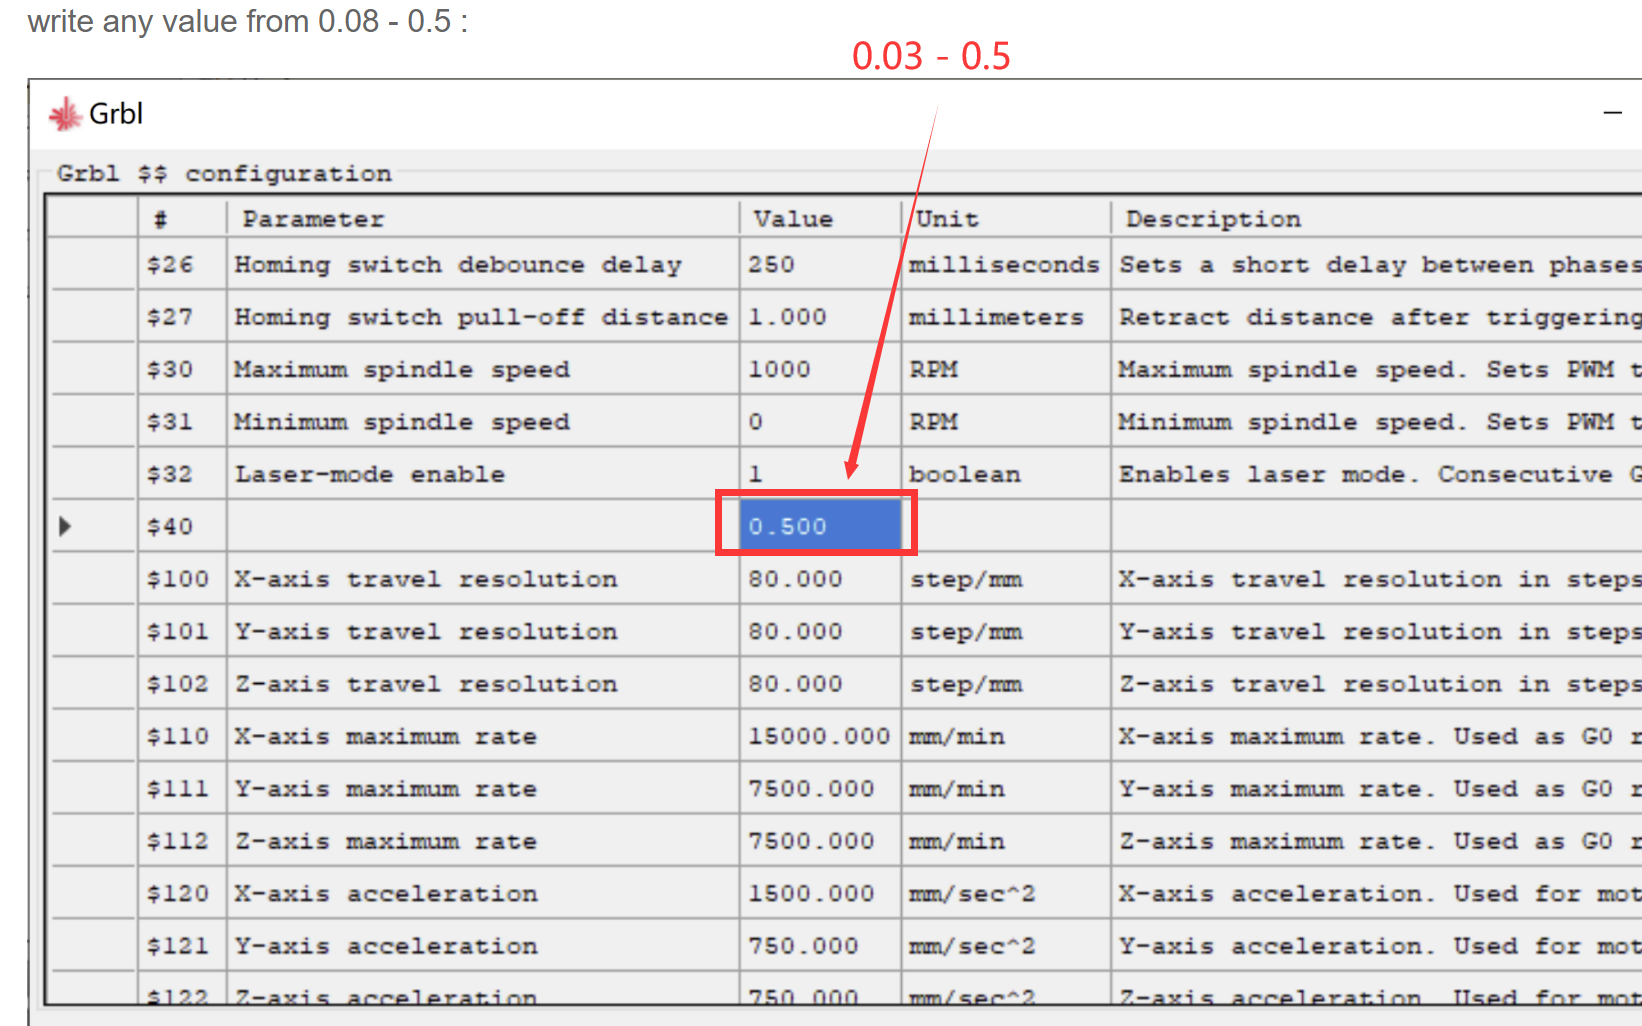
How to set low light intensity in GRBL:
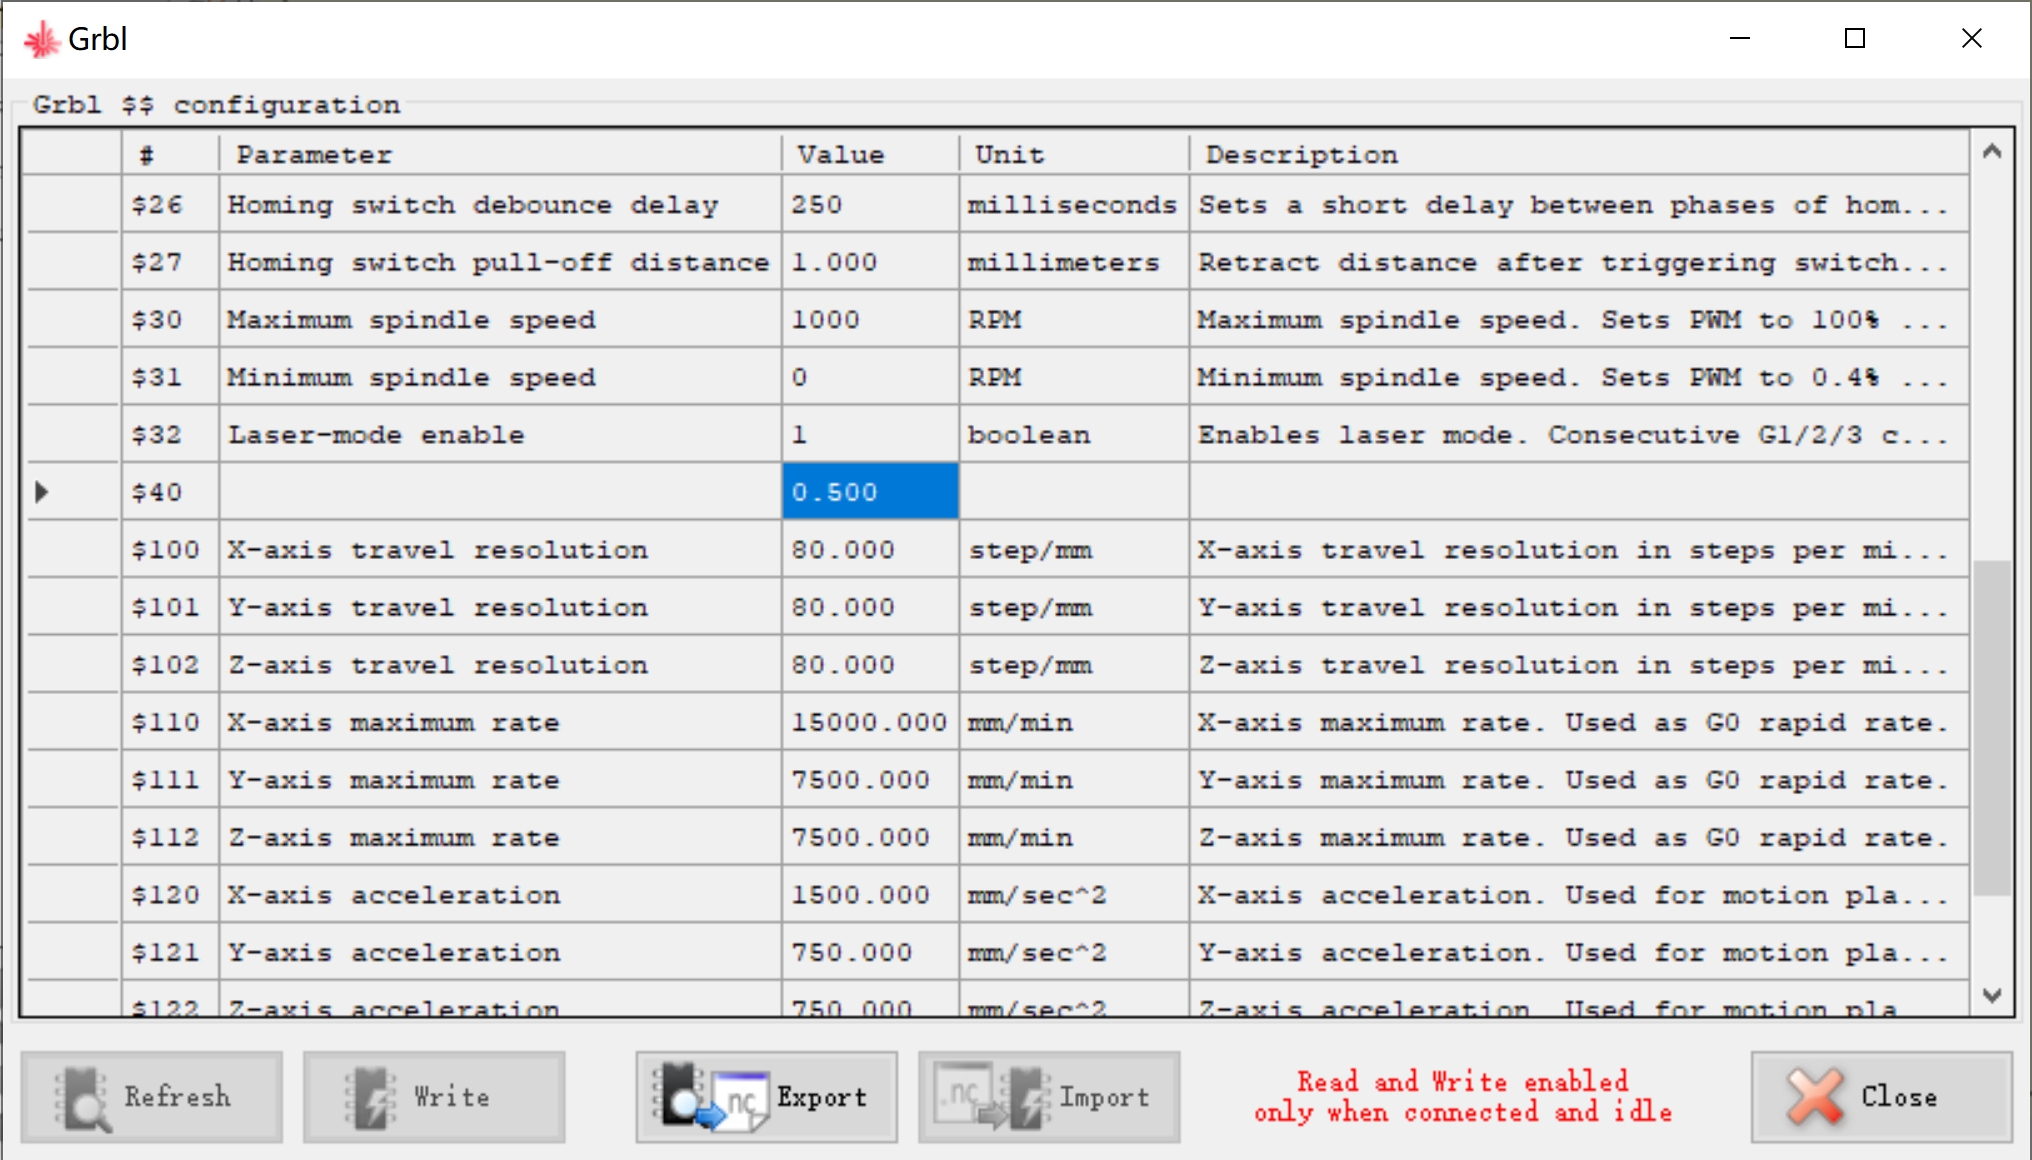
Grbl Configuration:
Write any value from 0.08 - 0.5, The value means % laser intensity, please proceed with caution,If you modify the parameters and cannot restore the default firmware, you can re-update the firmware in NEJE Win software.
Lightburn Software
VCP_Driver.exe (Ignore if driver is already installed)
LightBurn is a paid software. You can download it from the official website of Lightburn. This software is not developed by the NEJE team. You can use it for free for 30 days.
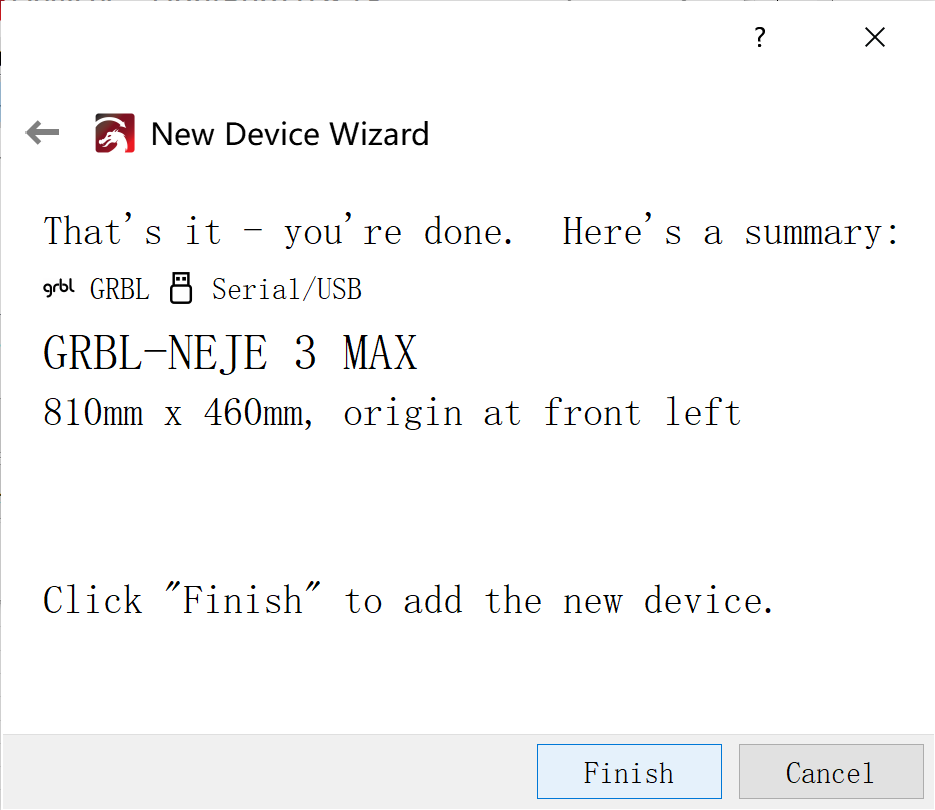
Initialize lightburn settings:

Area setting: X: 810×460 Y.
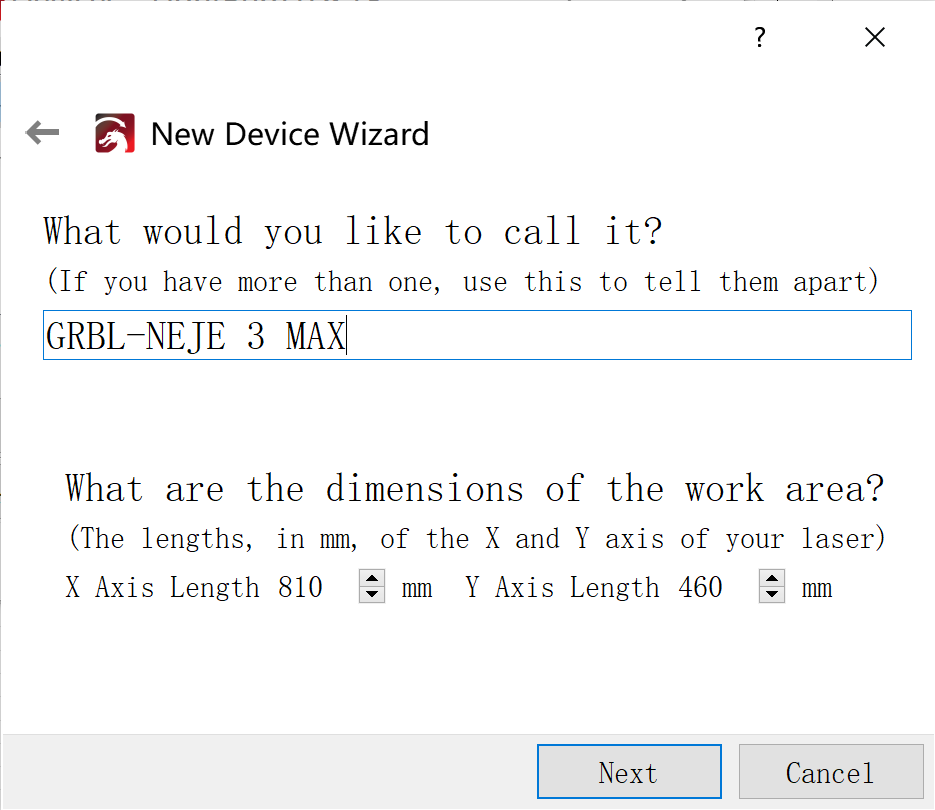
Origin X0,Y0: Front Left. Auto “Home”.

Finish:
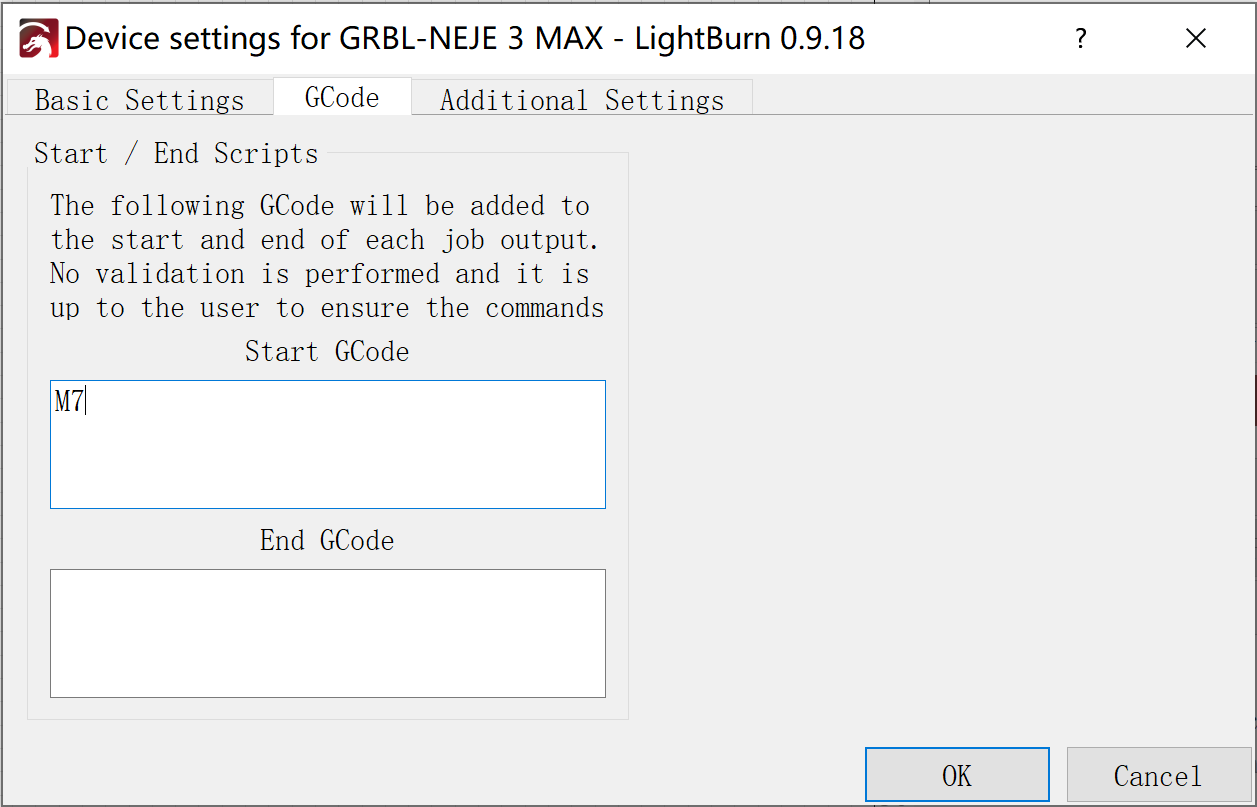
How to start M7 in lightburn:
Device Settings
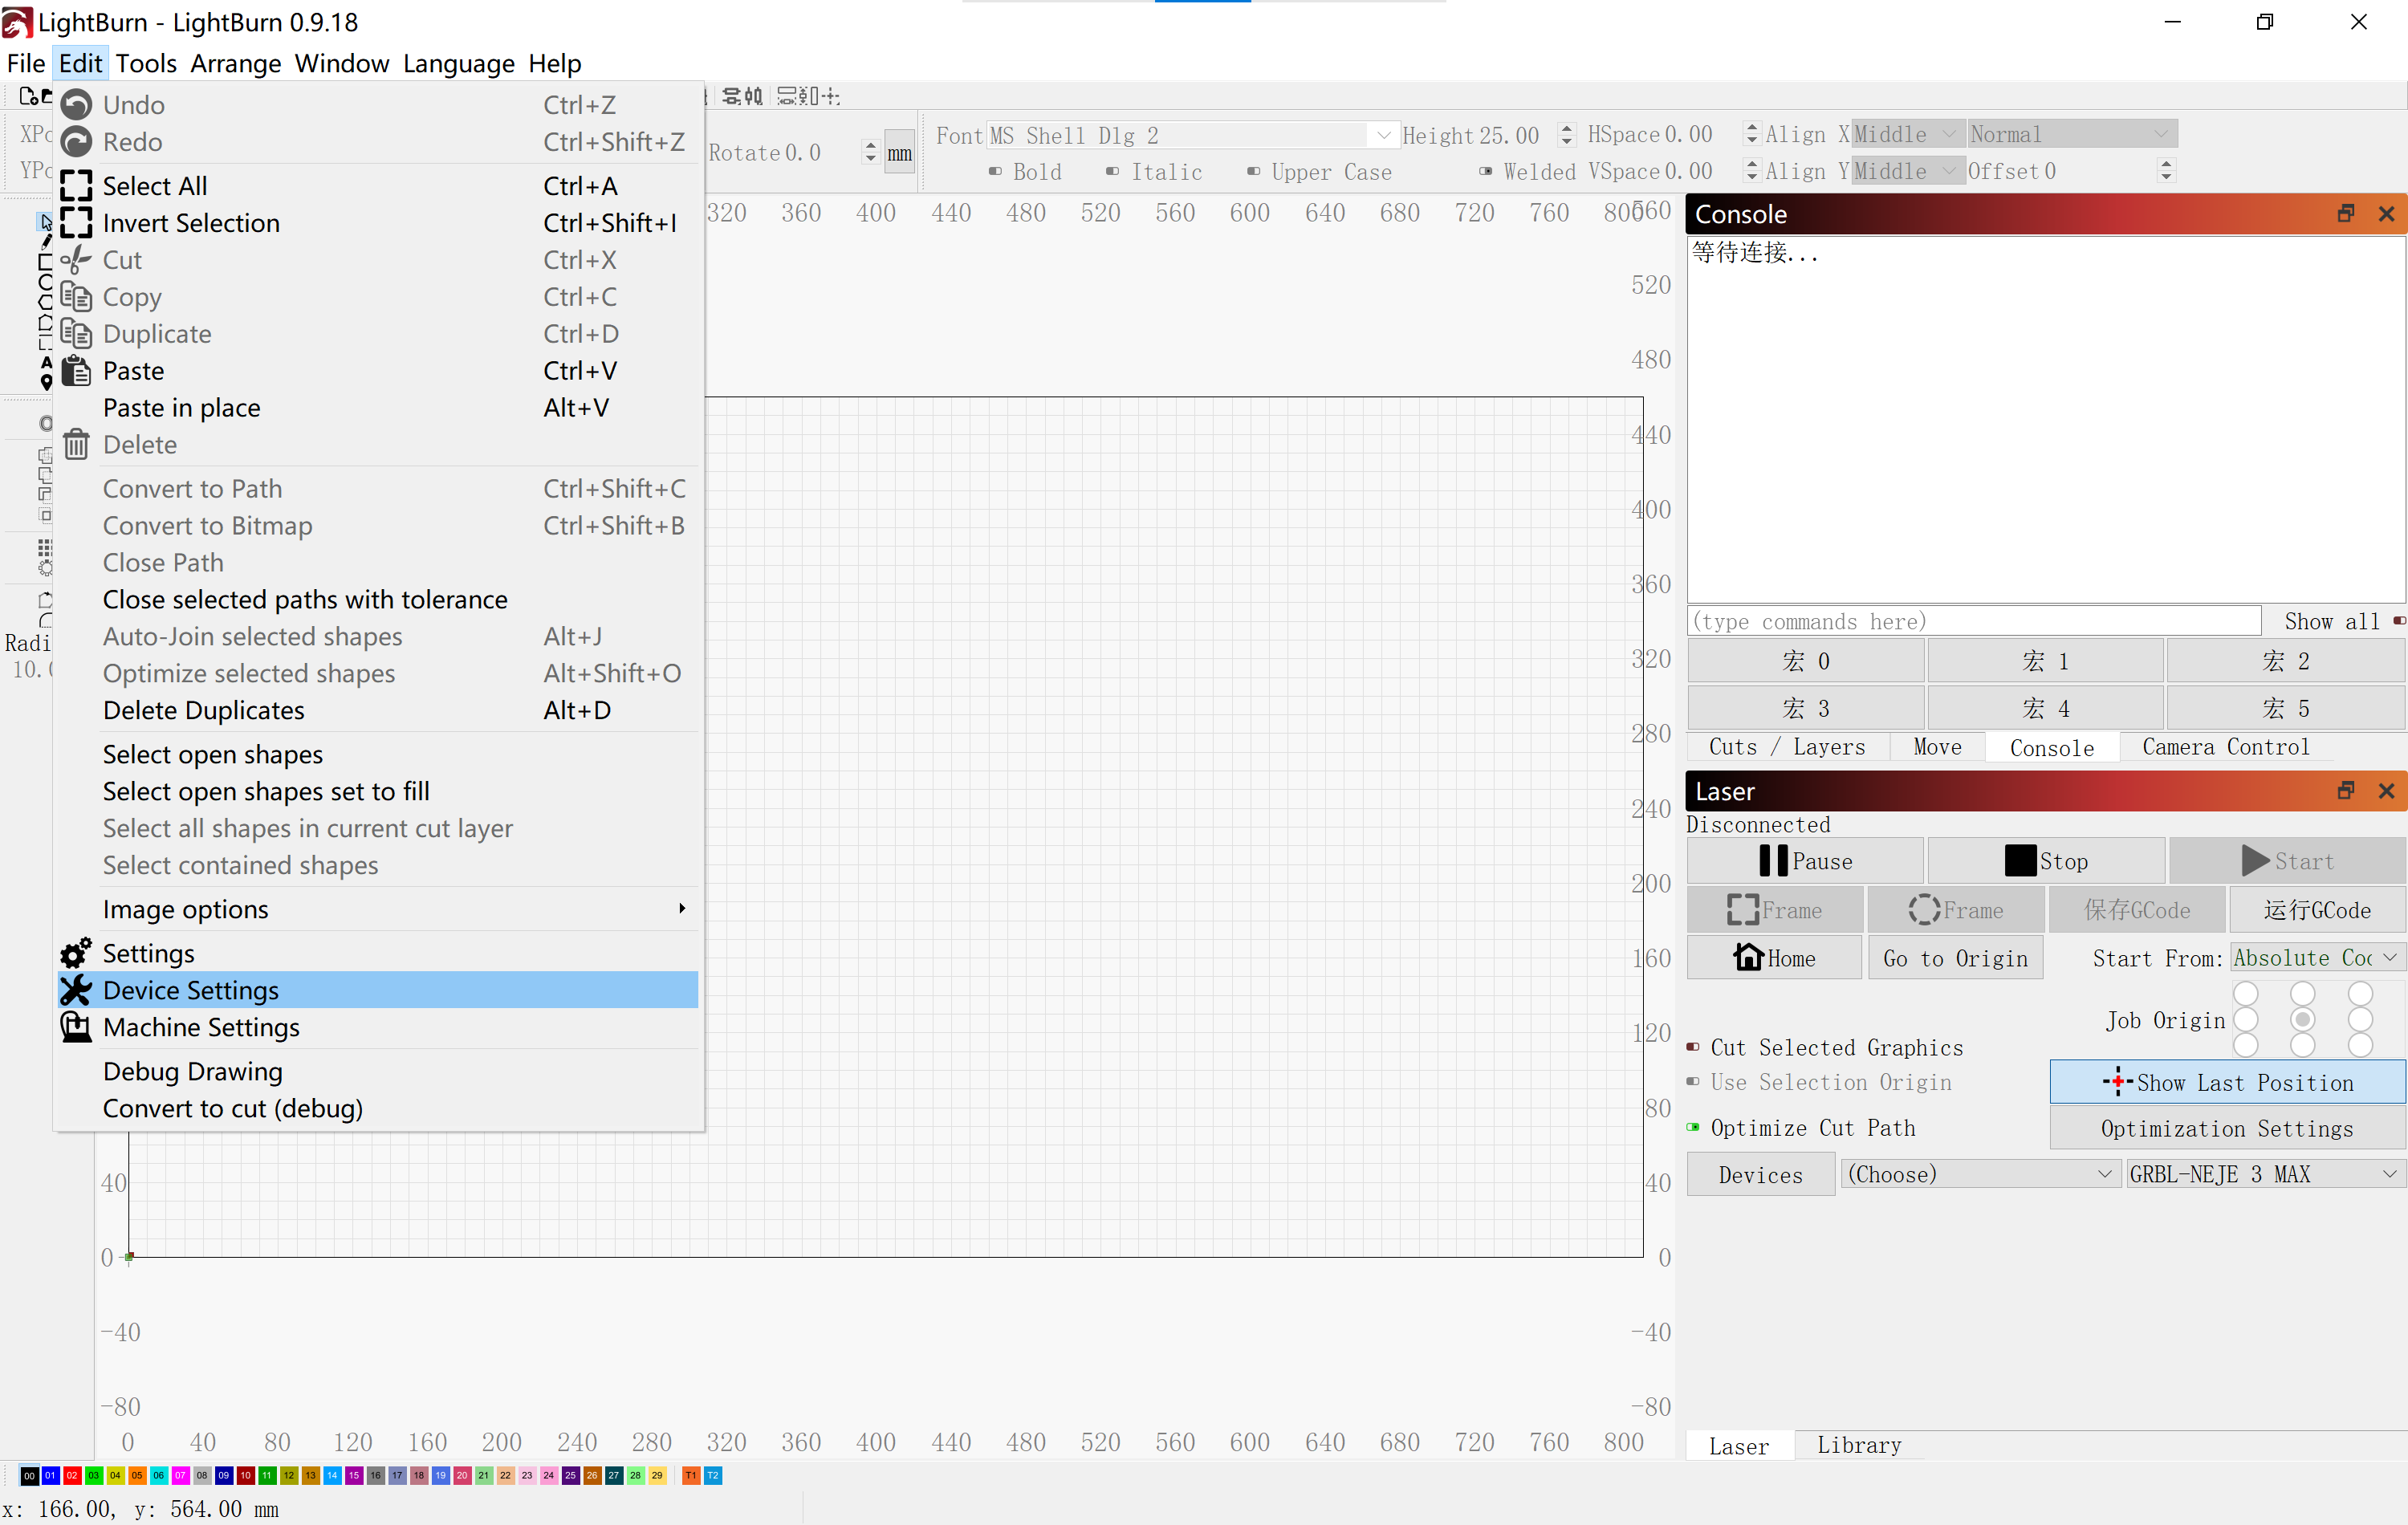
Start G-code: M7
Step 3: Safety Attention

Please do not leave the equipment when the equipment is working, long-term stay may cause the material to burn!
Please wear protective glasses before operation!
Please do not touch the laser outlet with your hands. It may burn your hands!
Please avoid strongly impact on the machine!
Children under 14 years of age are prohibited from using this product!
Children over 14 years of age need adult supervision when using this product!
Avoid accidental touch by pets!
Step 4: Place Materials
Make sure the plane of the engraved material is at the same distance from the laser, so that the focus position is consistent and the engraved image is burned evenly.

Step 5: Focus
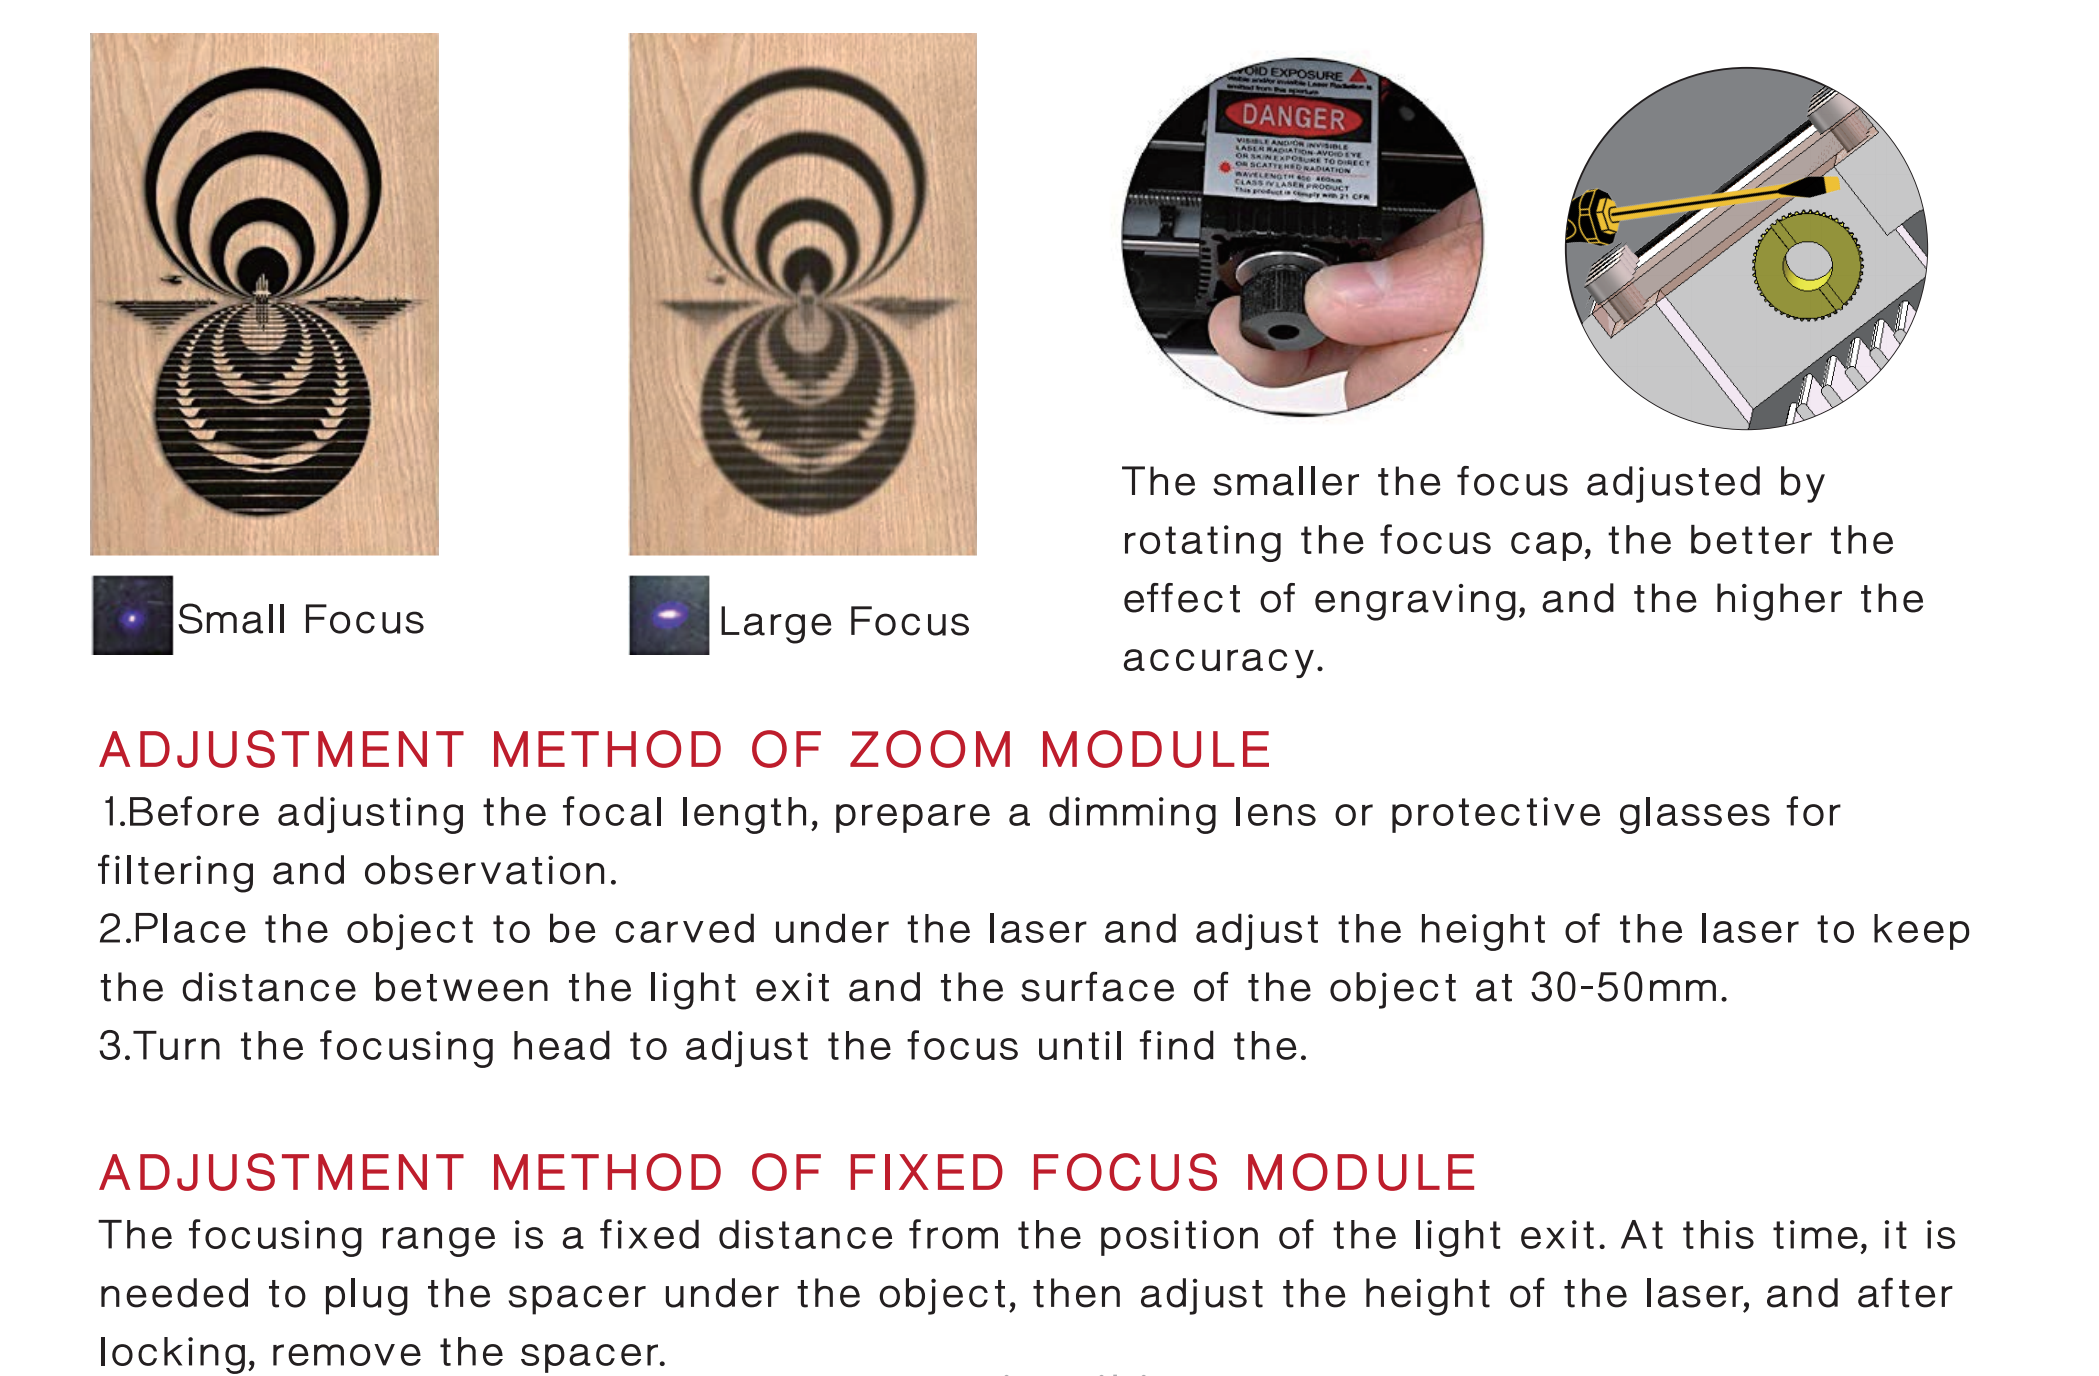
Understand the principle of focusing: if you use it for engraving, you can focus on the surface of the object. If you use it for cutting, you need to focus on the upper middle of the material.
For more module focusing, please refer to: NEJE_Module_V1.0.pdf
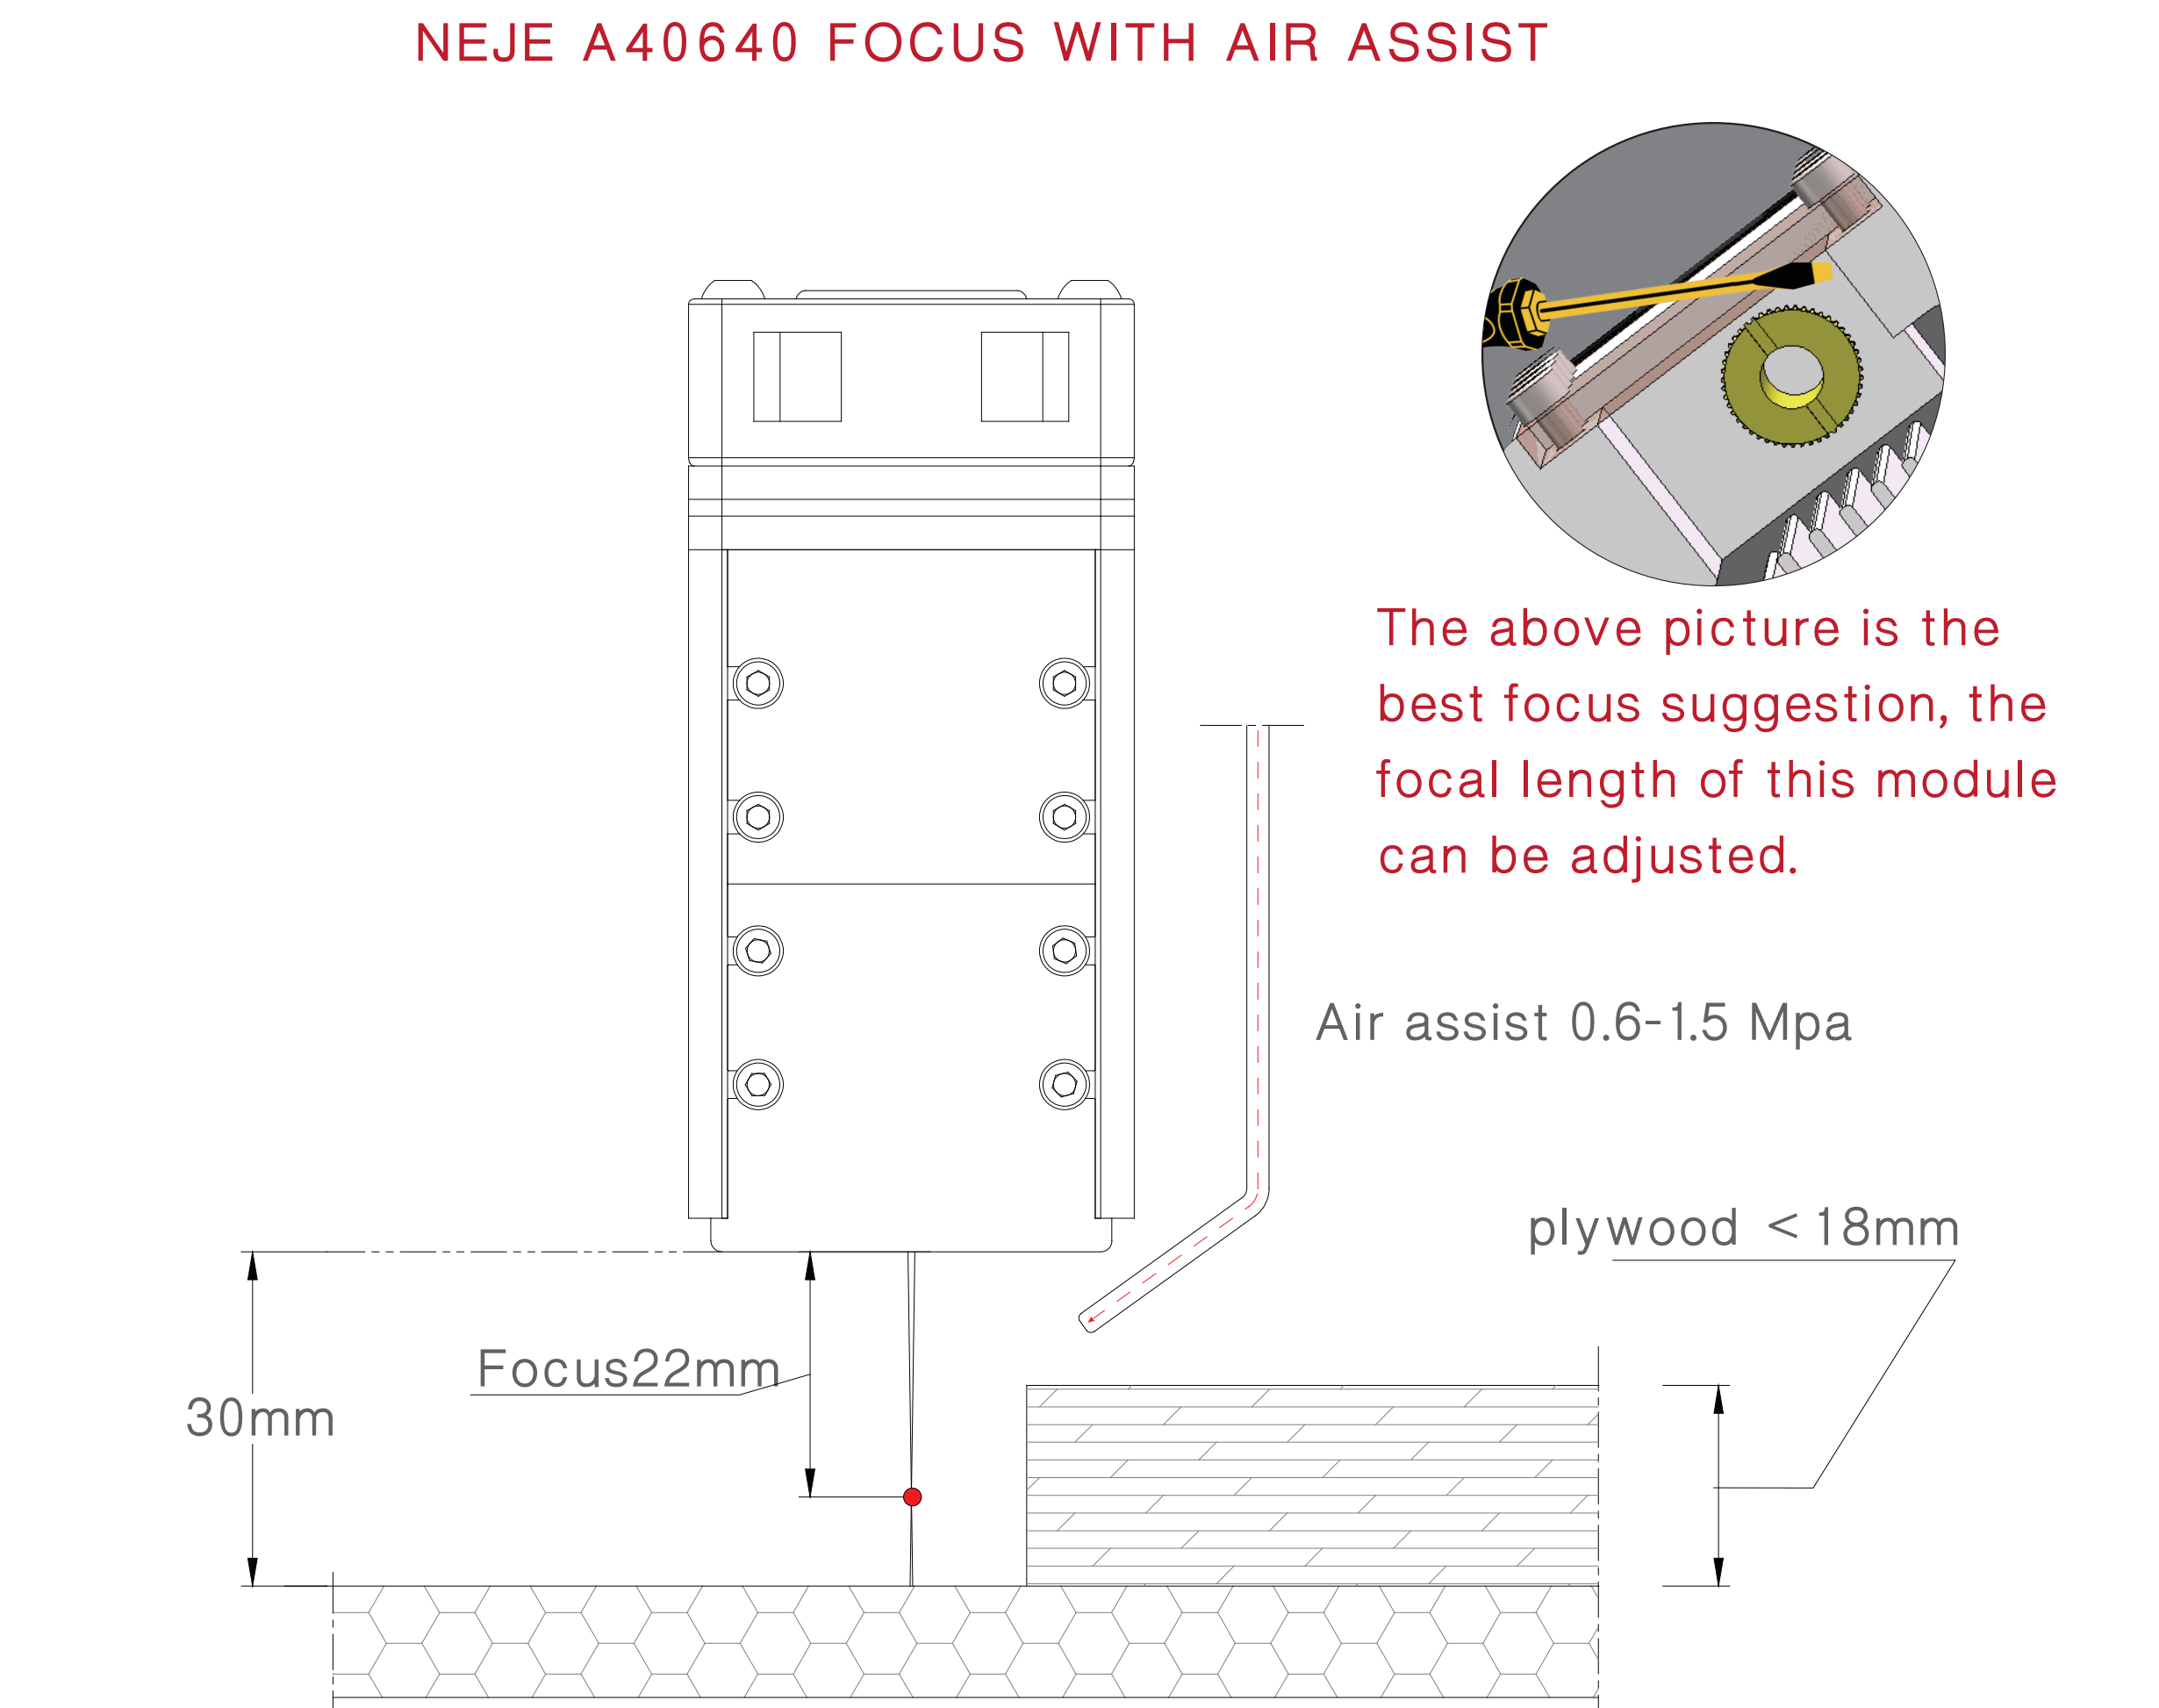
Module: A40640, When focusing to 55mm position (lens-to-focus distance), you can get a 0.15×0.15mm focal point and be able to cut material up to 18-20mm (requires accurate focus, 0.6-1.5mpa air assist to align the cut).
When the focus is adjusted to about 33mm from the light outlet with a flat-blade screwdriver, you can get a focus of 0.08*0.08mm, which is suitable for engraving and fast cutting of materials smaller than 10mm.
Find the best focus by rotating the lens. If it is a module with a fixed focus, it is enough to find the distance between the module and the object. Usually, we use a certain thickness of material to pad under the module to help find the best position.
Adjust the suitable low light through the software. The NEJE mode can be adjusted in the “Settings” column of the NEJE Win software; the GRBL mode can be adjusted in the “Grbl Configuration” of the laserGRBL software, which has been explained above.
Put a gray cardboard on the surface of the white material (such as plywood) as a focus reference to find the precise focus. A fine focal point can be observed through the protective goggles or the shade of the module.

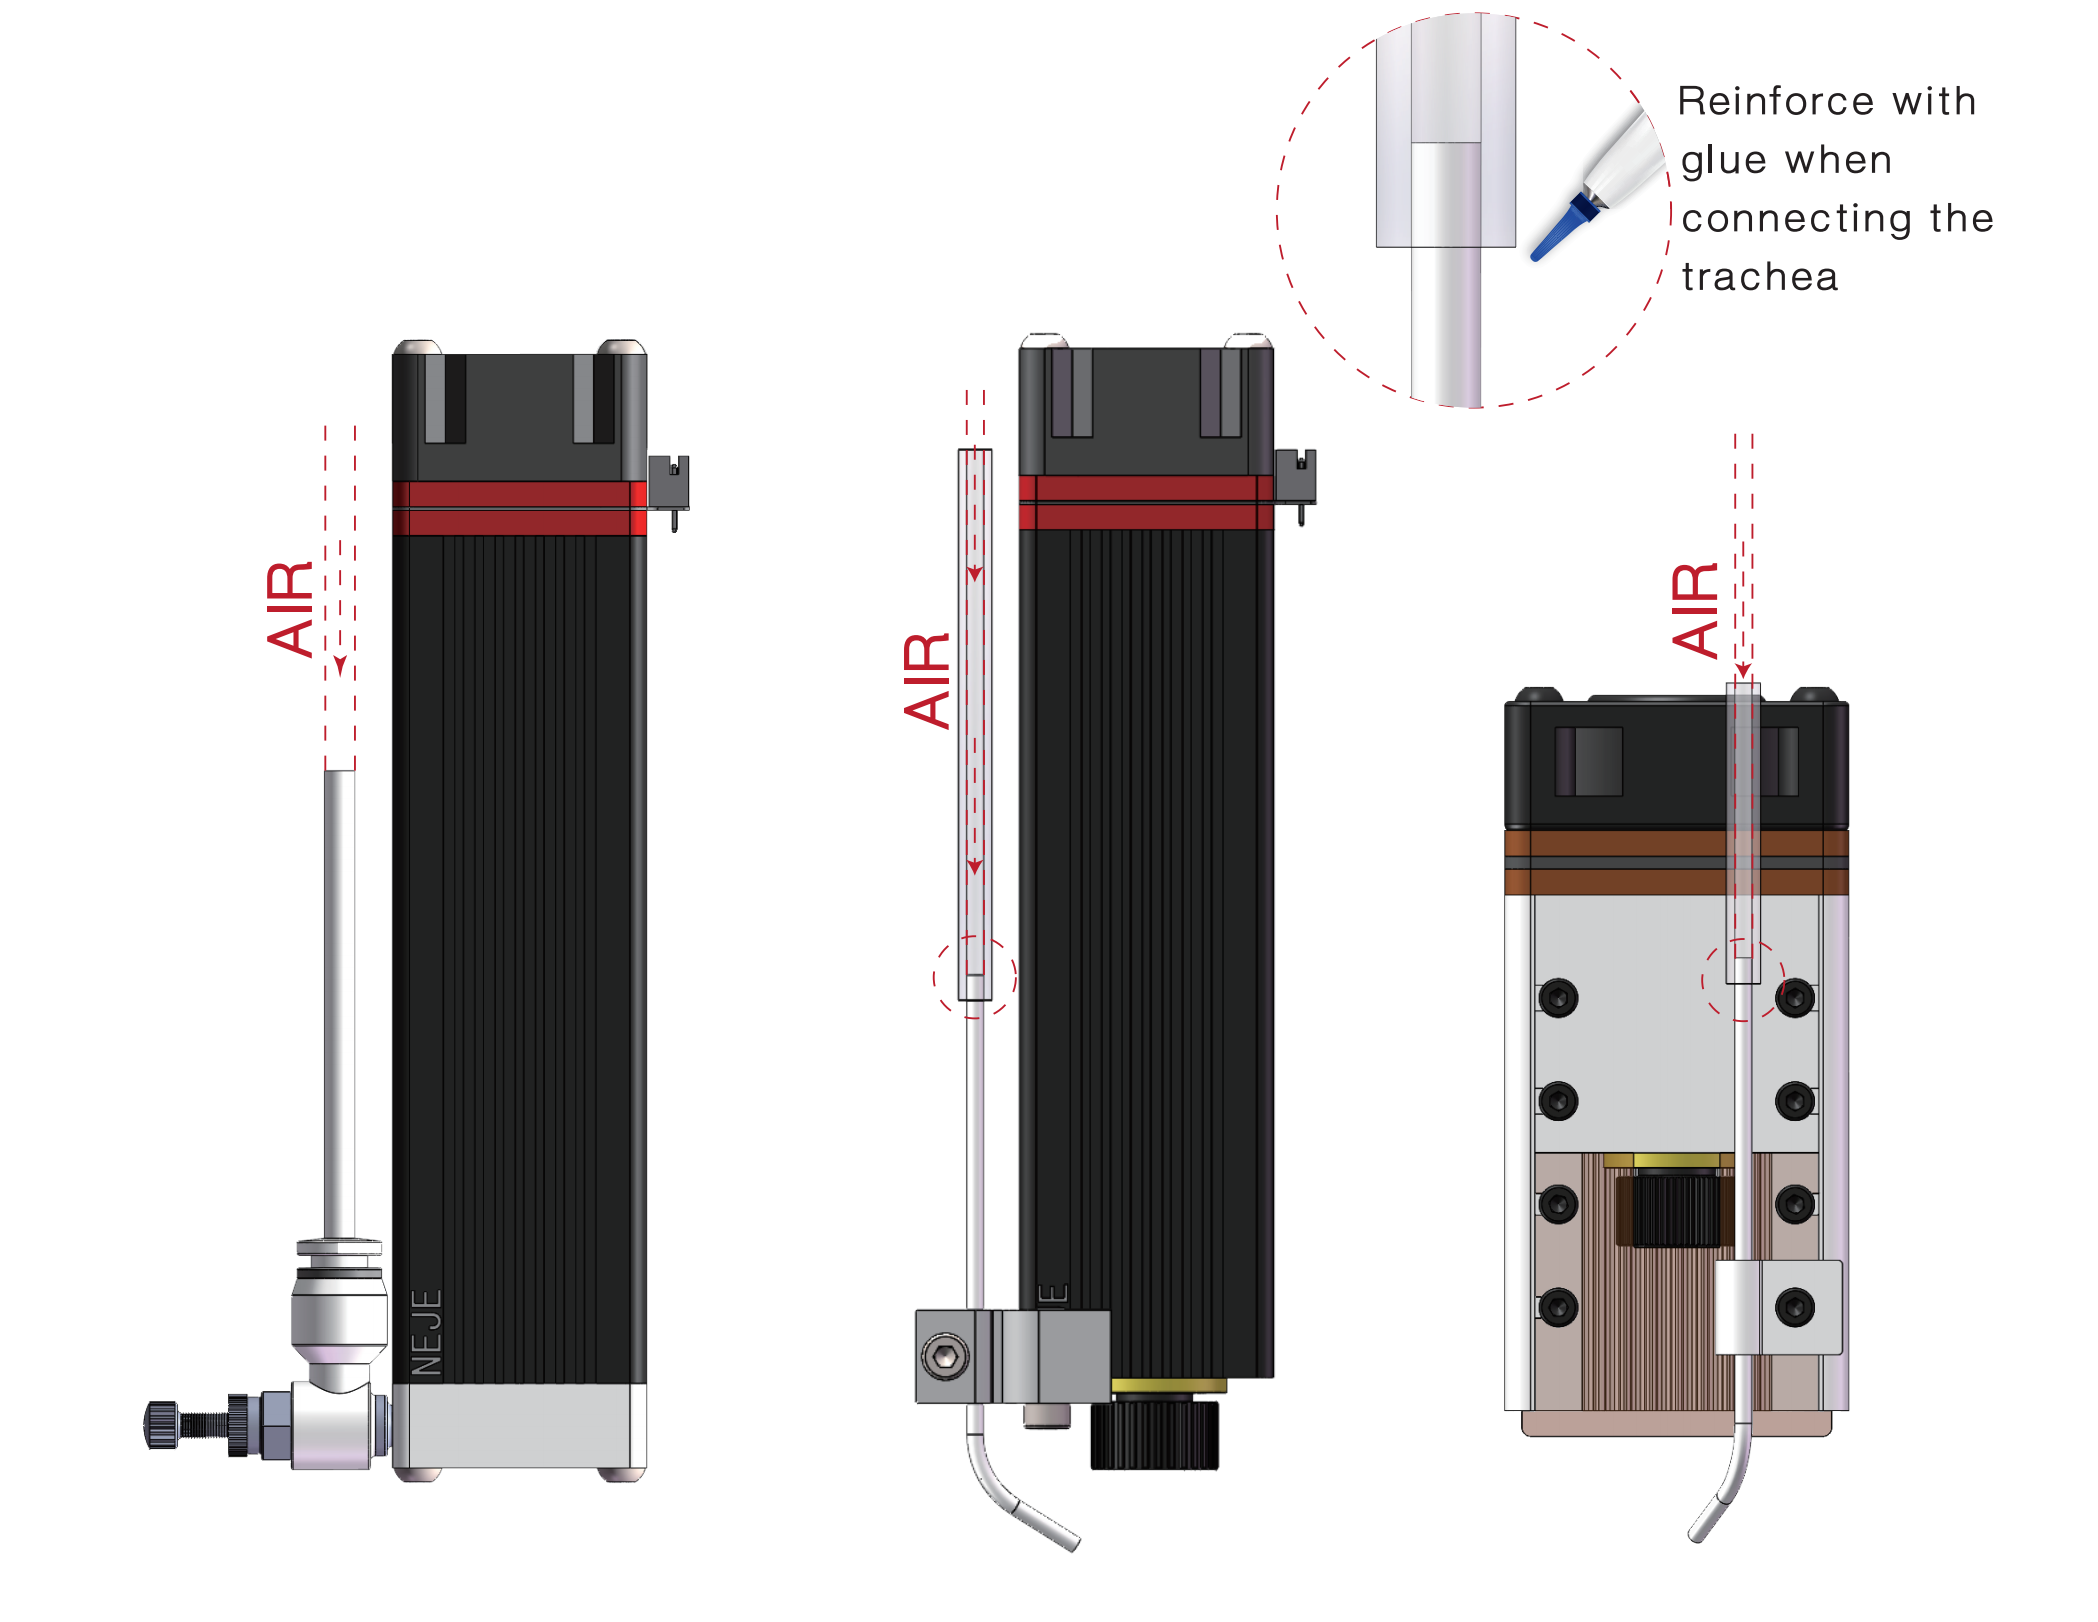
Step 6: Install air assist
- Please make sure that the air outlet is aligned with the focus point;
- Cutting MDF board requires 0.6-1.5mPa air pressure to efficiently clean the carbonized material;
- The air-assisted module designed in the cavity, try to choose a clean origin, oily or unclean origin may be Causes the lens to be broken at high temperature;
- A40640 modules and modules with similar external air sources can work without air assistance, and the modules designed with the cavity must work under the conditions of increased air assistance, otherwise it is easy to contaminate the lens and cause the lens high temperature rupture;
Step 7: Start Creating
Please set according to the material reference parameters, the actual effect will have errors, different material density, focusing accuracy, air-assisted air pressure strength and accuracy, whether the material is placed flat or not will affect the engraving or cutting effect;
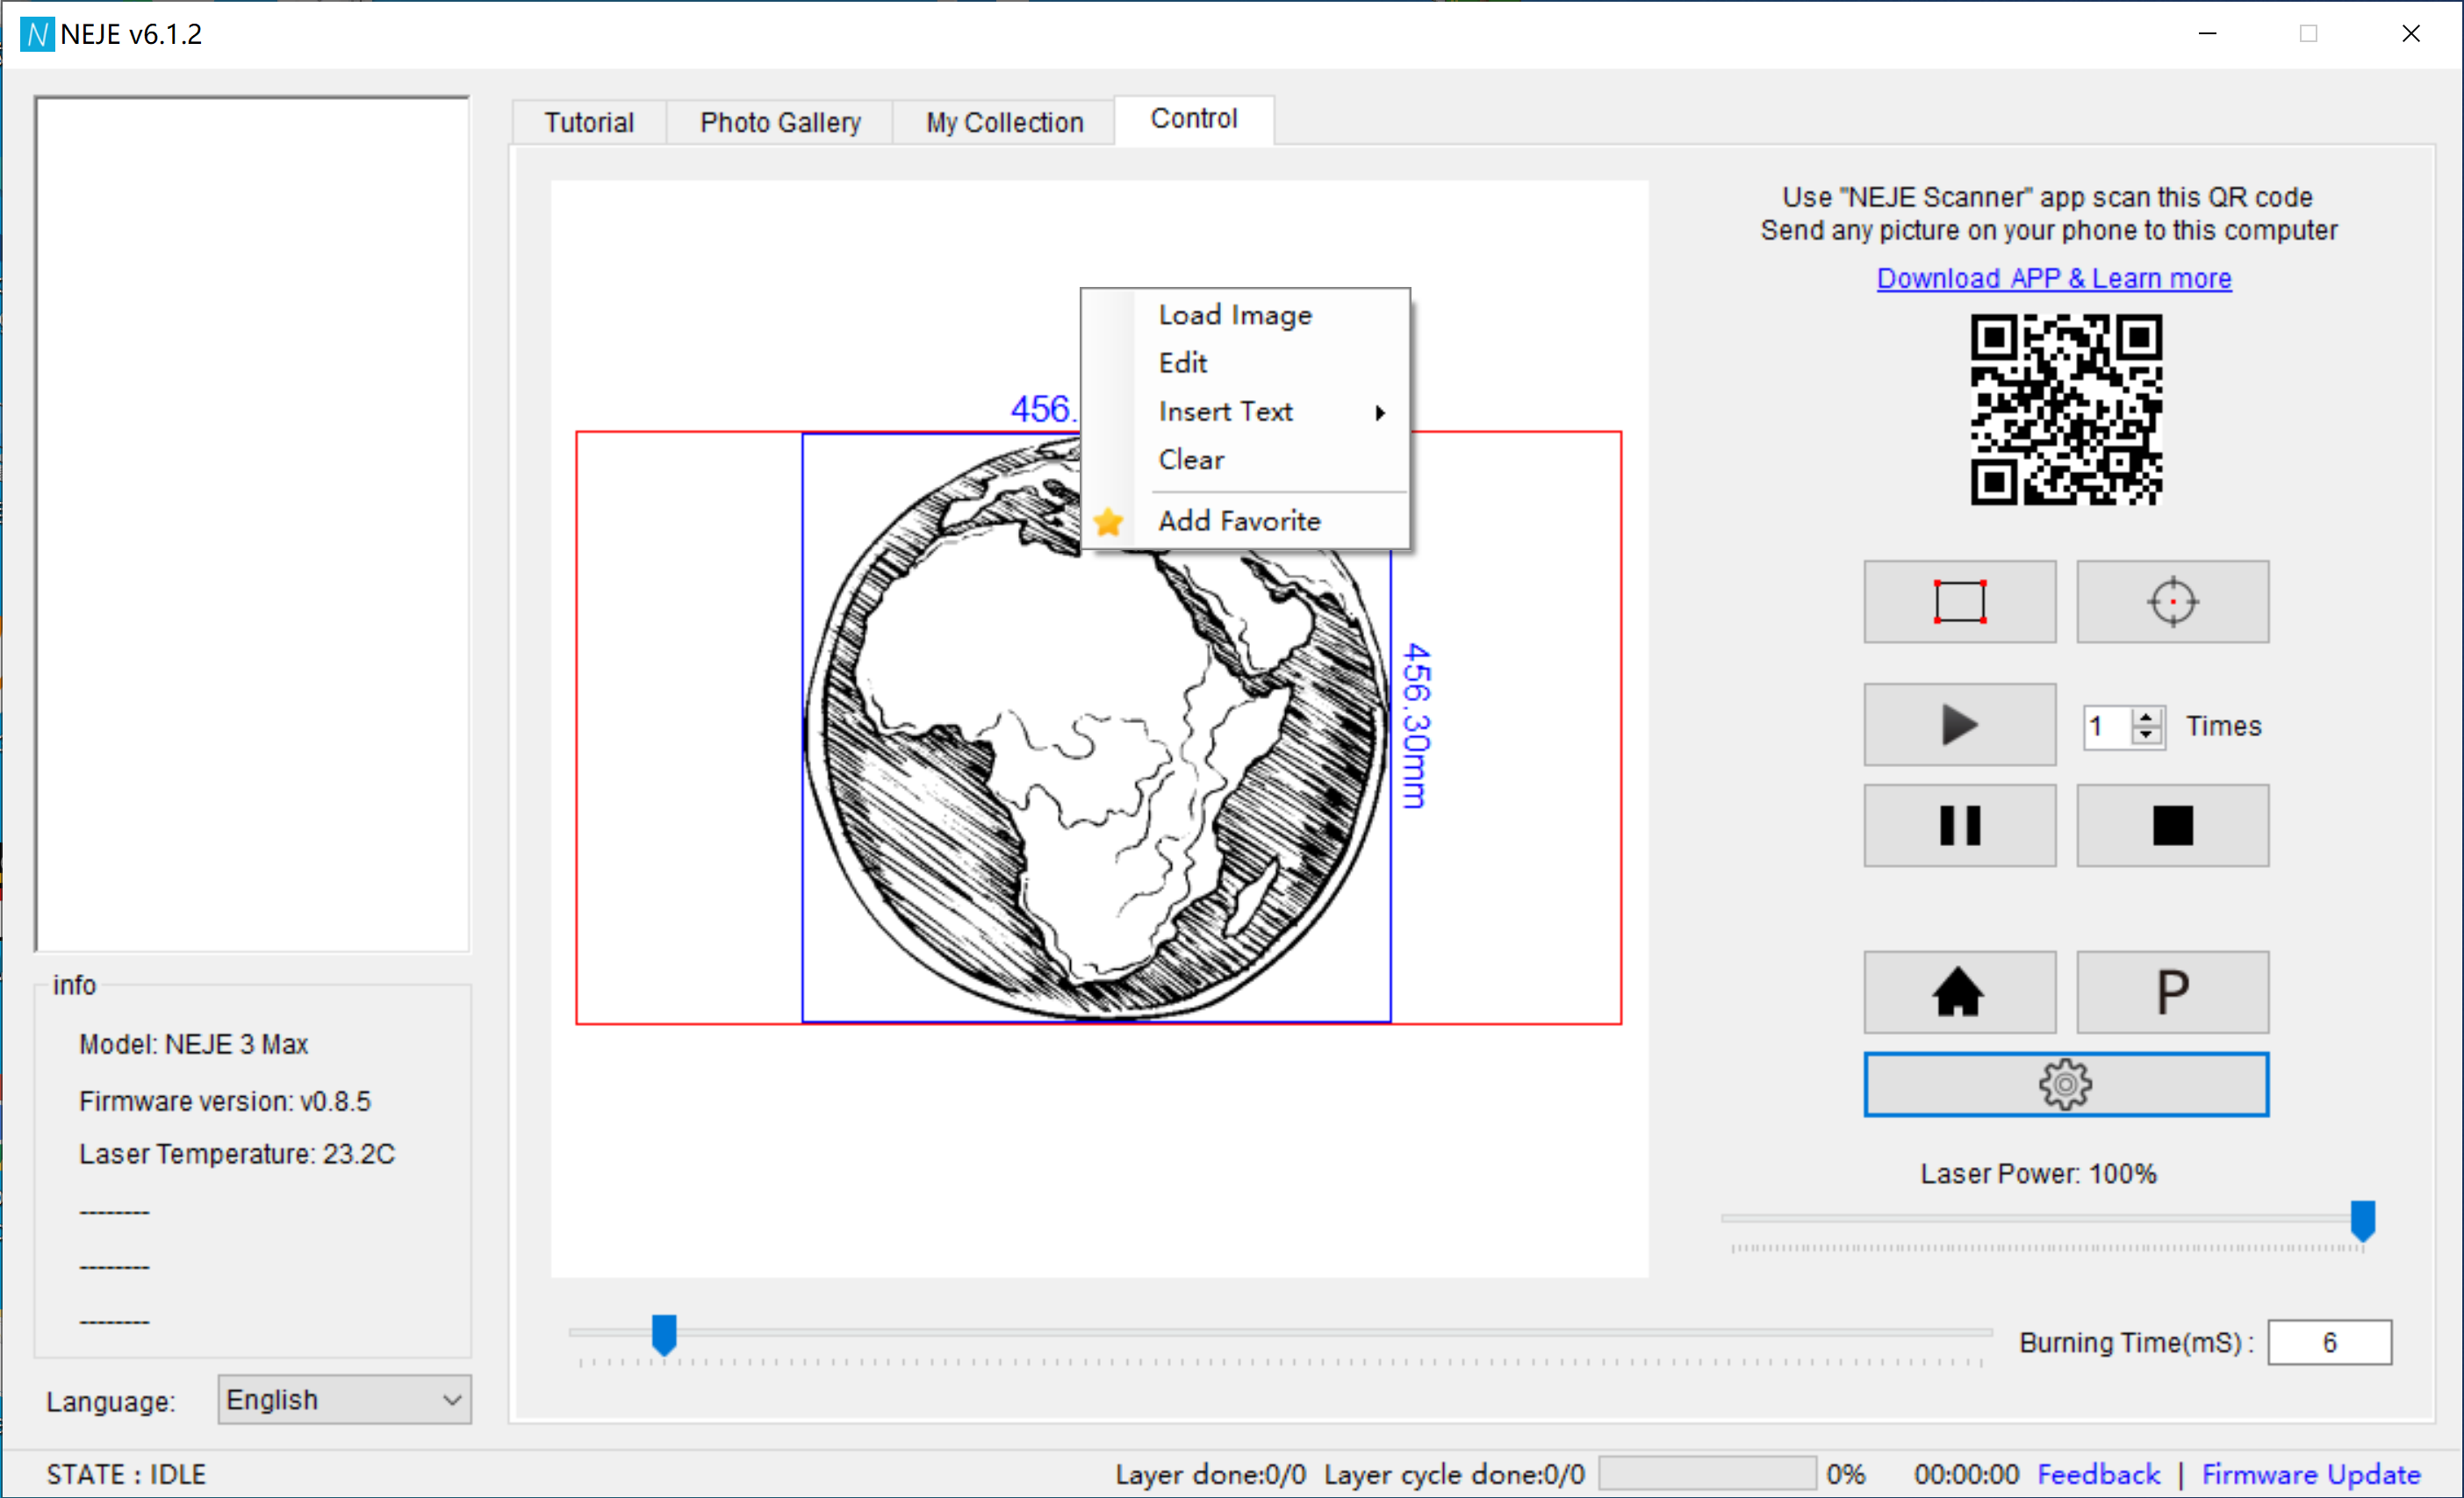
Start with NEJE Win Software
NEJE V6.1.2:
Choose an image (.bmp .jpg) from: Photo Gallery, My Collection, Load Image from My Computer, Insert Text, “NEJE Scanner”APP:
Cut the range that needs to be engraved:

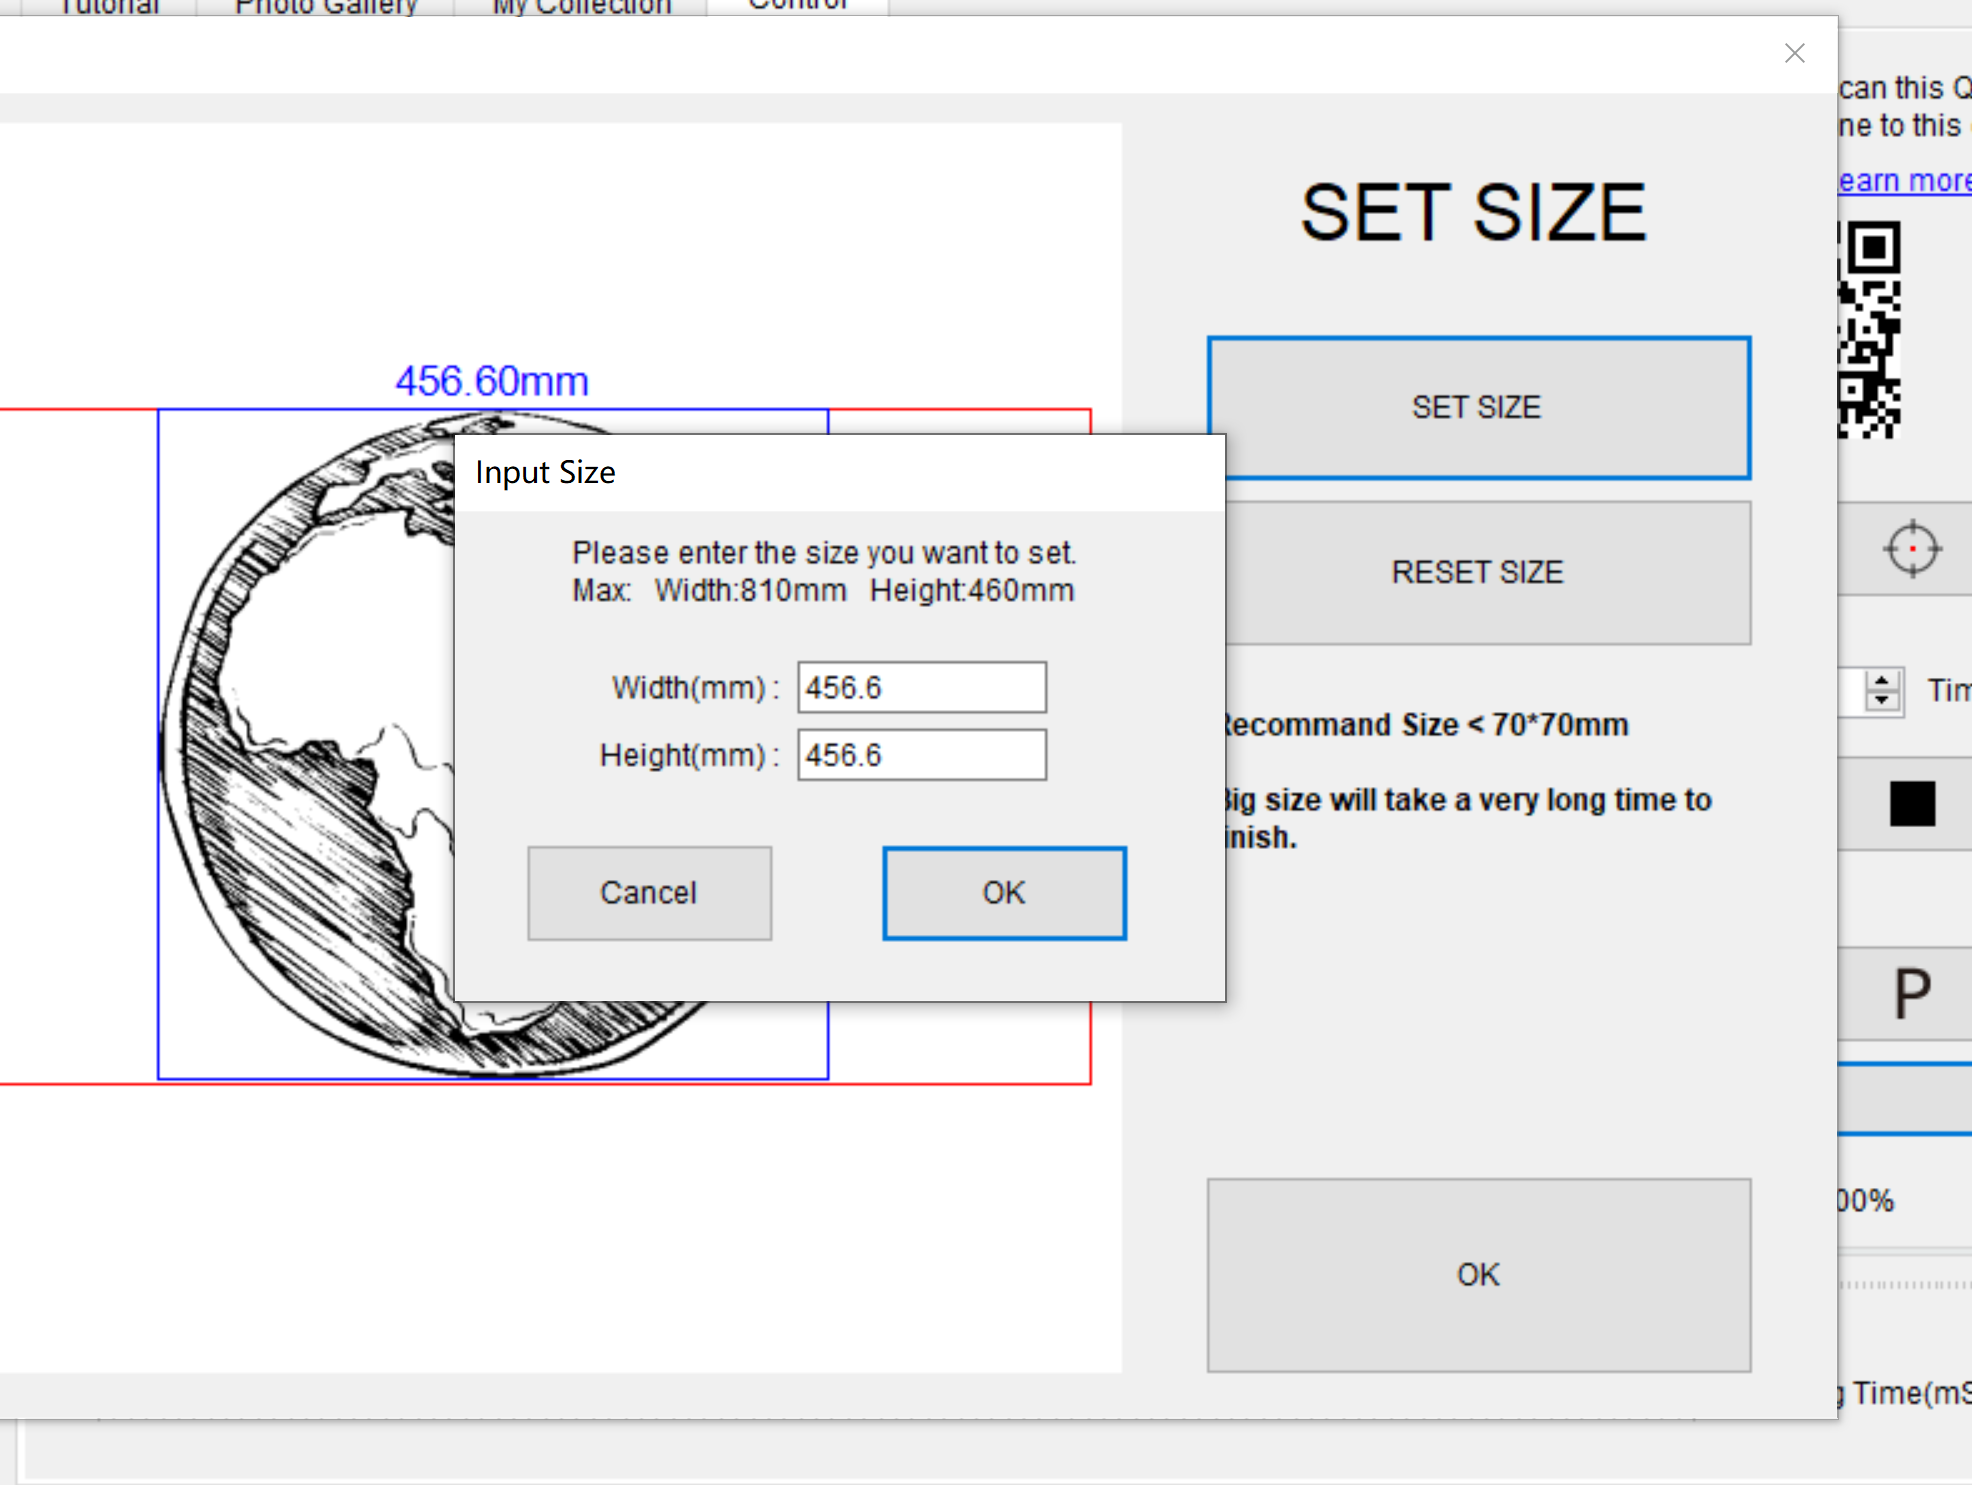
Set image size:
To adjust the rendering, or not to:
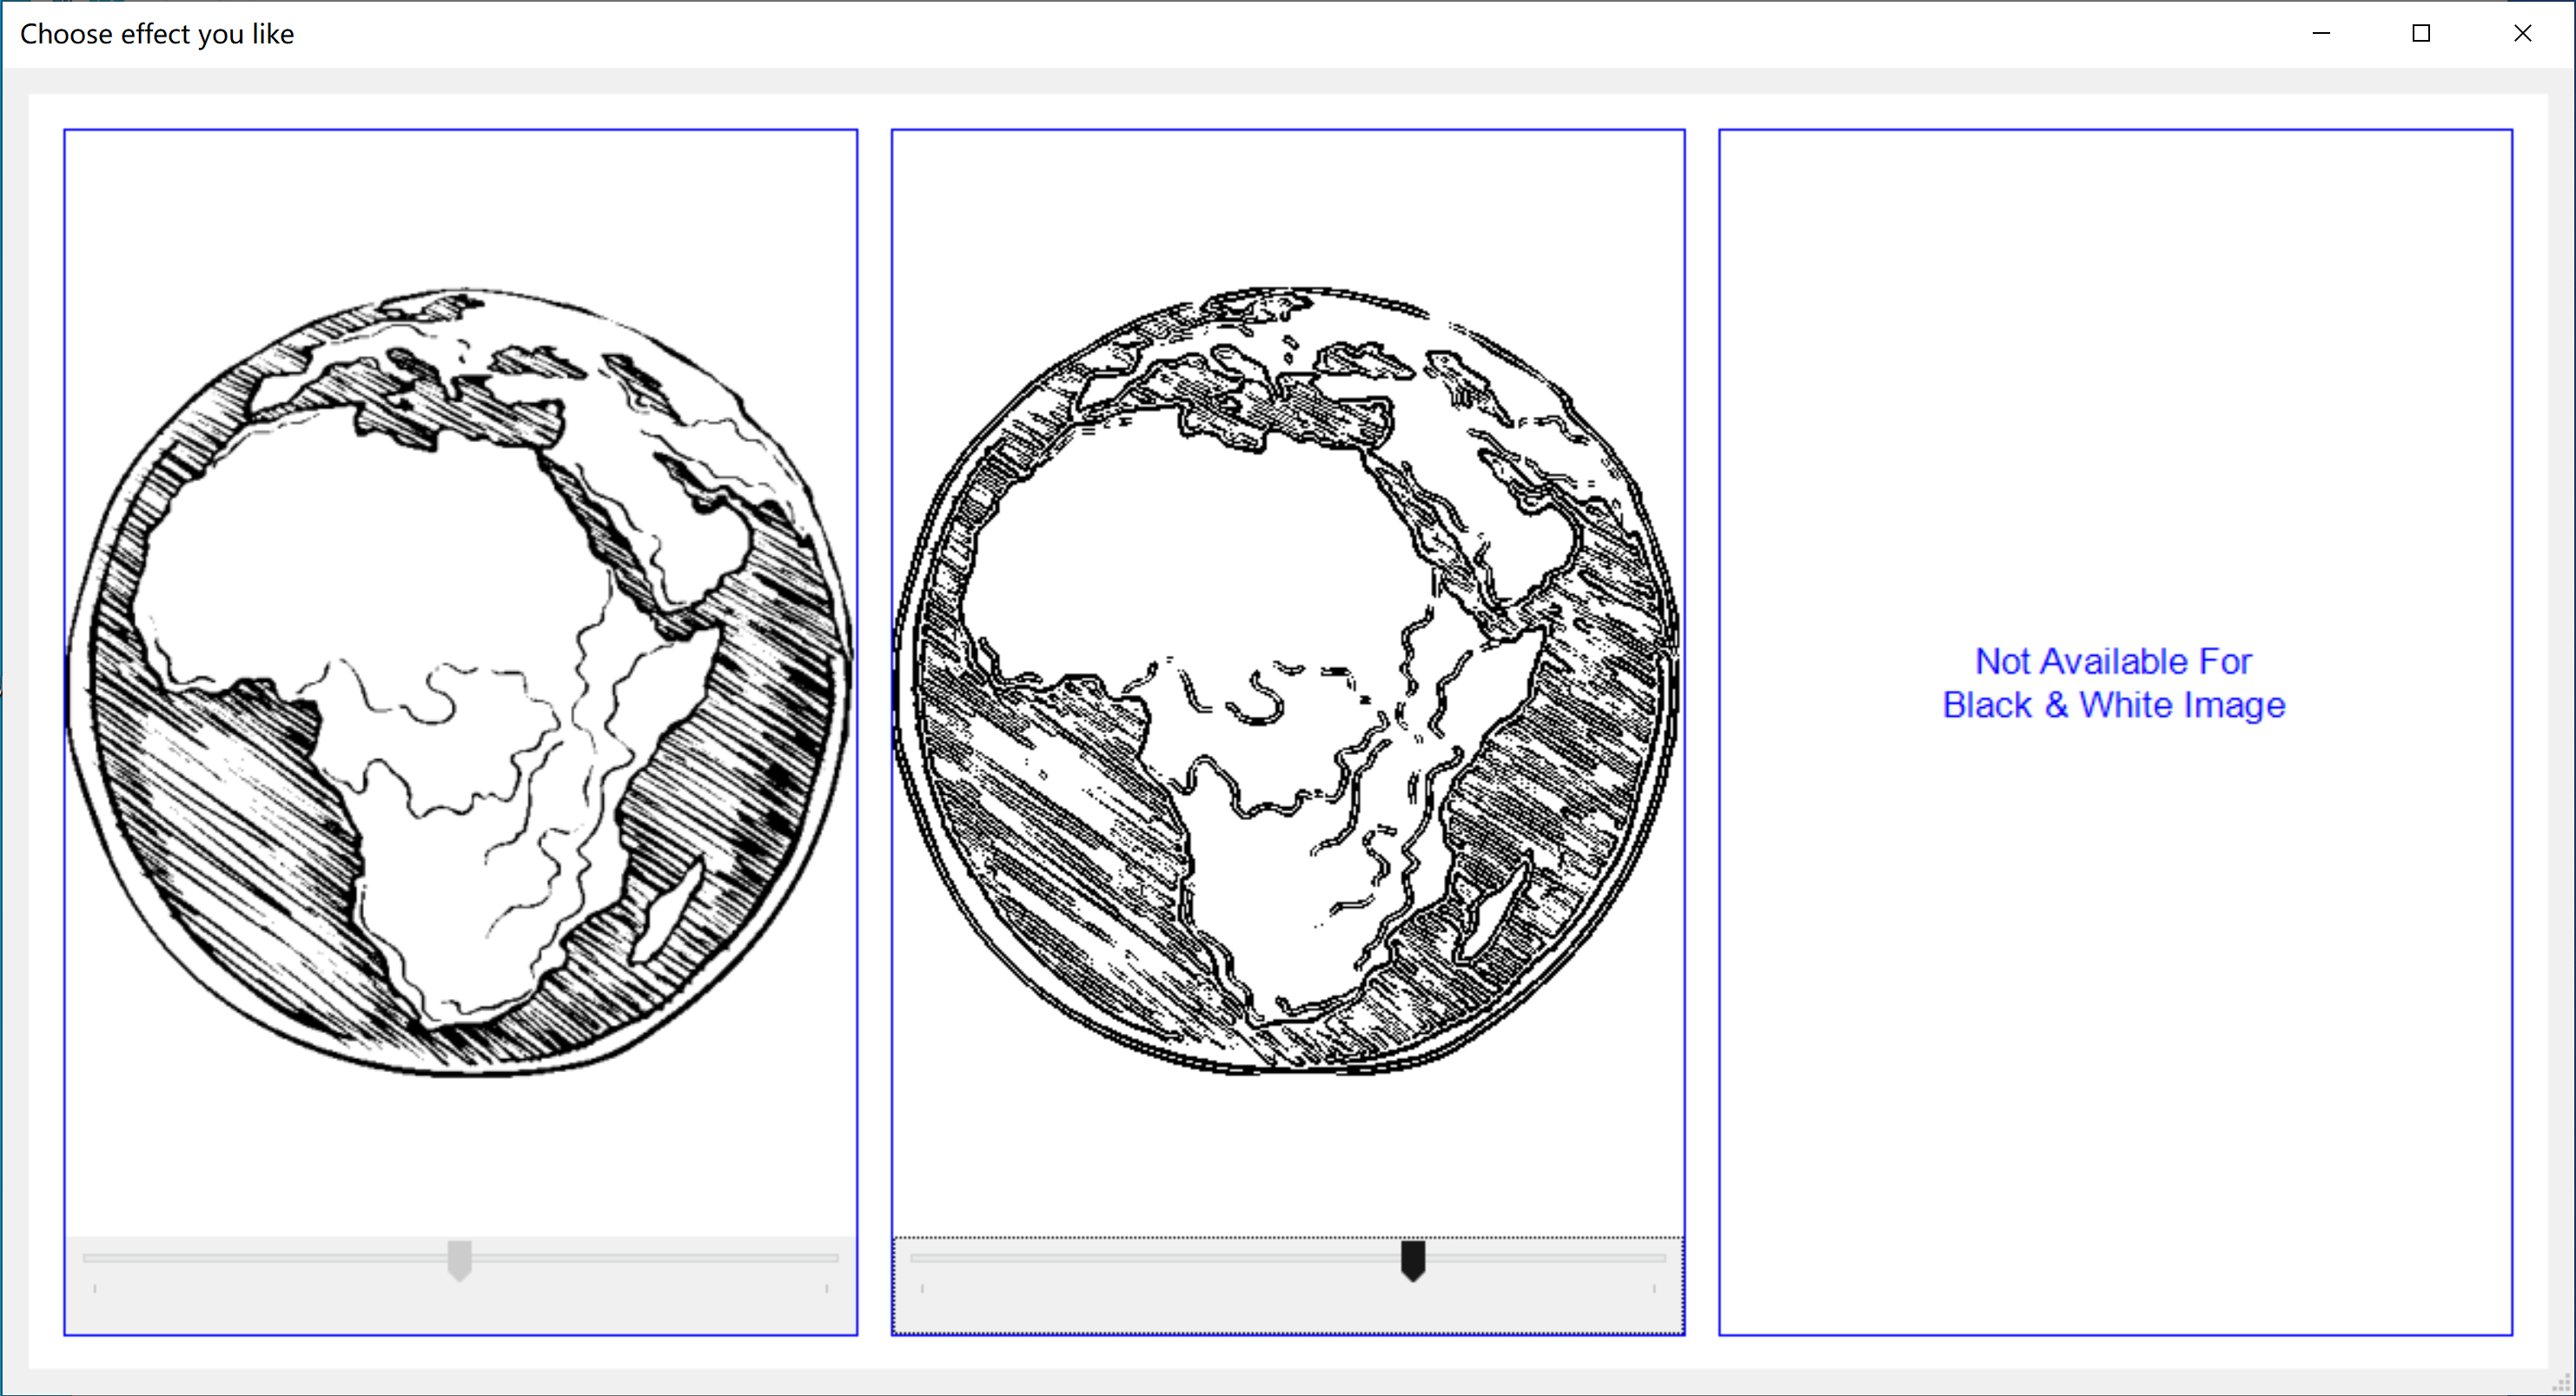
Special effects processing:

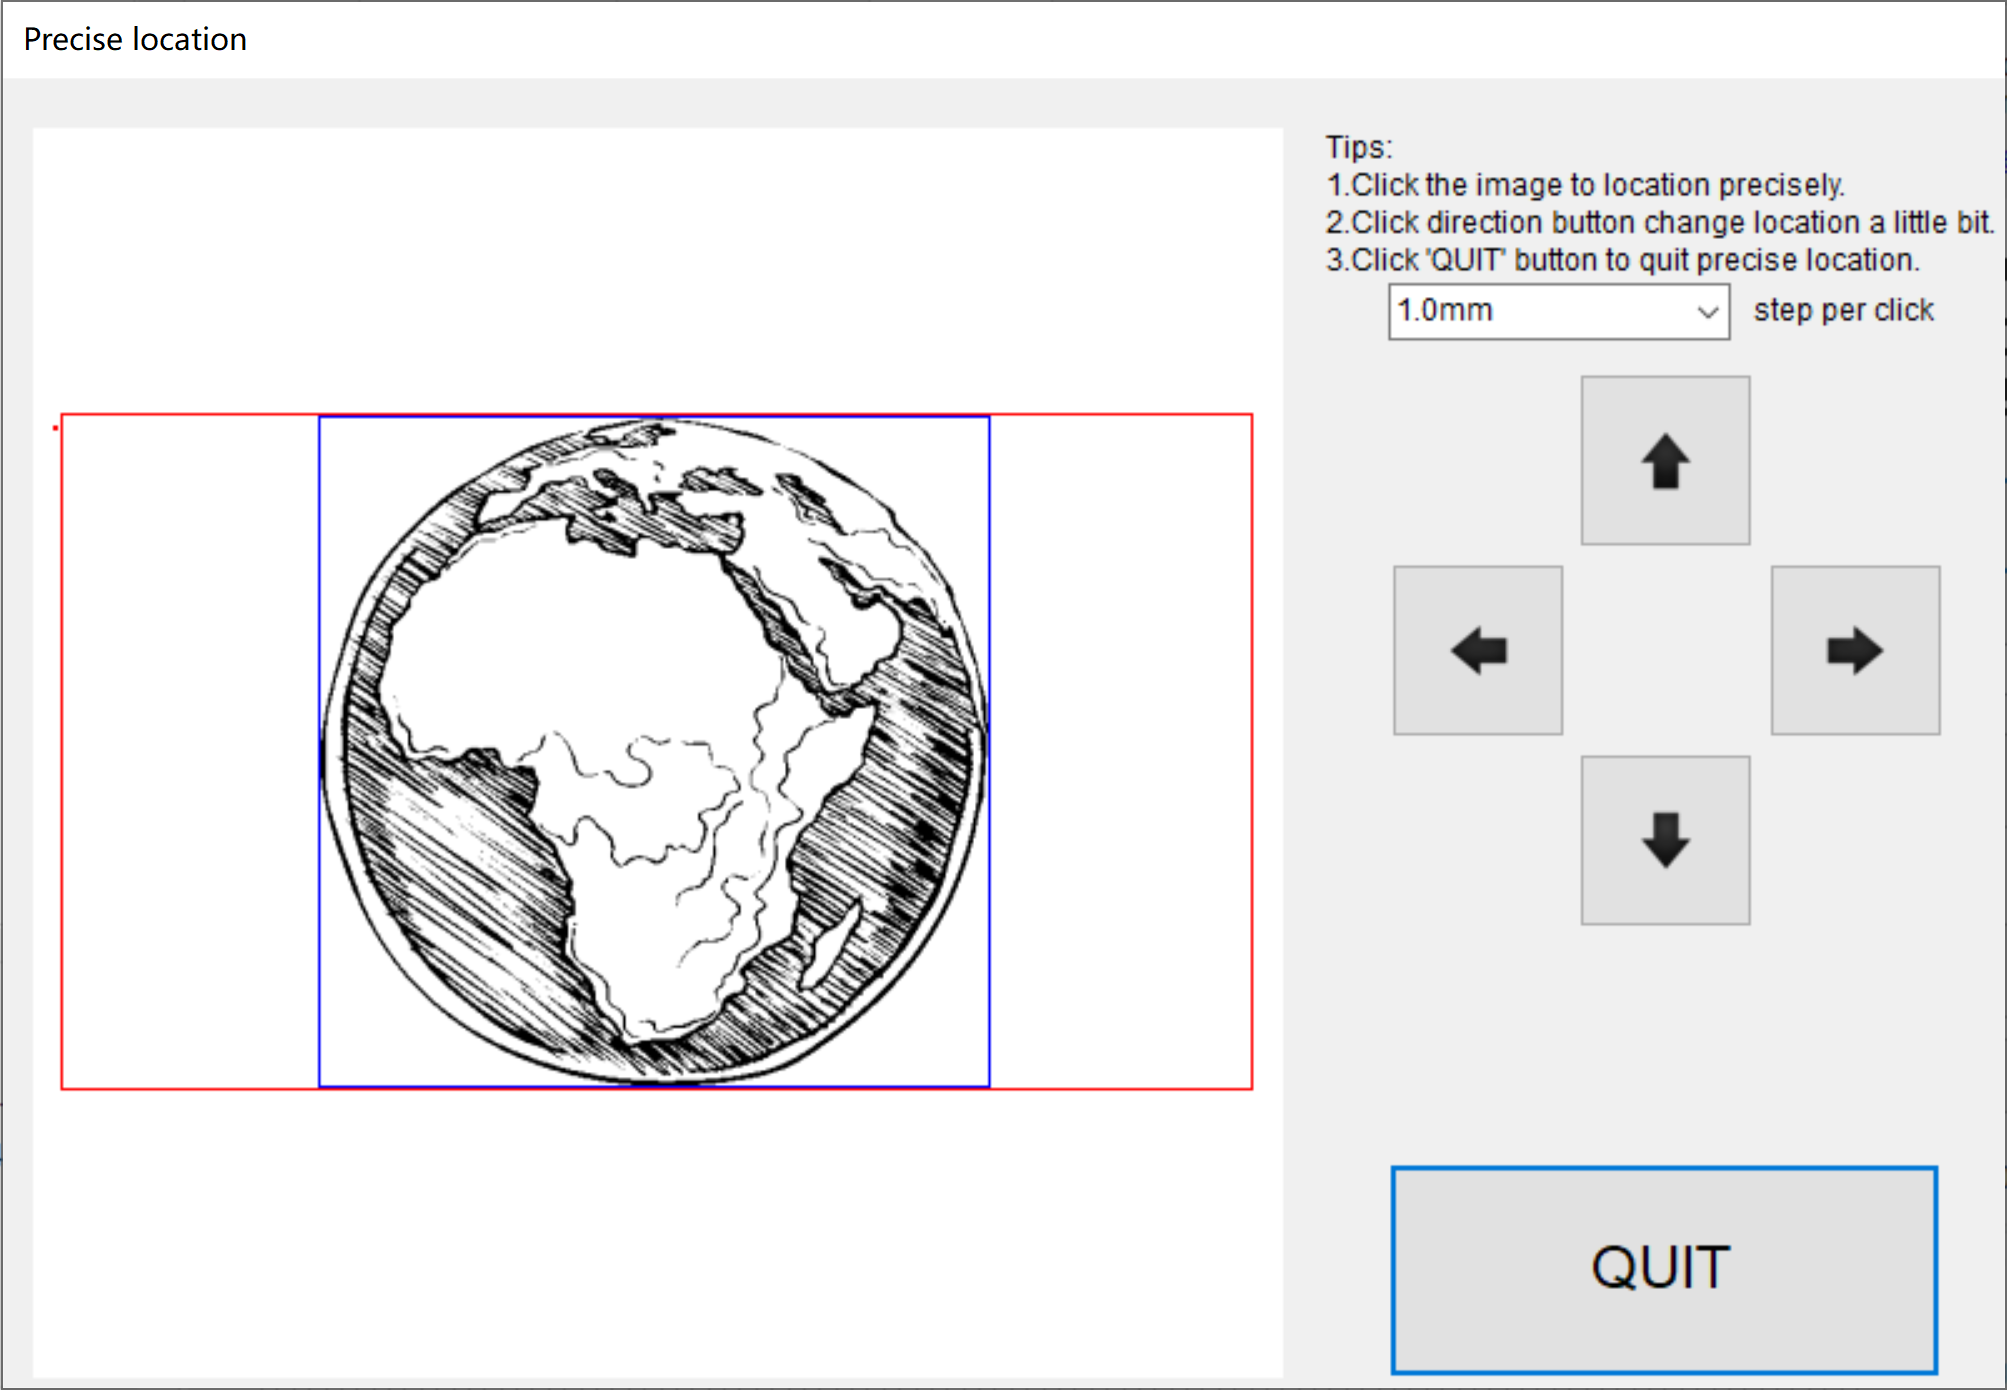
Box positioning:

Point positioning, precise control at 0.075mm accuracy:
Setting:

Firmware Update:
Start with “NEJE 3” Android APP

Start with laserGRBL
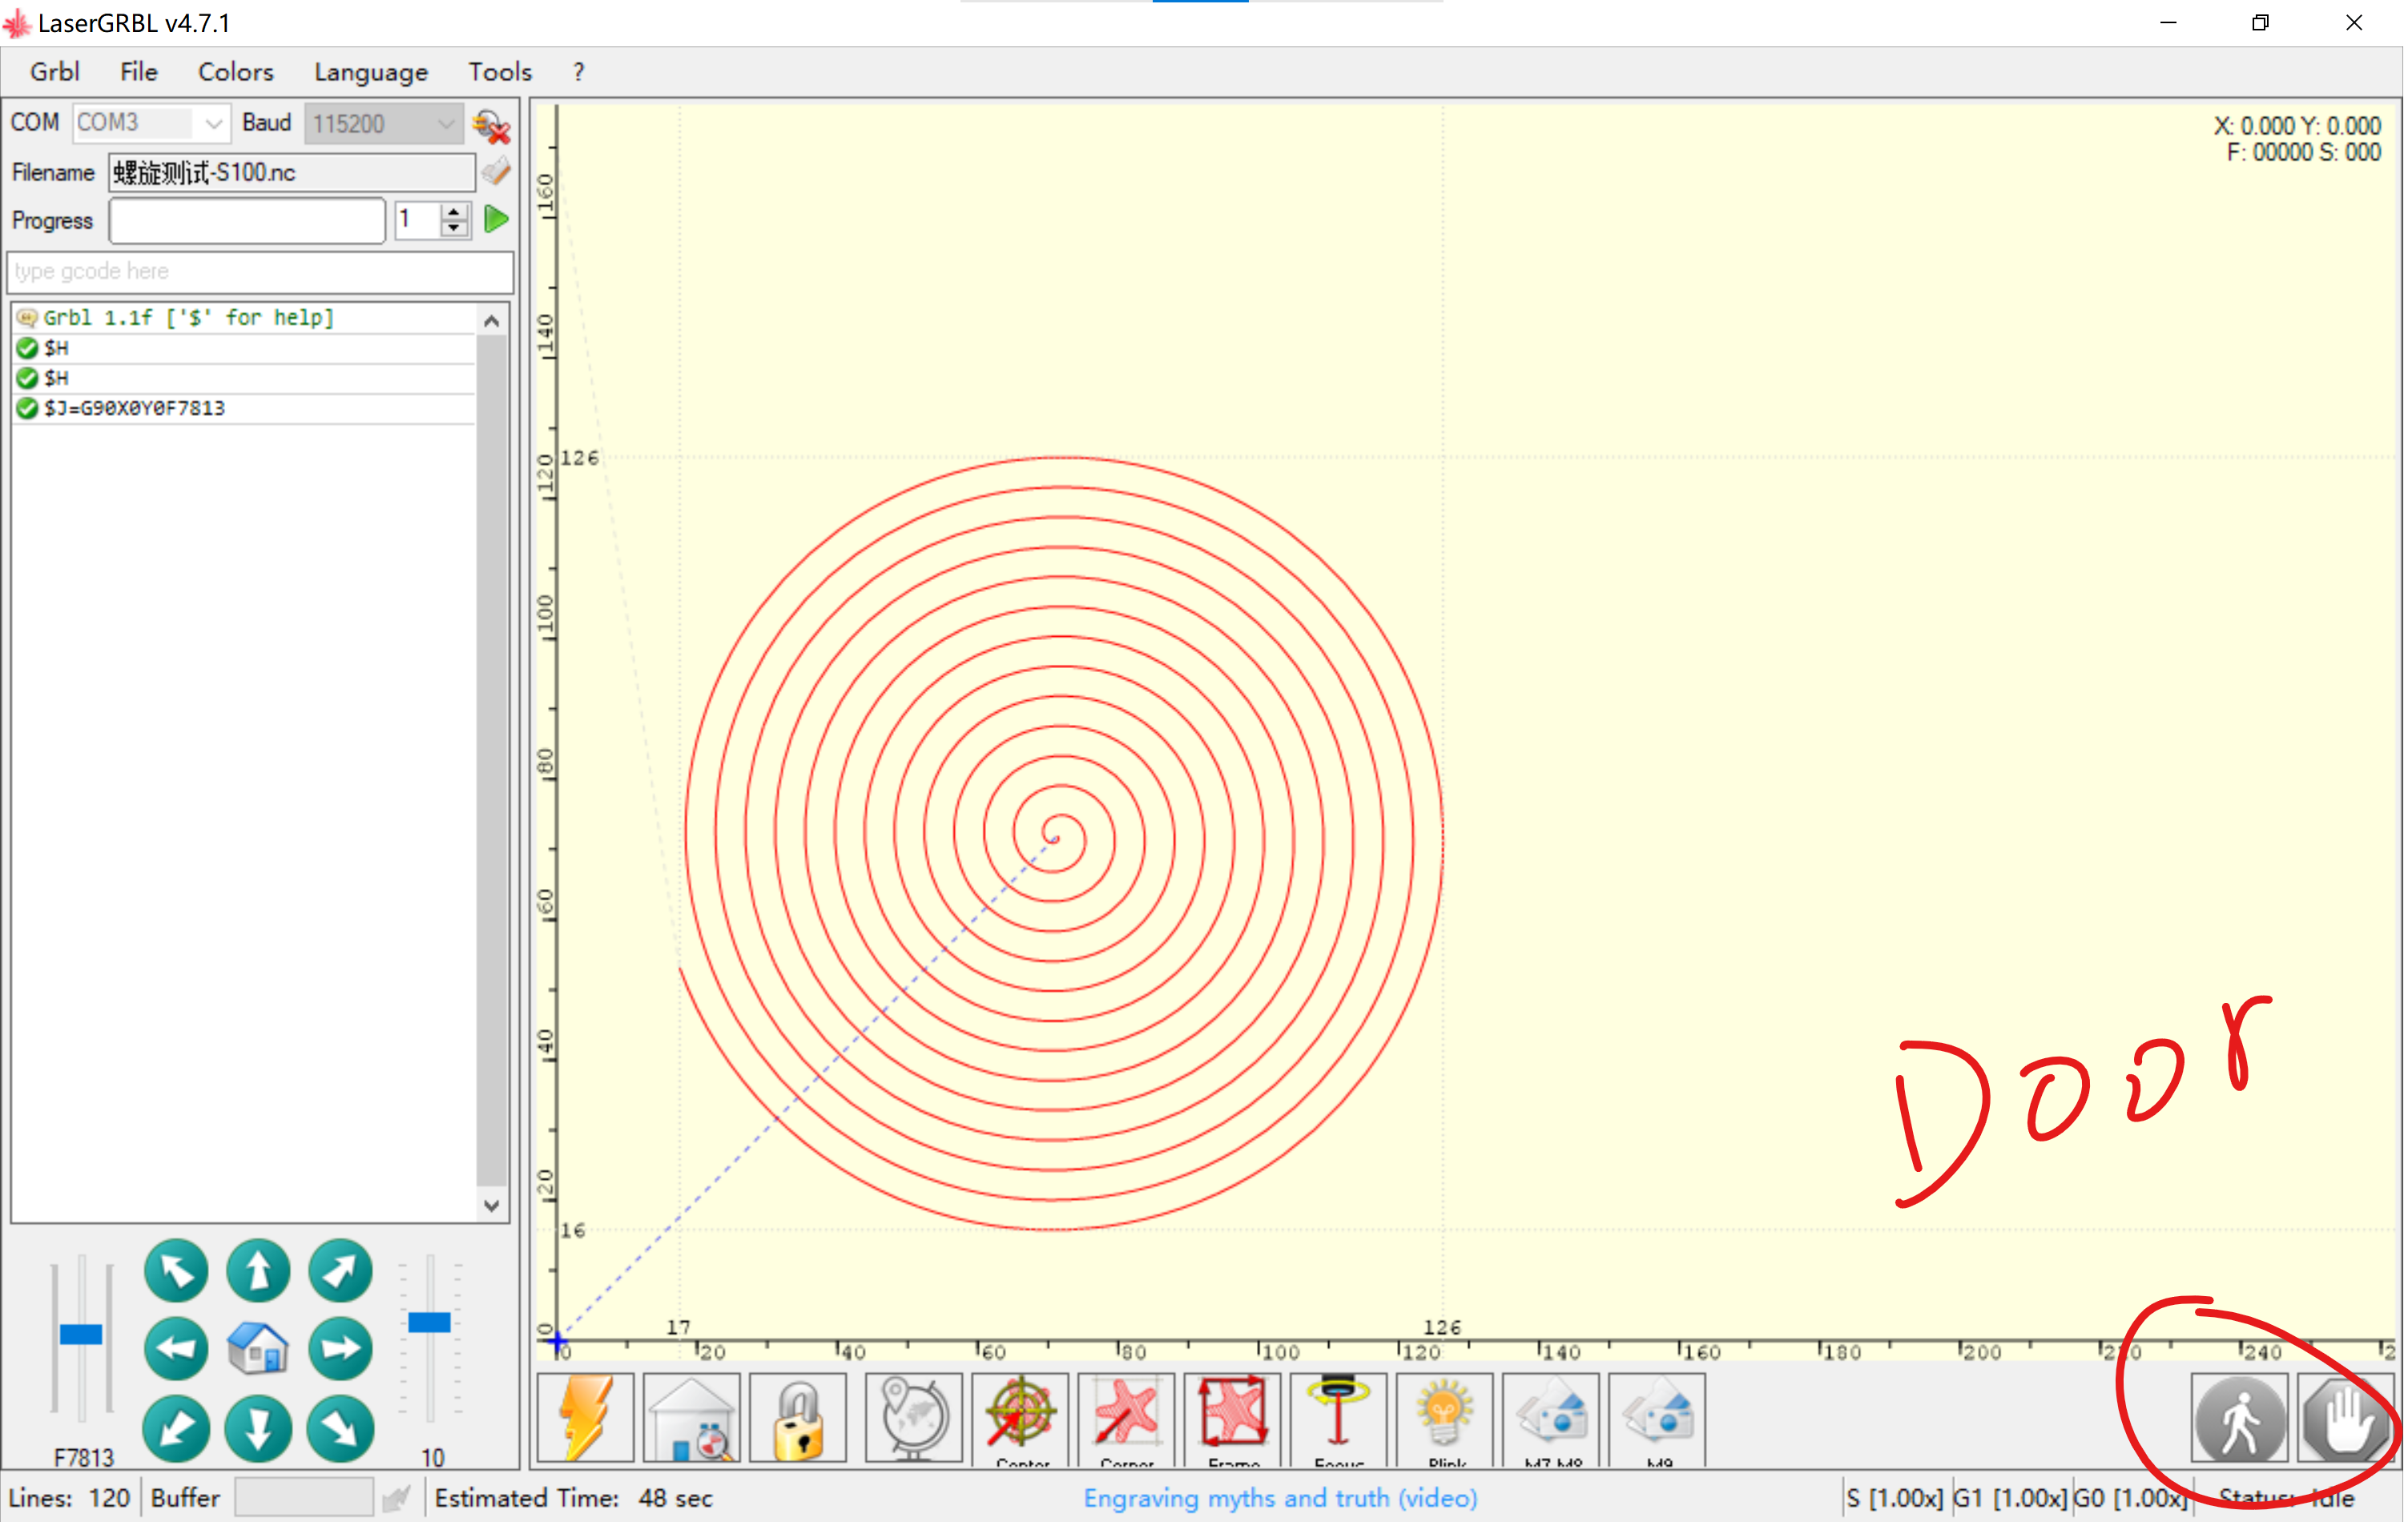
Please refer to the official instructions for laserGRBL. It should be noted that NEJE 3 Max has added M8, M7 and Door to adapt to laserGRBL. In addition to the low-light settings mentioned above, you need to add M8 to the .nc file to control the air to open, M7 controls the exhaust to open, M9 controls them to close;
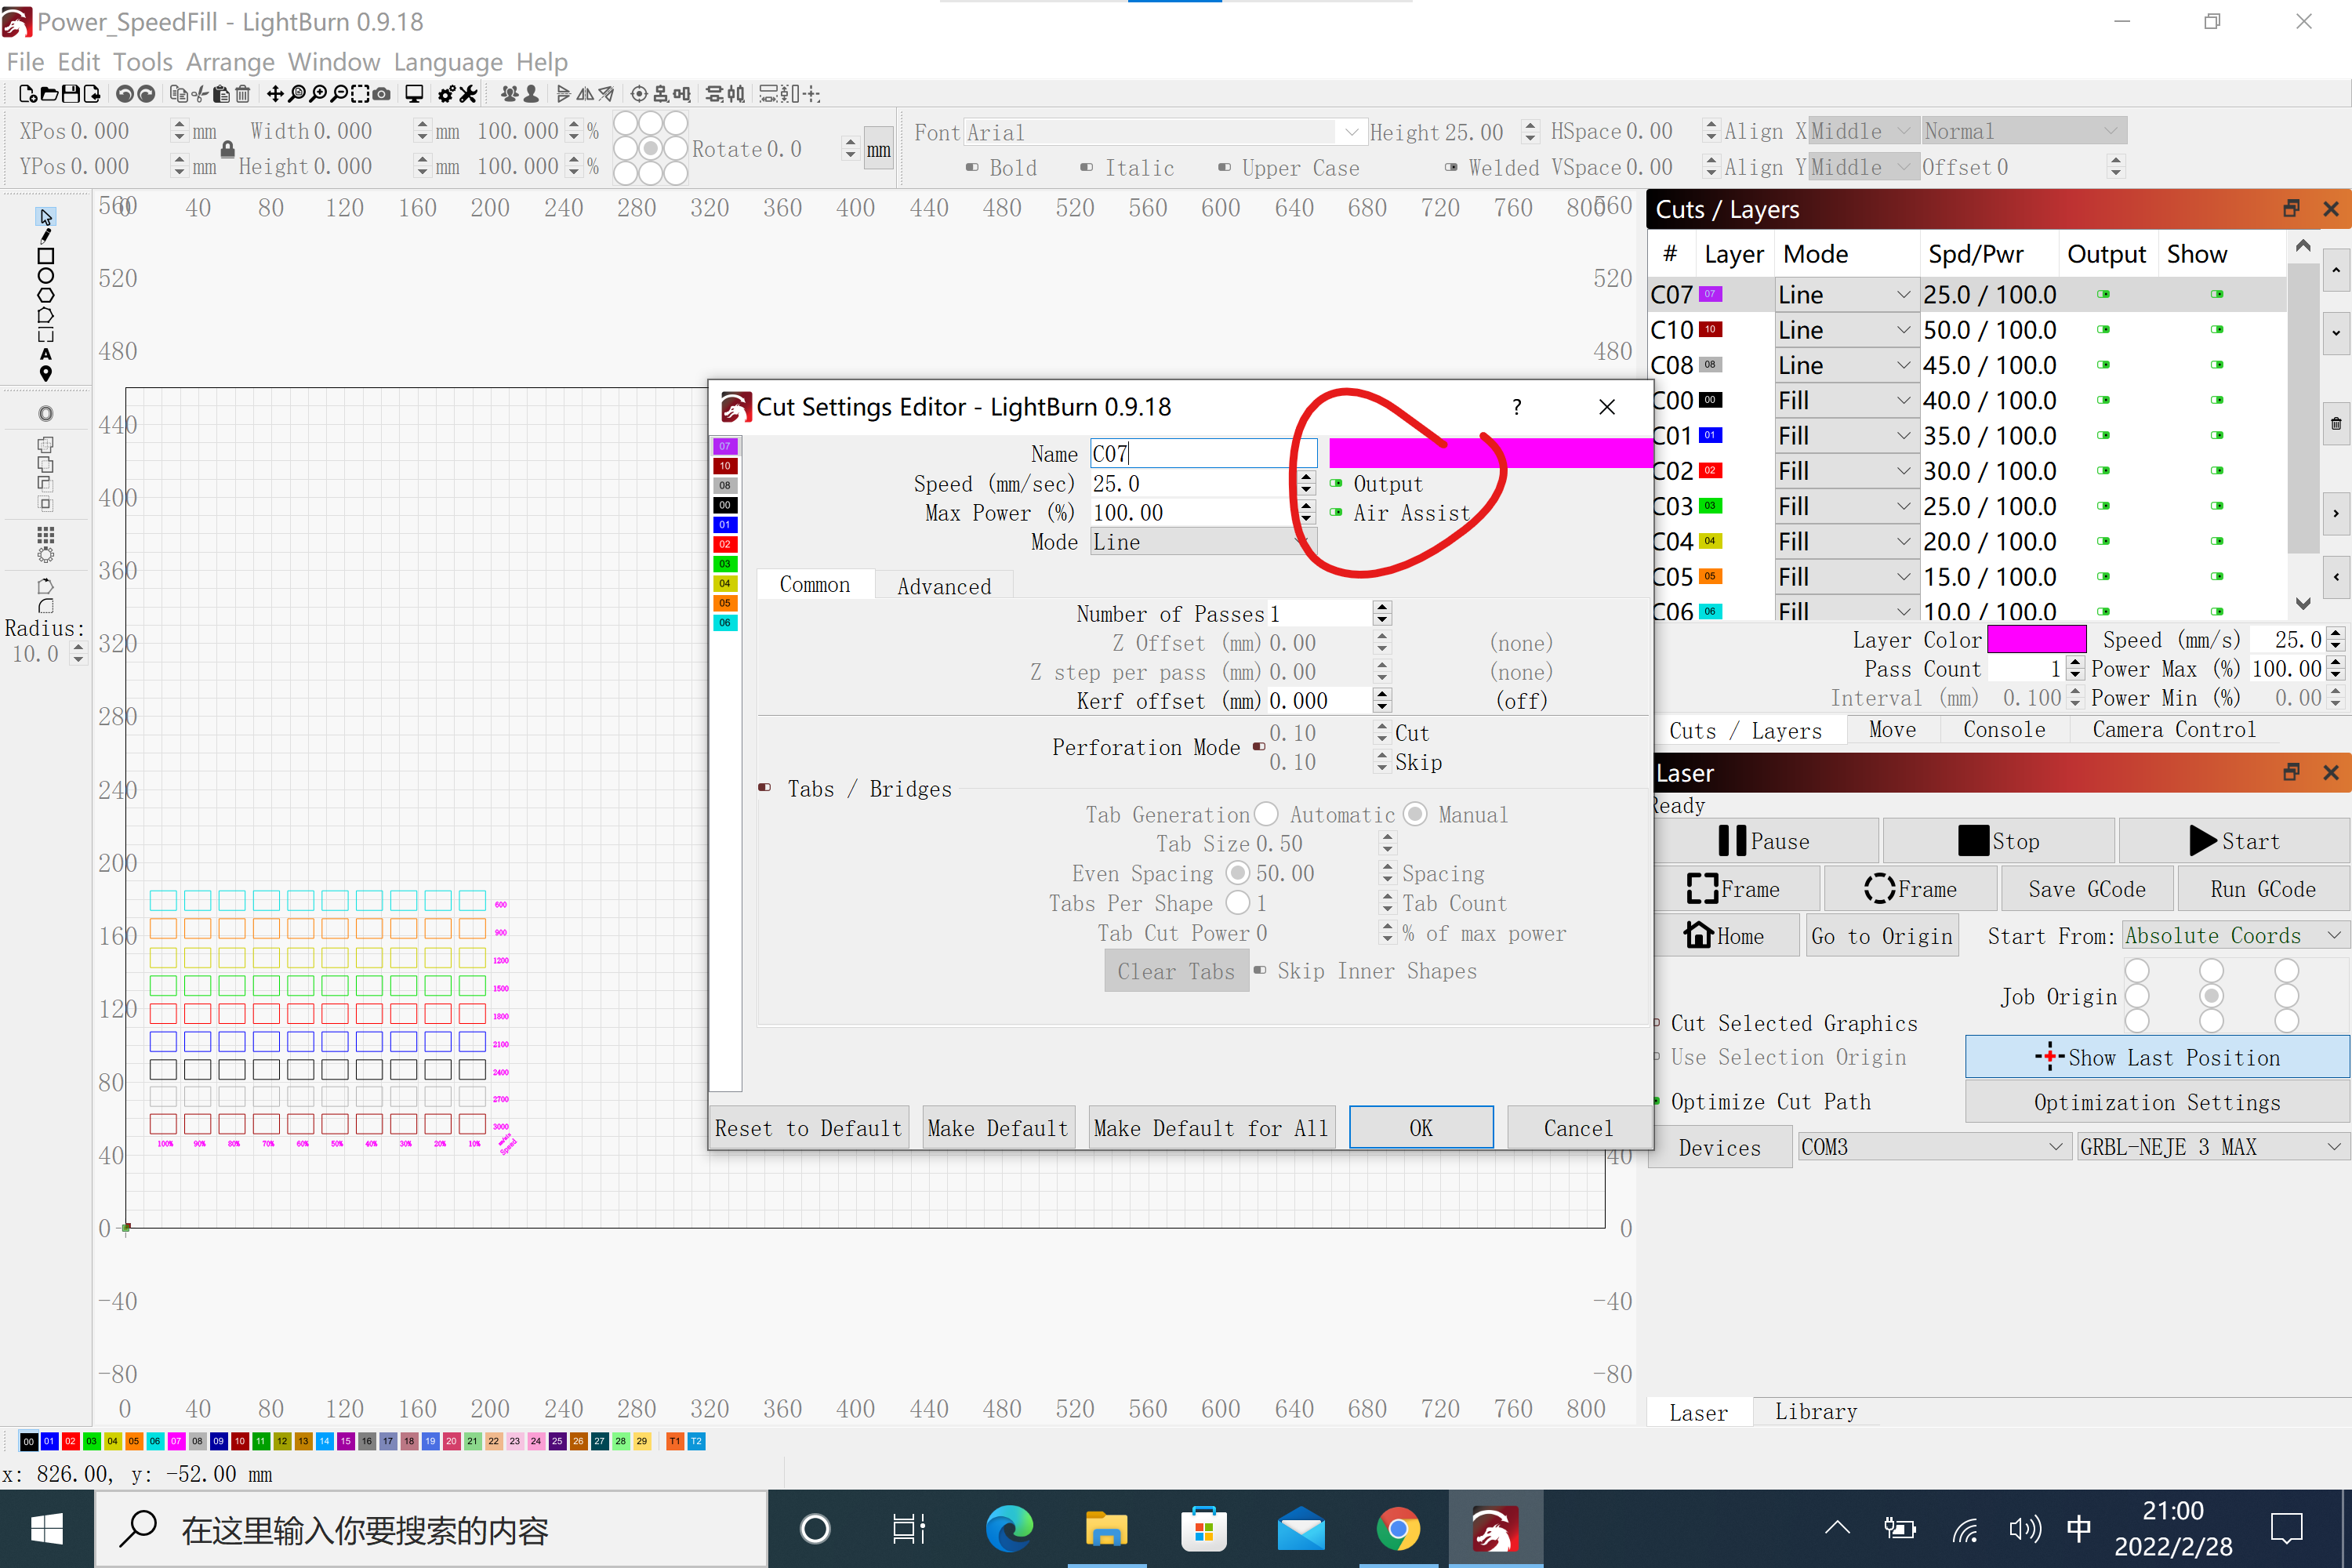
Start with Lightburn
For the use of lightburn software, please refer to the lightburn official documentation. It should be noted that the M8 function needs to be turned on in the lightburn layer setting, and the M7 needs to be manually turned on by referring to the previous method. Lightburn defaults to signal the M9 to turn off the engraving end, and the Door function only works in lightburn mode. Can be stopped, but cannot resume engraving after stopping, NEJE mode and laserGRBL mode can resume engraving after the Door function is activated;
Maintenance
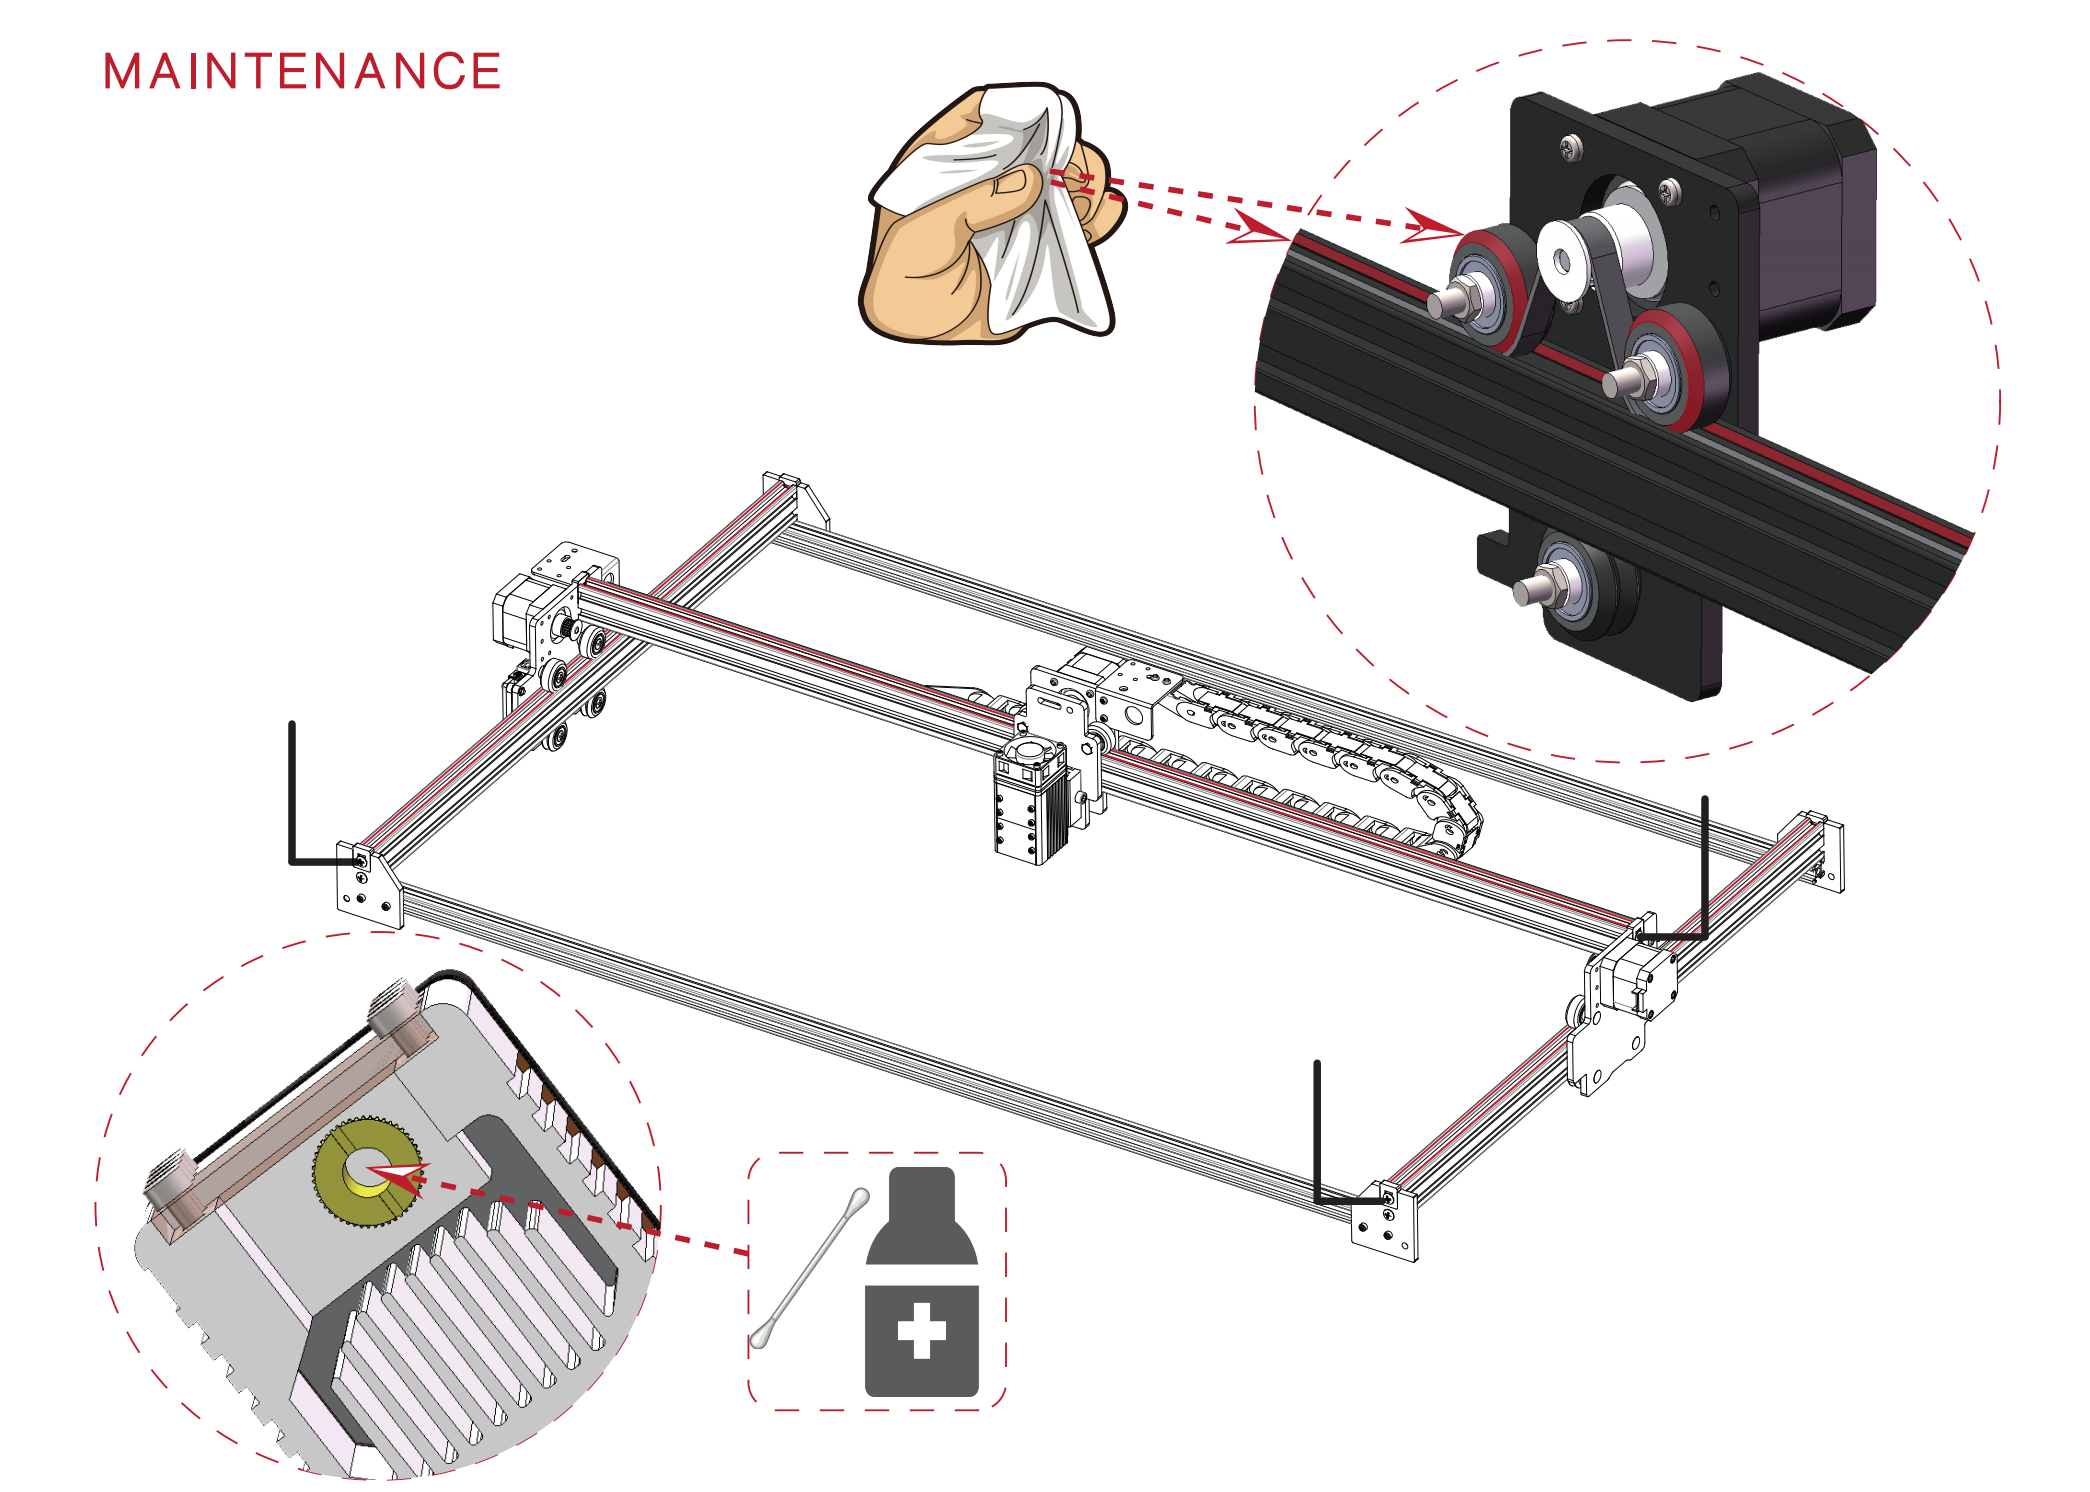
- Dust cleaning: regularly clean the dirt and dust on the tracks and wheels, and check the tightness of the timing belt.
- Lens cleaning: Smoke from engraving or cutting, or oily air sources may contaminate the lens. After contaminating the lens, the lens will be broken due to the high temperature of the laser. It is recommended to use alcohol to clean the lens surface frequently;
- Moisture-proof storage: If your laser machine is not used for a long time, we suggest adding some anti-rust oil to the metal places such as the screws and bearings of the machine to avoid metal rust, and store it in a dry environment.