Table of Contents

NEJE Max 4 20w laser engraver, wood Laser Cutter, laser wood engraver, cnc laser cutter machine for wood, mdf, plywood, leather, stone.
What NEJE Max 4 has improved
- 750(X)*460(Y)*45(Z)mm working area, the Y-axis can extend the track by 1030mm. In the 3-dimensional space, it can support simultaneous processing of various items of different thicknesses. Compared with the ordinary 400x400mm frame, the work efficiency is increased by 400 %.
- It is a revolutionary solution to the fire safety problem of high-power modules. Through the Z-axis layer-by-layer cutting mode and the unique optical cutter design of E80, it can safely cut 17mm pine boards without fire even in the absence of air charge.
- The cutting efficiency is increased by 200%, which is higher than the cutting efficiency of 40W (optical power) module. The perfect optical design of NEJE E80, by optimizing the beam structure and adopting more complex manufacturing technology, makes the E80 focus power density and beam angle perfect State, in the case of 1 times the difference in power, it can even achieve the same cutting speed, and the incision is smaller, avoiding the problem of trapezoid and XY asymmetry.
- Realize the wireless offline of lighburn work files, NEJE adopts the built-in virtual command mode combined with Bluetooth technology, wirelessly transmits and controls the professional multi-layer gc files through NEJE, NEJE retains the “One Key Start” function, eliminates the backward sd card mode, and allows the device Work no longer hogs your computer.
- The standard pen module can draw images through the pen tip, and even give children and beginners the experience of CNC. The pen tip can also be used to draw paths and pre-process advertising materials that cannot be processed by laser wavelengths.
- 24000mm/min processing speed, faster peak speed than 400mm frame, the combination of Max 4 and NEJE high-performance modules makes the work efficiency reach an excellent state, with NEJE A40640 high resolution and high pulse energy module, it can draw 300x300mm. The work only takes 10 minutes, and the drawing performance of the ultimate art work reaches the peak.
- X, Y, Z-axis repeat positioning accuracy reaches 0.001mm, XYZ axes are equipped with automatic reset, repeat positioning accuracy after reset can also reach 0.01-0.001mm, X-axis adopts industrial linear track, Y-axis adopts NEJE special design diamond cutter Cutting straight track, with stronger service life and precision.
- Industrial-grade structural precision, all parts of the new Max 4 machine are calibrated by high-precision industrial master machine, straight line track correction, precise matching of each plane installation direction, so that the module operation is more accurate and stable.
- The anti-shake pattern design can achieve no wave pattern under such a large-area and light-weight device. NEJE has specially customized alloy materials with different hardness, and through matching and reasonable shock-absorbing design, it can effectively eliminate the jitter troubles during precision drawing.
- New built-in anti-static discharge design, the device will be more stable and reliable.
- Compatible with all 12V and 24V modules of NEJE (currently only E80 is a 24V module), realizing the application of different materials and different process requirements.
- Support vertical work, save space, and flexibly process larger materials.
Machine Guide Videos
1.Unboxing and Assembly
2.Adjust Your Machine to Its Best
3.Software Set-Up
4.Let's make a simple project
5.Plotter Pen
6.How to Set Z Offset and Cut Deeper
7.Maintain the Machine Regularly
Step 1: Structural Install
NEJE Max 4 Unboxing and Assembly (video)
Tutorial for Max 4 Installation (video)
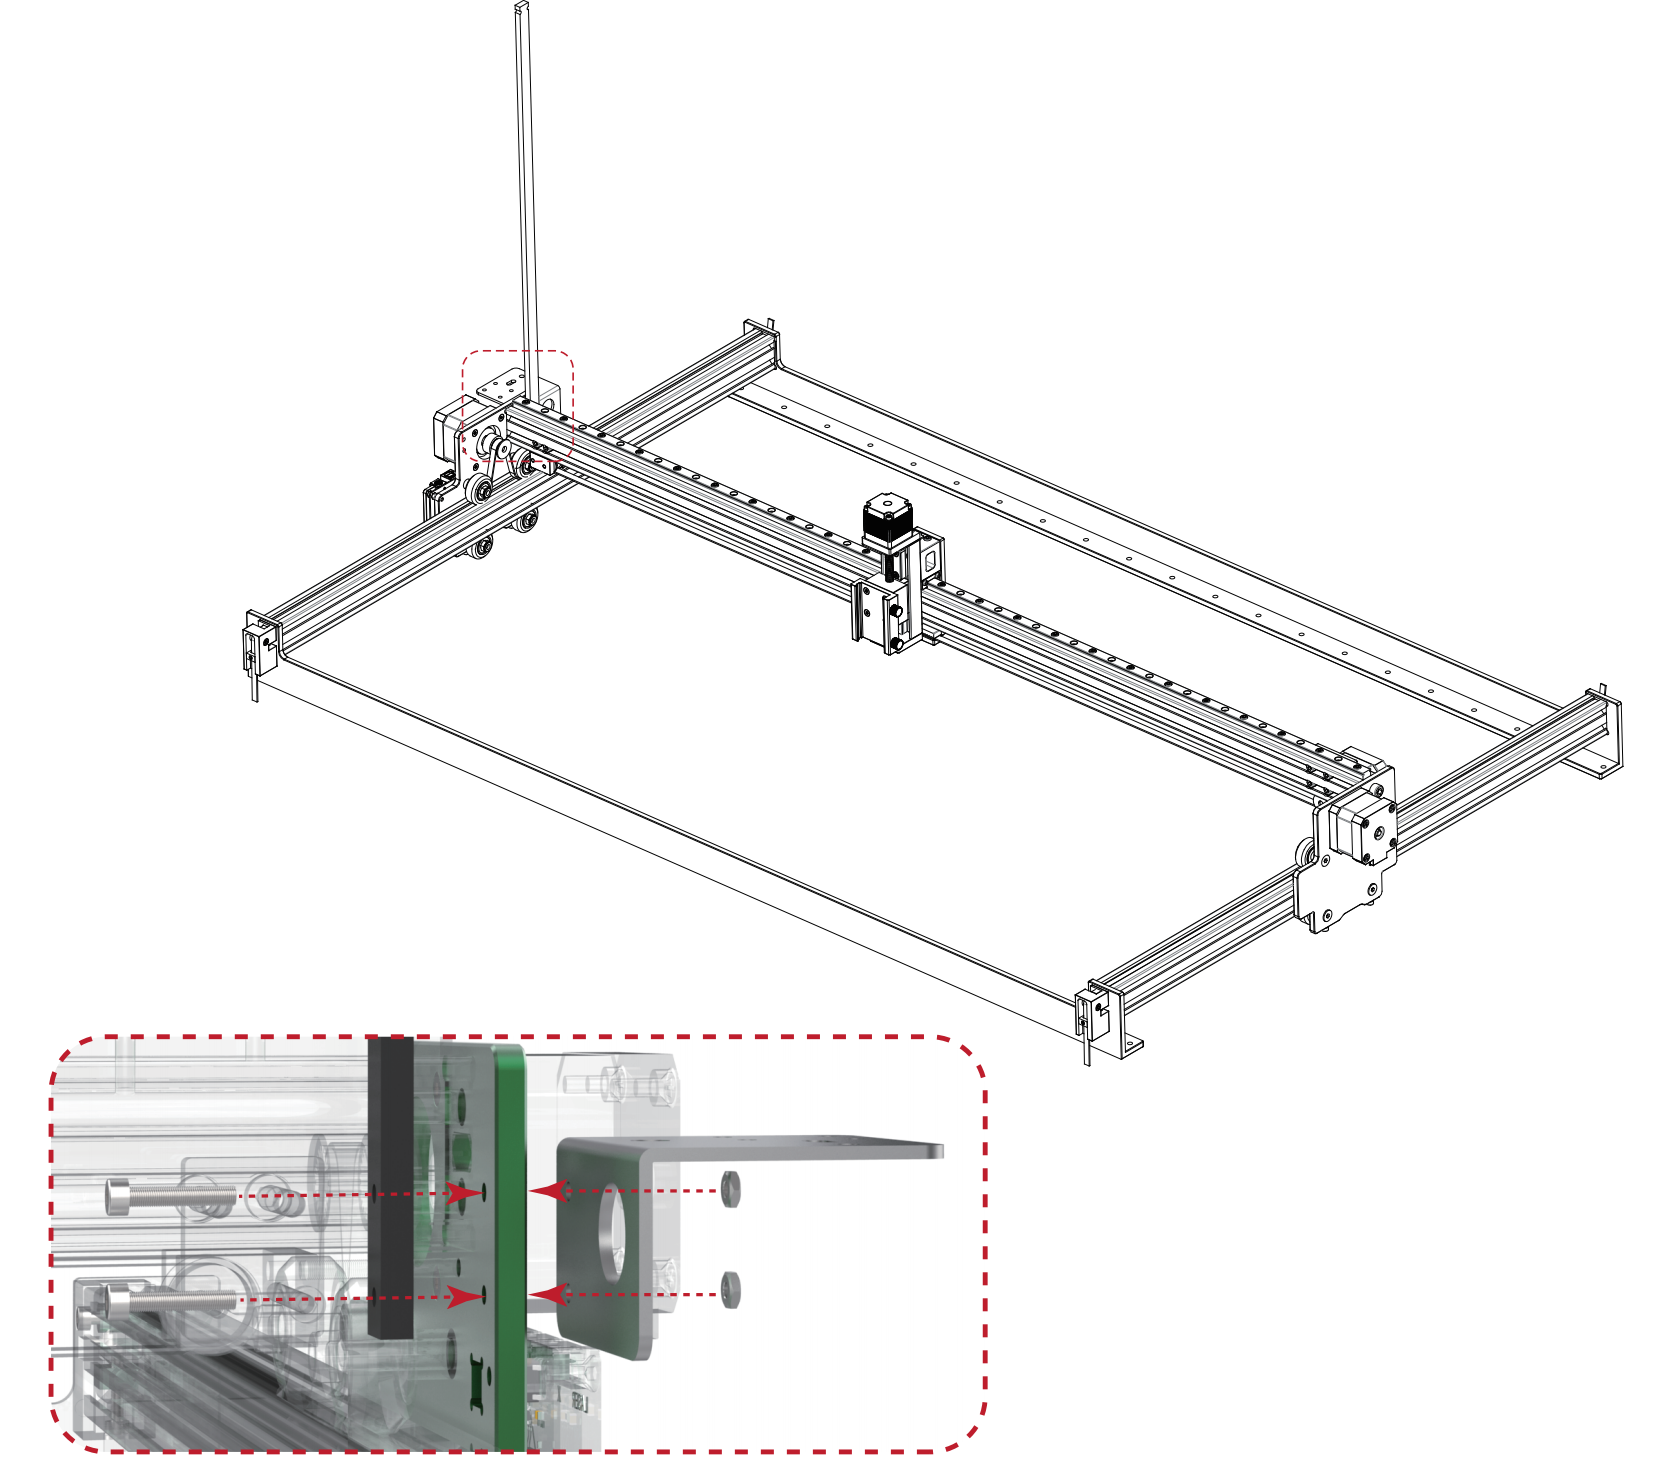
STEP 1: FRAME INSTALLATION

The belt adjuster can also not be installed, the actual error range is very small, just install 8 M6x10 screws directly.
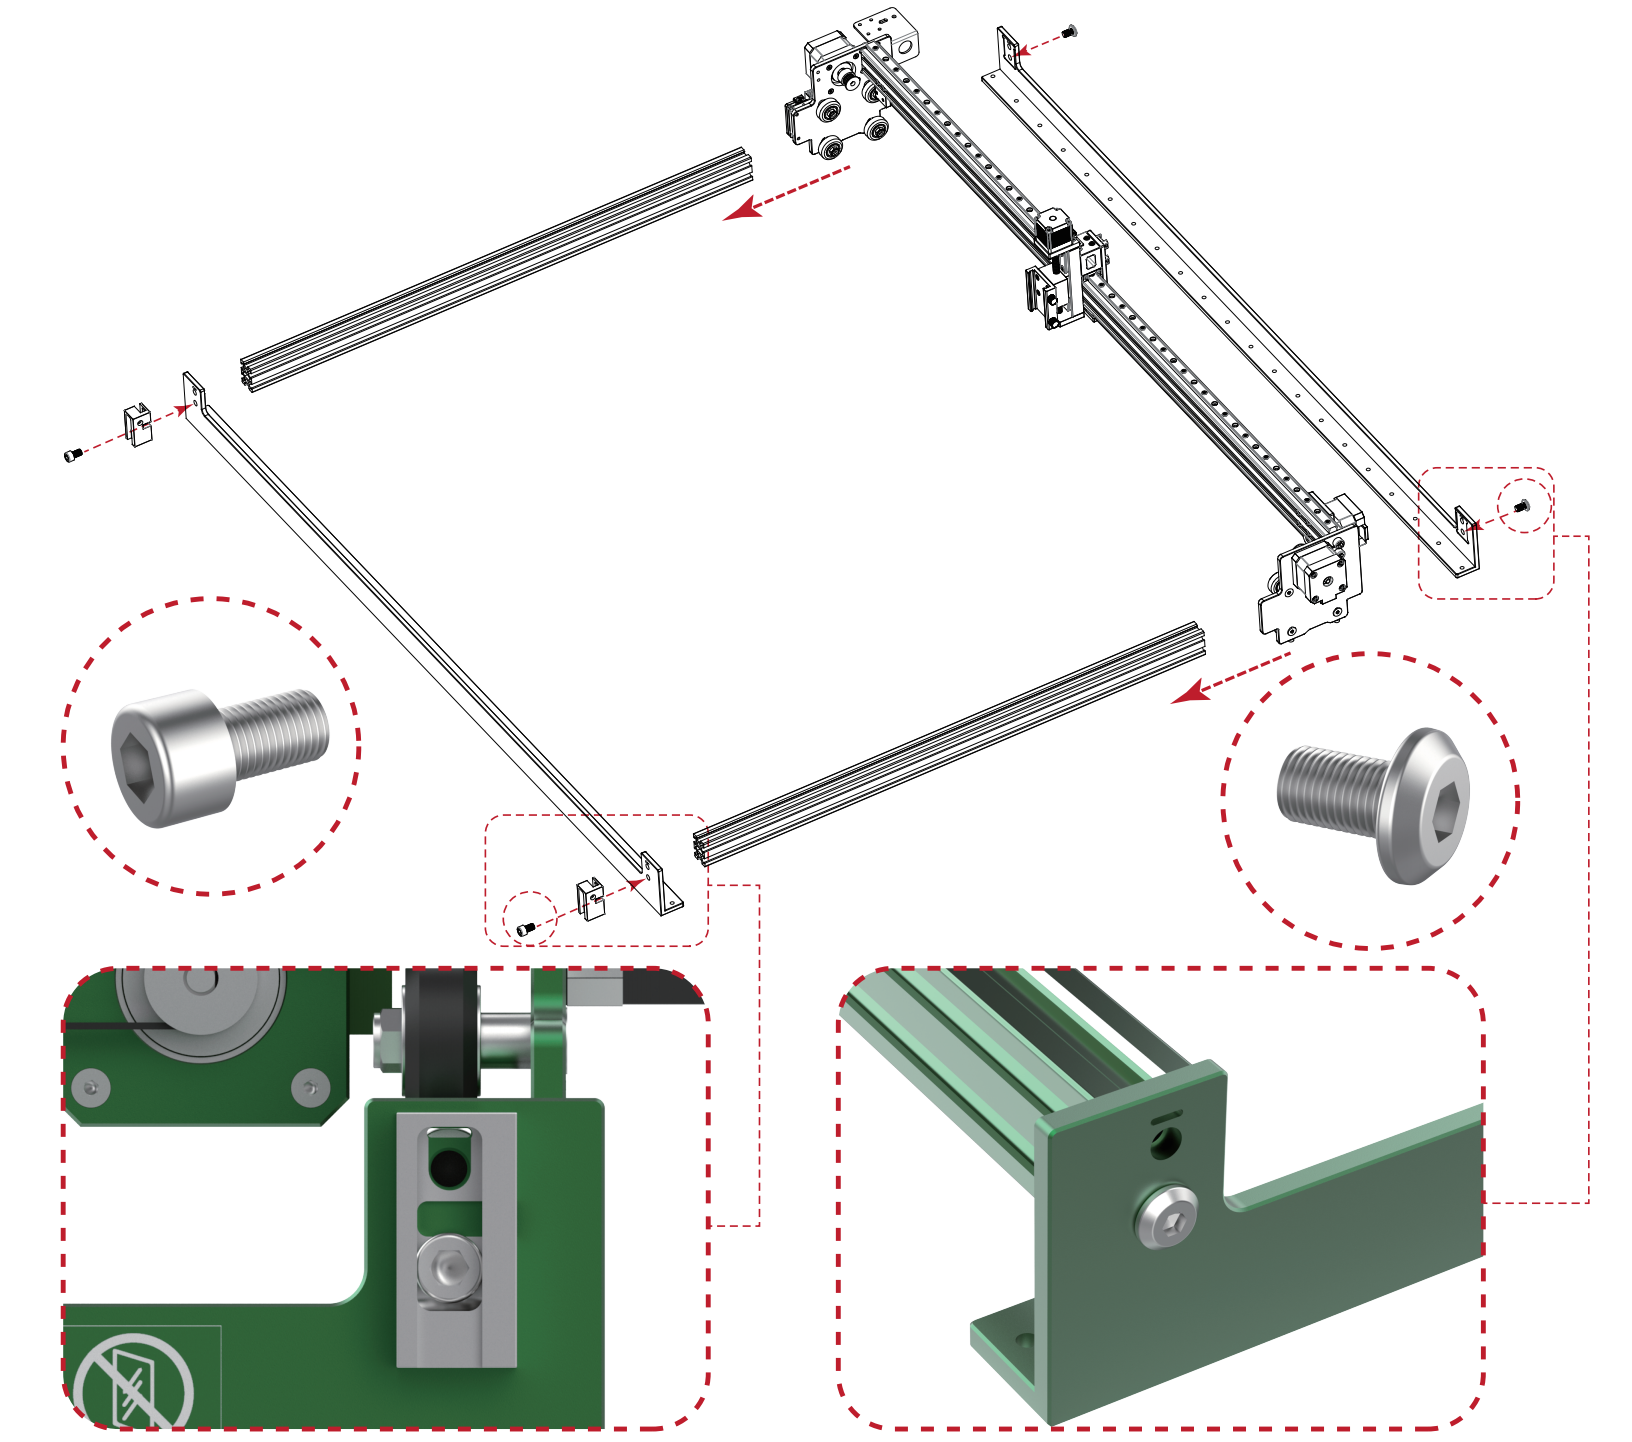
STEP 2: BELT INSTALLATION
If you don't plan to install the belt adjuster at the beginning, you can reserve a piece of timing belt for later installation of the belt adjuster.
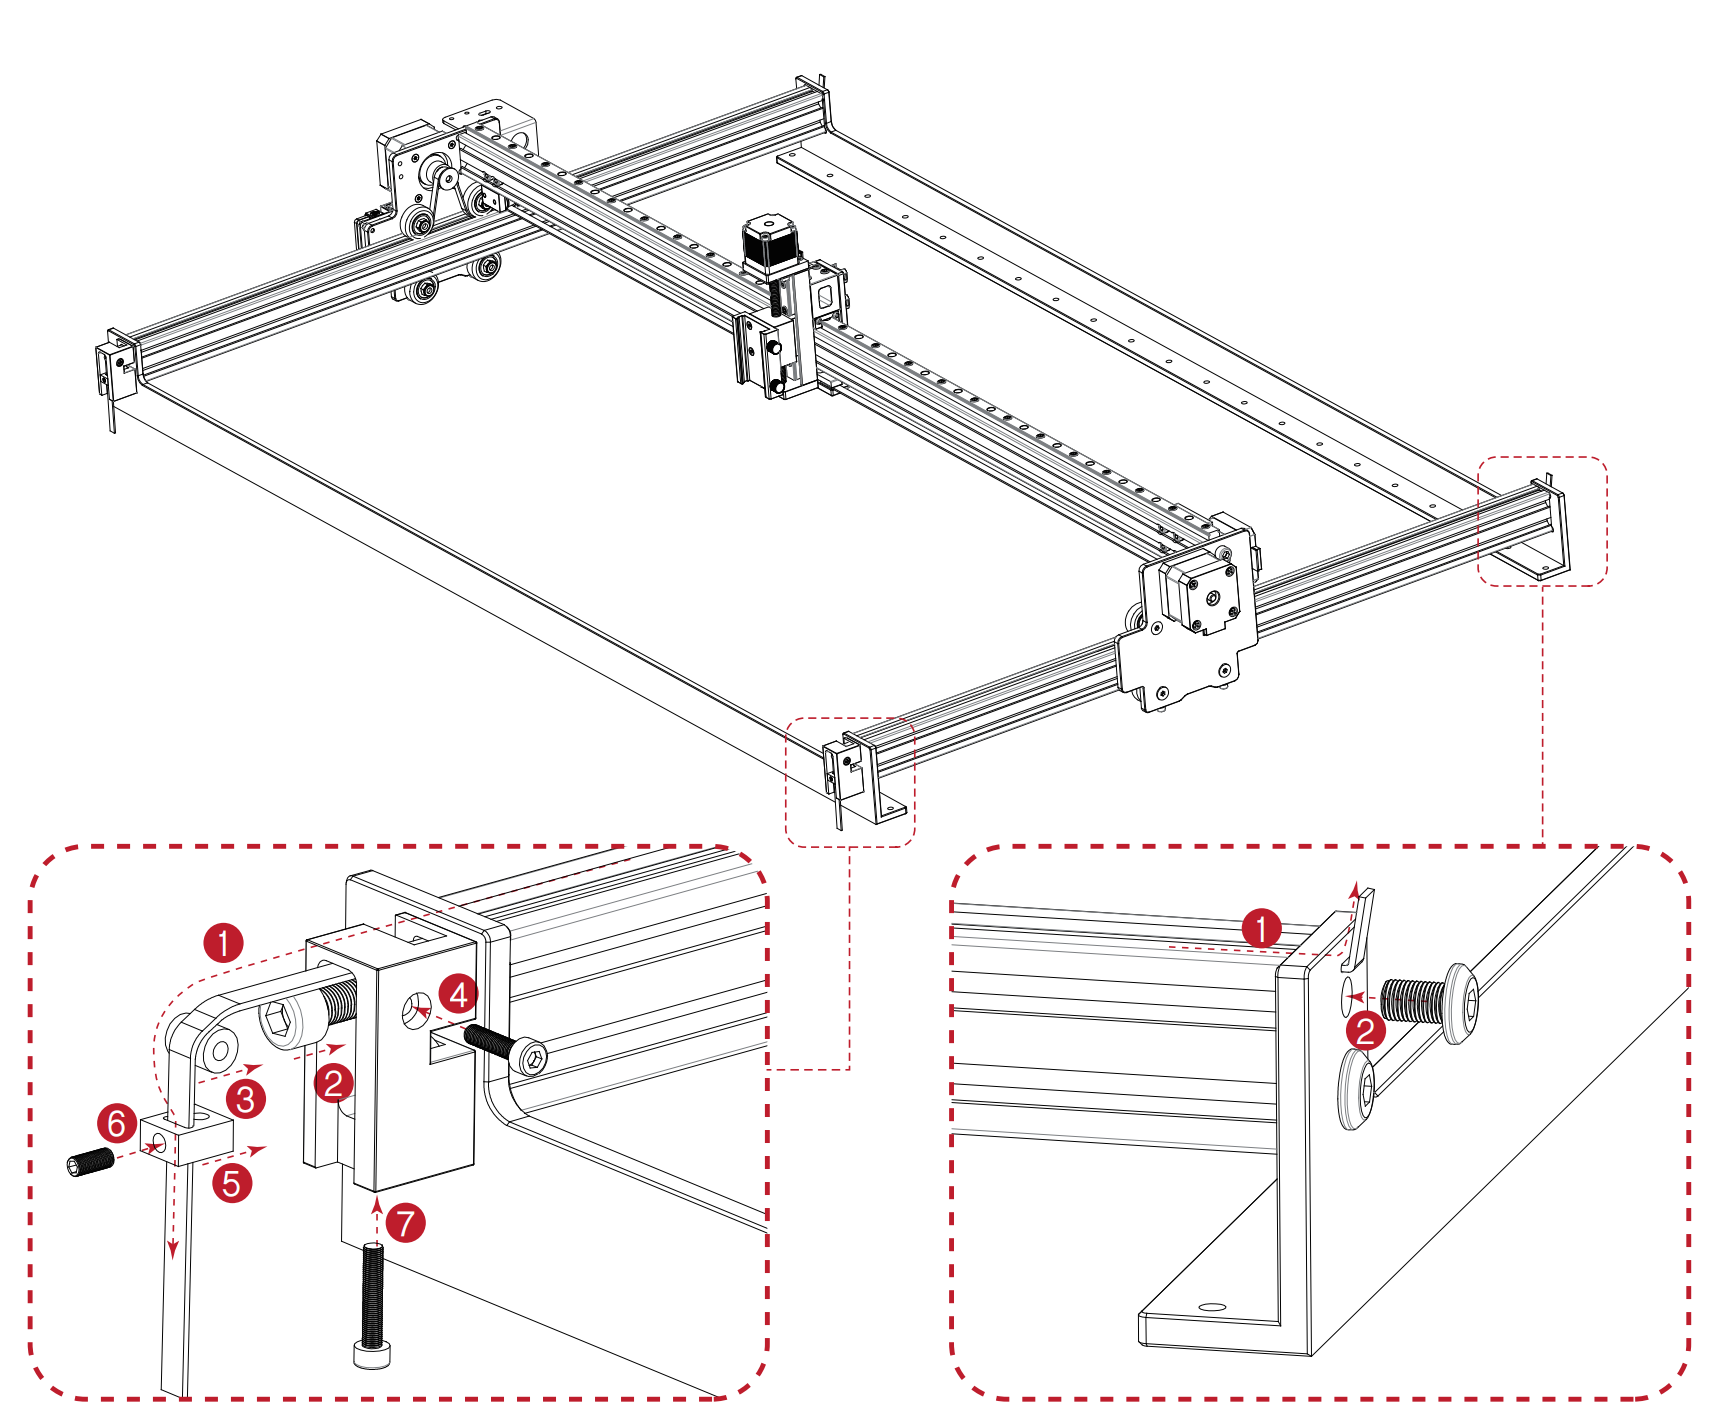
STEP 3:ADJUST
The default has been adjusted, do not adjust too tight, should reduce friction as much as possible.

STEP 4:INSTALL SUPPORT STRIPS AND CORNER CODES
The elastic support strip can play the role of supporting the cable, Currently it is installed by default and can be ignored.
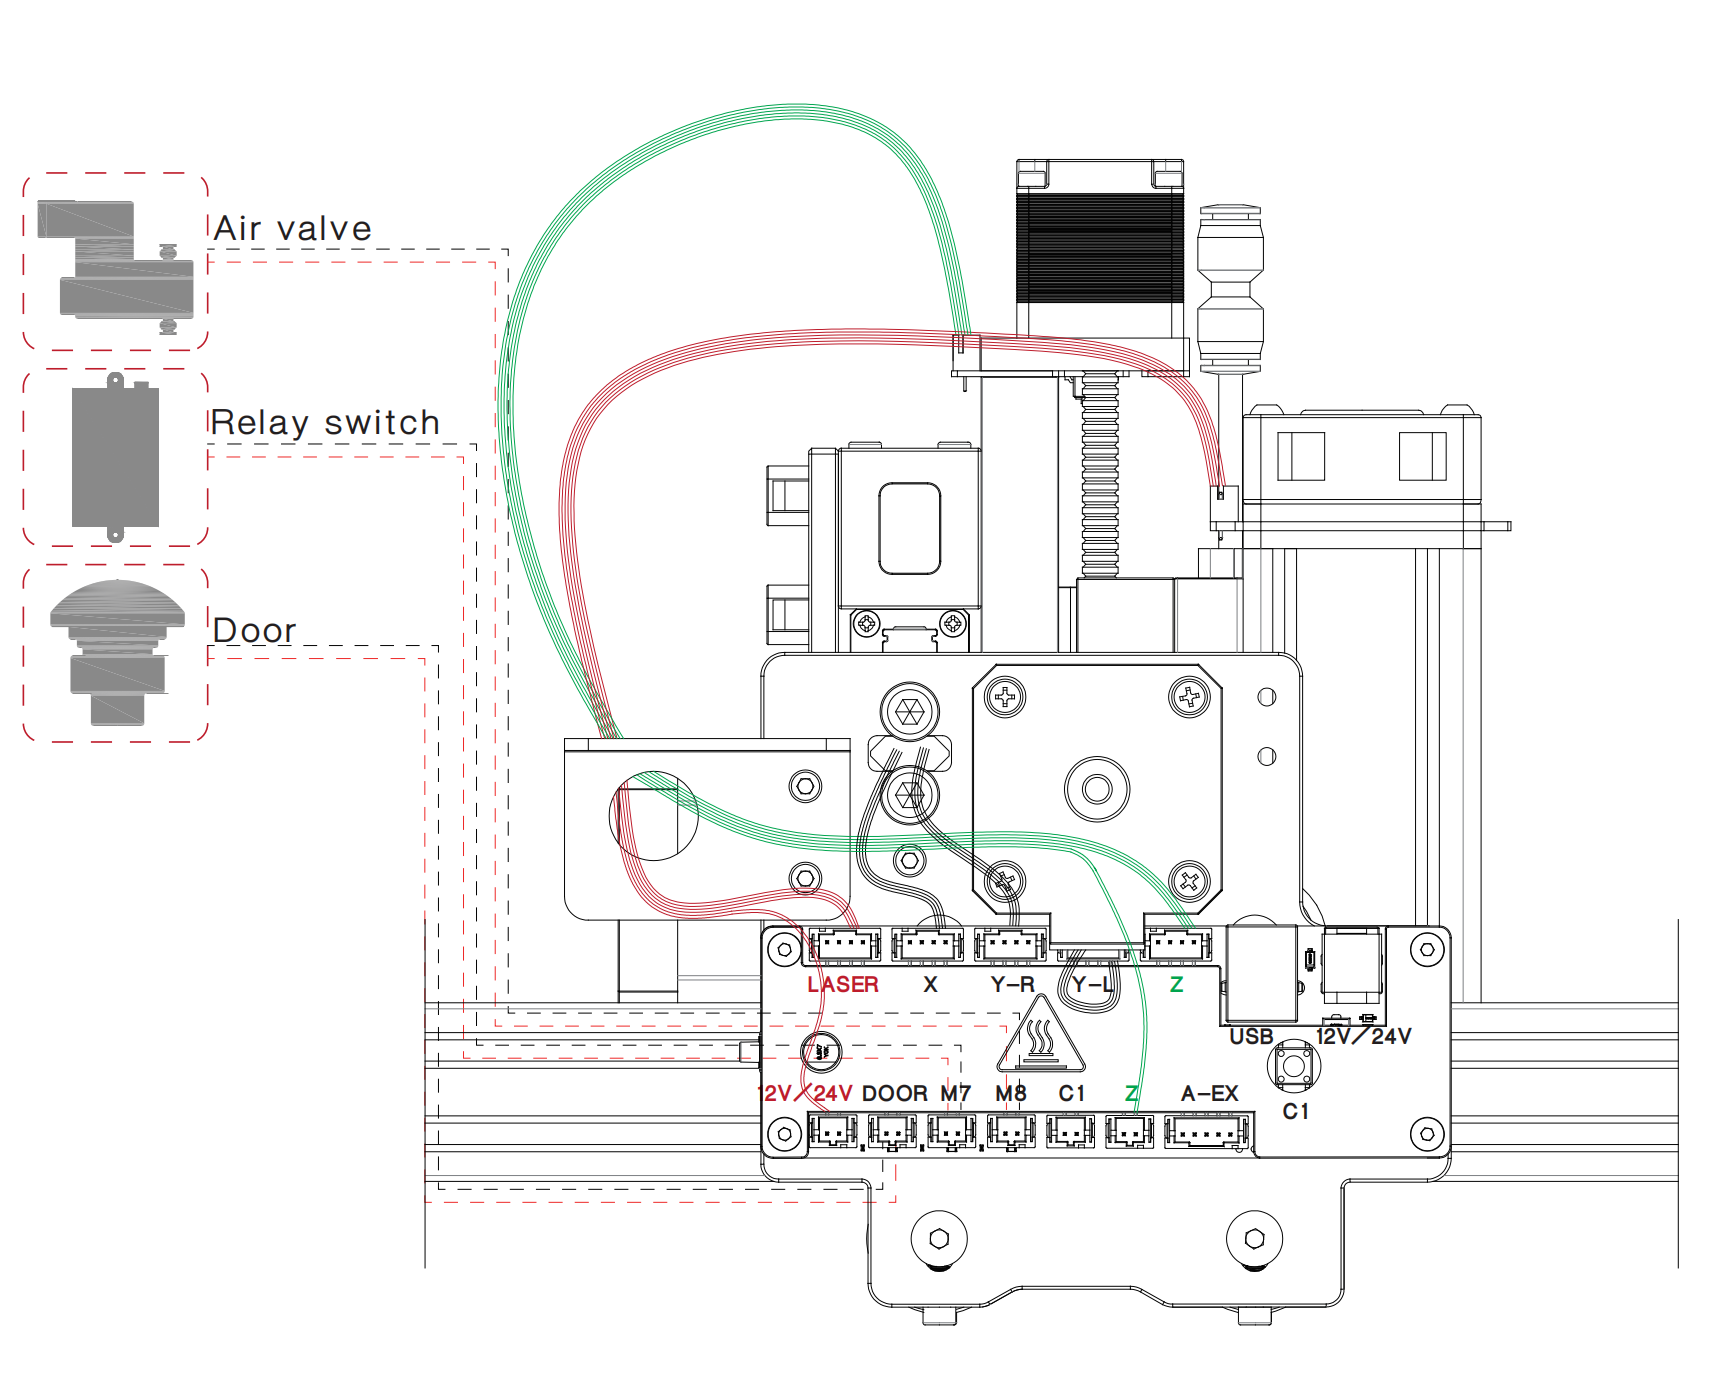
(CONNECTION DESCRIPTION)
A-axis expansion requires the installation of the A-axis adjustable current drive module provided by NEJE. NEJE provides a rotary module with adjustable current. You can also use the Z-axis or Y-axis as the rotary axis.
M8 and M7 interfaces can be used to expand the automatic air assist and automatic smoke exhaust system, and the Door interface can expand functions such as emergency stop, safety door, and flame detection. Considering that most users do not need professional expansion functions, NEJE Max 4 is temporarily canceled Automatic solenoid gas valve and relay module configurations. If you need to modify NEJE Max 4, it can be compatible with NEJE 3 Max accessories. The 12V relay module can also work on 24V platform. The solenoid valve needs to be adapted according to the input voltage, and the 12V solenoid valve cannot be used for 24V input, otherwise the motherboard may be damaged due to overpower.
Step 2: Safety Attention

Please do not leave the equipment when the equipment is working, long-term stay may cause the material to burn!
Please wear protective glasses before operation!
Please do not touch the laser outlet with your hands. It may burn your hands!
Please avoid strongly impact on the machine!
Children under 14 years of age are prohibited from using this product!
Children over 14 years of age need adult supervision when using this product!
Avoid accidental touch by pets!
Step 3: Leveling
Put the honeycomb platform flat to ensure that each position of the platform is the same distance from the laser.
Make sure the plane of the engraved material is at the same distance from the laser, so that the focus position is consistent and the engraved image is burned evenly.

Step 4: Set Default Focus Position
When using the lightburn software to operate NEJE Max 4 for the first time, please enable the Z-axis in the device settings first. After enabling the Z-axis, you can control the focus position on the layer.
After starting the device, the Z-axis will automatically reset, the Z-axis has a high-precision automatic reset sensor, and the position of the Z-axis after reset is Z0.The travel of Z axis is 45mm.
First here will be some definitions for the diagram. Z offset means the distance the Z axis moves,yet the distance the focal point moves. F0:The position of focal point when you assembled the module F1:The position of focal point after the Z axis moves Z offset=The distance from F0 to F1=h1-a h1=the distance from F0 to honeycomb board a=the distance from F1 to honeycomb board
To make it easier to figure out the Z offset,you can set the h1 with a certain number within 45mm For example,with E80,you can adjust the h1=45mm(choose a number you like),then adjust the height of the module with a ruler(h=h1+focal length=45mm+25mm=70mm).
And the a=the thickness of the material-the distance from F1 to the surface of material. For example,if I use E80 to cut a 5mm plywood in 1 pass,you need to make the F1 1mm lower from the surface of the plywood.The a=5mm-1mm=4mm
So simply,you only need to know the h1 and the a. Then you can set different focus on different layers, in the three-dimensional space Give full play to the performance and creation of Light Knife.
If you are using it for engraving, make the F1 on the surface of the board. If you are using it for cutting, you can make the F1 on the surface of the board or make it lower than the surface.For example,for a 17mm pine board, the F1 of the first pass is recommended to be set at: 4mm below the surface of the pine board, the a=17mm-4mm=13mm), according to the characteristics of the module, we recommend you to set the Z step per pass less than 1.5mm. It is determined according to the characteristics of the module.
A40640Ⅱ is a variable-focus high-power engraving tool module. The figure below is the description of the focal length as the main feature. The 15mm position needs to be adjusted manually first.

NEJE A40640 Laser & Material Database

Step 5: Module and Material Knowledge
About air assist
It is easy for novices to overlook that the inner cavity of the lens may be polluted by air containing water and oil, which needs to be cleaned in time.
Method 1: Do not use air pumps. A40640 and E40 modules (after removing the air mouth) can be carved and cut directly (the thickness is recommended to be less than 3mm, the fir board can be less than 8mm), the built -in fan has the function of smoke exhaust. Generally, This is the most commonly used way and the most portable.
Method 2: Use the oxygen hemers to protect the lens. This method can provide oil -free and water -free gas source protection lens. It does not receive pollution for a long time. It is suitable for long -term carvings and thin density materials for thin materials, but it cannot provide sufficient air pressure to increase MDF The carving and cutting performance of materials such as board, leather, hard paper and other materials.
Method 3: Use the inner diameter of about 1mm metal trachea as an air assist. This method can be provided with lower -cost inkjet equipment to provide more than 30PSI pressure, and small air compressor engine oil and water will not pollute the lens. For MDF boards, leather, hard paper, etc. The cutting of materials has a improvement effect.
Method 4: (suitable for professional players): use standard metal wind mouth+industrial oil and water filter+woodworking air compressor. This method is suitable for long -term multi -frequency operation cutting tasks, with E40 and E80 modules, to enhance the cutting performance of more powerful and portable operations, control through the M8 instruction+electromagnetic air valve The performance is very low. If you are a professional player, you can simply purchase a professional small oil and water filter, but don't forget to release the sewage in the air pump frequently)
Step 6: Software Download and Tutorials
Motorized Z axis Setting
When you configure the NEJE Max 4 for the first time, you need to enable the Z-axis in the device settings so that you can set the Z-axis motion parameters in the layer settings.
Plottery / Drawing pen / Blade
1.How to set Z offset for drawing pen?
We suggest you to make the Z offset to be 1-2mm,to shorten the Z axis travel when doing your projects.This will save your time. To make the Z offset to be 2mm,you can simply adjust the height of plotter pen:Material’s thickness+2mm.
2.Which file is better for drawing with a plotter pen?
We suggest you to use DXF.
3.What is the best software to use it?
Lightburn.
It's super easy to use drawing pen in Lightburn. You can check the drawing pen tutorials in our YouTube Channel.
Curved Surface Engraving
Curved surface carving is a relatively professional CNC function, as it requires you to first create a 3D path file using CAM software. You can execute it through NEJE or lightburn software.
"One Key Start" Button / "C1" Expansion
The NEJE Max 4 comes with dual firmware, Neje and GRBL. It is recommended that you check for the latest firmware updates. The NEJE control board features a “one key start” button and a corresponding C1 expansion interface with the same functionality. Users can utilize the NEJE software or the “REC” function designed by NEJE for Lightburn and LaserGRBL to transfer files to the device, achieving offline control. The “one key start” button and C1 expansion interface offer multiple functions: double-clicking switches between NEJE and GRBL environments (yellow light indicates NEJE mode, green light indicates GRBL mode), a single click is for positioning, double-clicking starts engraving, pressing once during the work process pauses, and pressing again resumes work. For repeated production, simply double-click to start engraving each time. The new NEJE software also supports complex multi-layer files, which will be a very efficient way of operating.
M8,M7,Door Expansion
The NEJE series devices support M8, M7, and Door function expansion. We usually use M8 to control automatic air assist, which is used to assist in cutting or protect the lens. It can automatically control the gas supply when the equipment starts and ends. You can connect M8 through a relay switch or electromagnetic air valve. The M7 function can be configured in the lightburn software and NEJE software to check whether it is enabled. Usually, we use M7 to expand the automatic smoke discharging system, and we usually use relay modules to control the power supply of smoke discharging equipment. The Door function mainly expands safety functions. NEJE engineers have designed expansion functions for flame sensors, emergency stops, and safety doors. The expansion of the Door function can help prevent safety issues to a certain extent By expanding the interface, you can obtain a more automated device that greatly improves operational efficiency and experience in the actual operation process.
Please select the corresponding voltage air valve according to the input power supply voltage, otherwise the functions of the main board M8 and M7 may be damaged!
For detailed updates on M8 and M7 settings, please refer to the software documentation page.
Rotary Expansion
The NEJE Max 4 is a standalone A-axis that can be easily configured with the rotation axis function by setting it in the lightburn software. You don't need to use the Y, Z axes as rotation axes When configuring the rotation axis, you need to first position the Y axis to the specified position, and then start the A axis. You need to remember that when using the A axis, you need to multiply the actual object diameter by a fixed parameter as the input diameter.
Area Expansion
The characteristic of the NEJE Max series equipment is that you can obtain industrial grade large-area technology at a lower cost, and the new Y-axis extension track is calibrated using a CNC industrial master machine and diamond cutting tools for linear correction. Calibrating the horizontal tolerance of extruded profiles for long dimensions allows for higher accuracy and longer lifespan of large-area equipment, as well as higher work efficiency. Projects such as large-area engraving and wall art are easier to perform.
NEJE engineers have improved the hardness and material of the frame material, and adopted innovative shock-absorbing design to make the equipment lightweight while achieving perfect drawing effects.
Camera Expansion
DIY Case
 Hello,I have made some small improvements to my Elena's Box, handles to lift the honeycomb table, red corners of the drawer so that they are easily visible, logo on the inside, change of color of the smoke extraction collector, although I have some doubts about whether to install linear actuators or not, the ones that would work well are quite expensive and perhaps with a simple counterweight I will also achieve agility to open and close the lid. What do you think?
https://youtu.be/556GoL-P2DE
Hello,I have made some small improvements to my Elena's Box, handles to lift the honeycomb table, red corners of the drawer so that they are easily visible, logo on the inside, change of color of the smoke extraction collector, although I have some doubts about whether to install linear actuators or not, the ones that would work well are quite expensive and perhaps with a simple counterweight I will also achieve agility to open and close the lid. What do you think?
https://youtu.be/556GoL-P2DE


NEJE provides an external frame, which not only can collect exhaust gas and fire protection functions, but also can install cameras when the area is expanded.
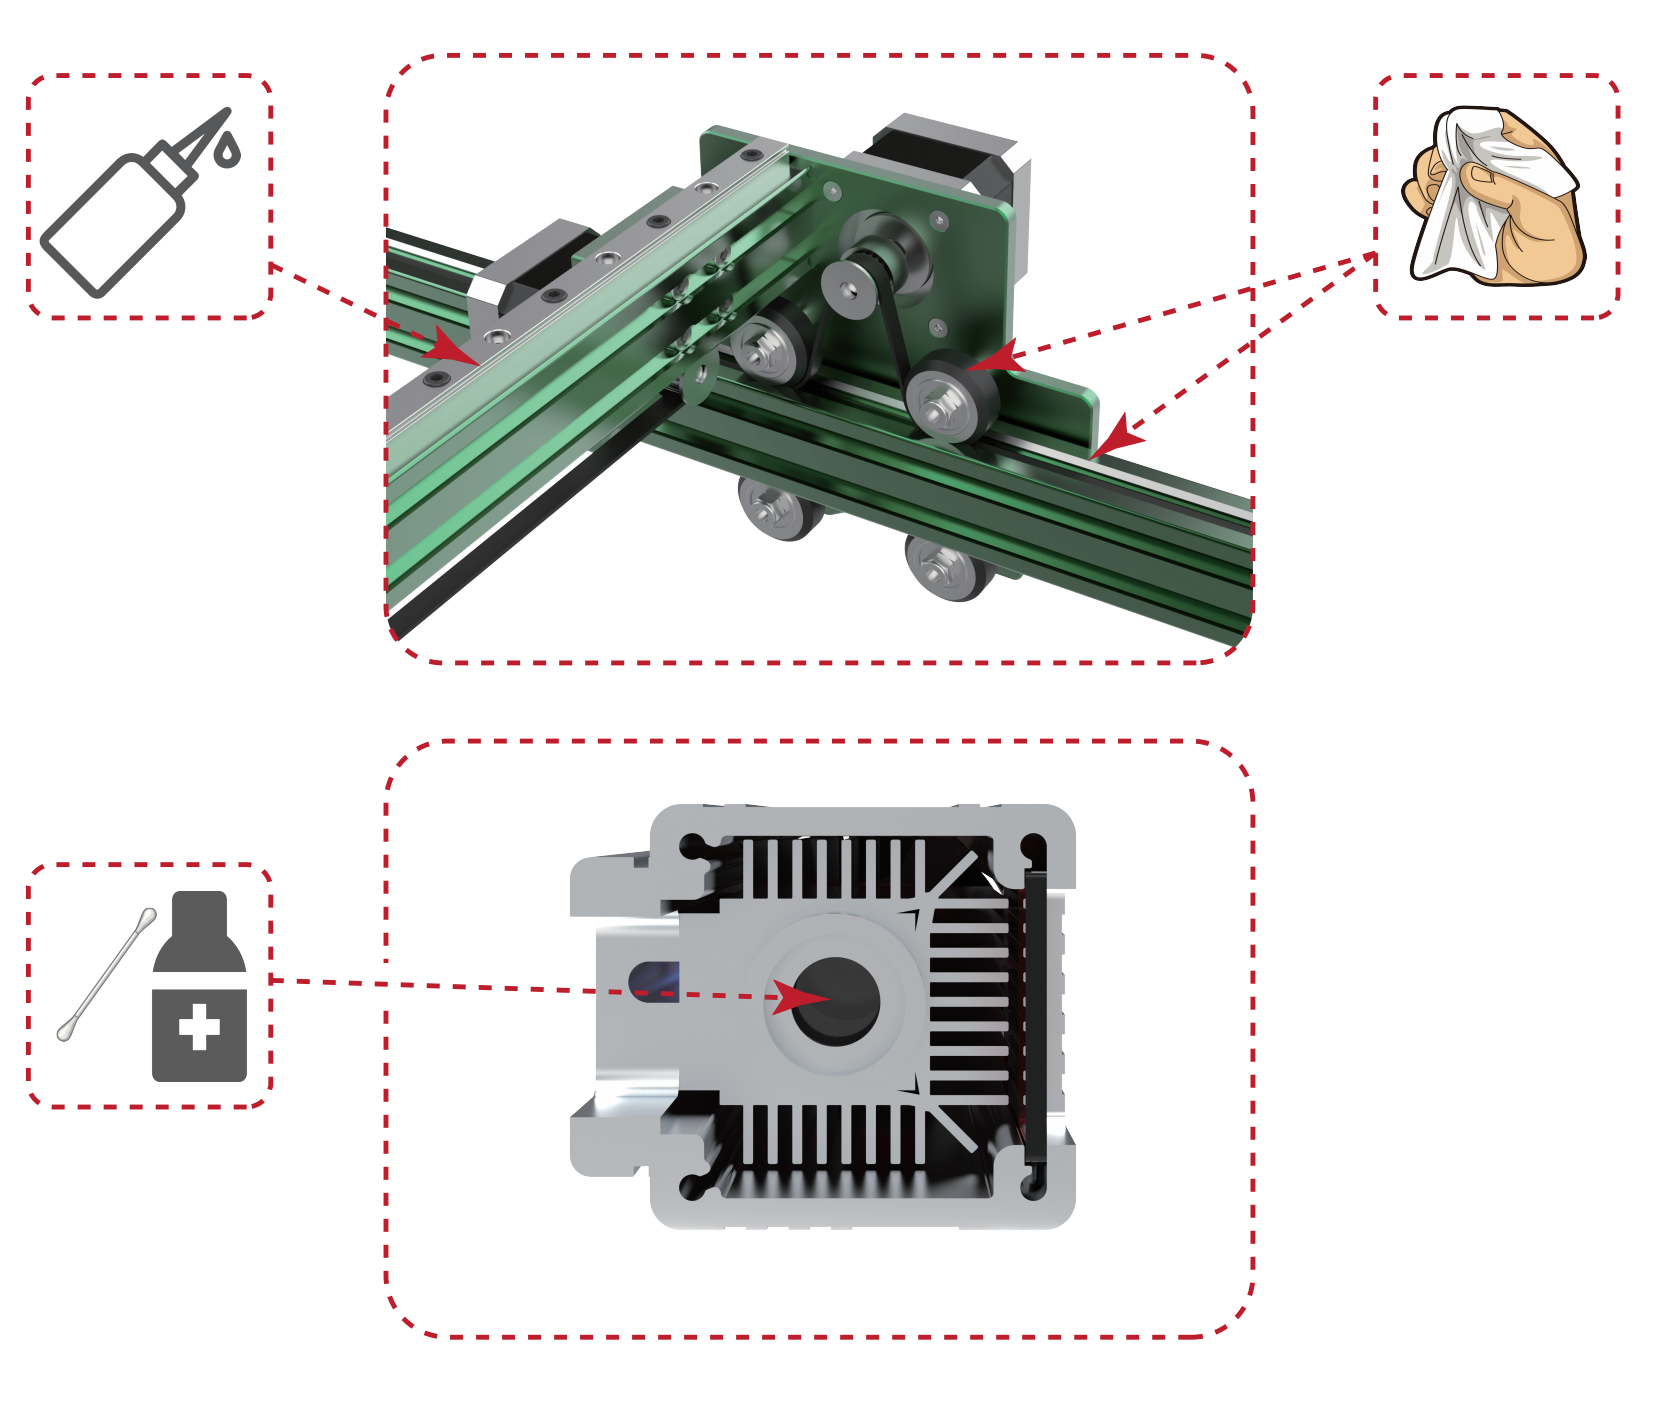
Maintenance
Dust cleaning: regularly clean the dirt and dust on the tracks and wheels, and check the tightness of the timing belt.
Lens cleaning: Smoke from engraving or cutting, or oily air sources may contaminate the lens. After contaminating the lens, the lens will be broken due to the high temperature of the laser. It is recommended to use alcohol to clean the lens surface frequently;
Moisture-proof storage: If your laser machine is not used for a long time, we suggest adding some anti-rust oil to the metal places such as the screws and bearings of the machine to avoid metal rust, and store it in a dry environment.
Maintain the machine regularly(video)
FAQs
Troubleshooting
1. Unable to return to the starting point?

- - - From the project process, we can see that there are two abnormal situations. The edge of the material is severely carbonized, and the laser does not return to the starting position. So how to solve these problems?
First of all, there are two essential problems here. The first is that the selection of materials and cutting speed is not correct. The second is a mechanical problem. Repeated positioning is determined by the smoothness of the machine. So the main points to troubleshoot the mechanical smoothness are as follows:
1.Track: NEJE Max 4 uses a linear track, which is smooth and reliable. First, check the track, clean the track, and re-apply some new grease to the connection between the track ball and the track to ensure smoothness.
2.Timing belt, the tension adjustment of the timing belt is equally important. NEJE 4 Max is equipped with tension adjusters in both X and Y directions. Too loose or too tight is not appropriate. The right tension is an important factor for smoothness. NEJE Max 4 is equipped with a spring structure in the X direction to automatically control the tension of the timing belt. We need to ensure that the timing belt is in good condition.
3.Screws, check whether the locking screws between the synchronous wheel and the stepper motor are firm or loose.
4.Replace the synchronous wheel and synchronous belt. The synchronous wheel and synchronous belt may cause wear and foreign matter adhesion during long-term use, resulting in the synchronous belt and synchronous wheel not being able to fully match.